123FormBuilder Knowledge Base
Search our documentation platform for answers, service specifications and 3rd-party integrations.
Knowledge Base
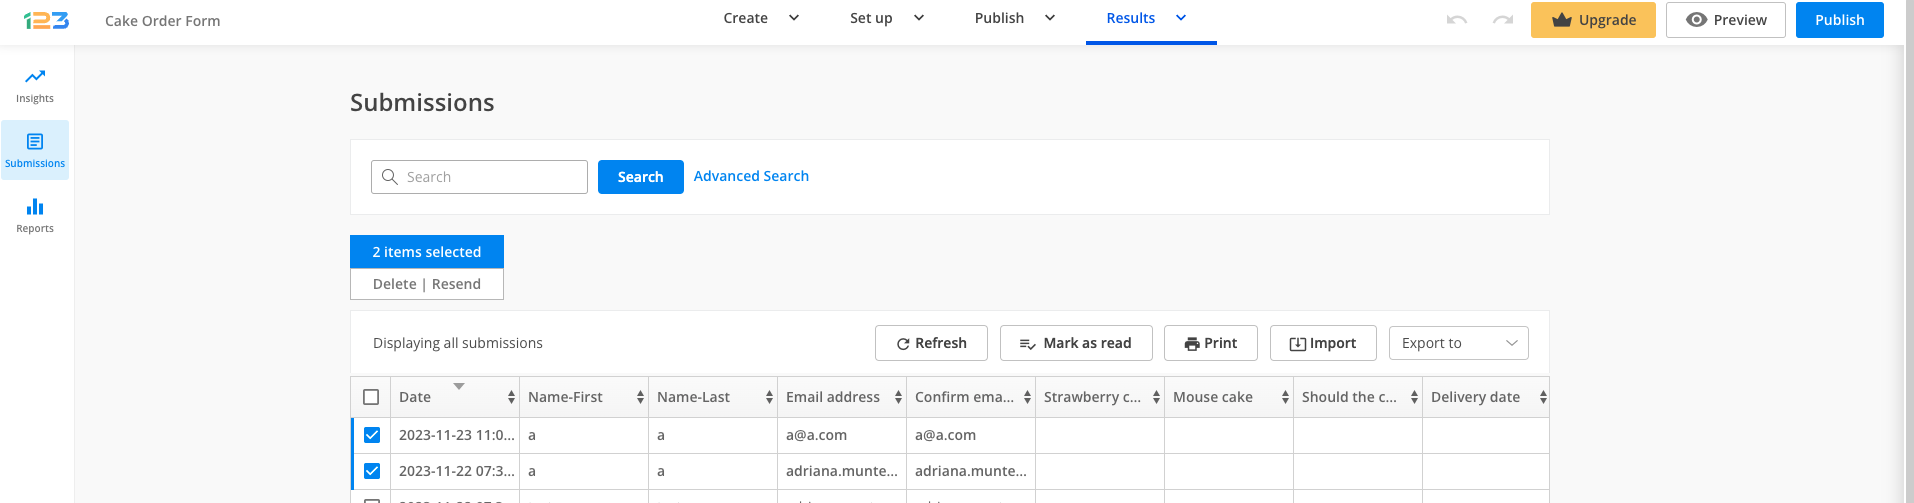
To resend multiple submissions, go to the Results section of your form within the form builder and navigate to the Submissions tab.
Select the submissions you want to resend by ticking the checkboxes on the left. You’ll notice a button is displayed on top of the table that states Resend.
After clicking on Resend, a small pop-up will appear on the screen to confirm the action and select which email notifications to be resent. Make sure you do not use a pop-up blocker that might hide the confirmation pop-up.
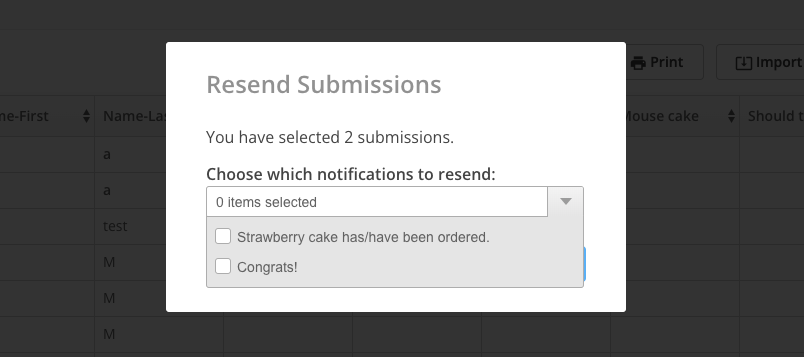
If the form is integrated with a payment processor, you can mark the payment status of those selected entries. This feature can be used when users are paying via check or cash.

Based on your needs, you can publish web forms in your Volusion store wherever Volusion allows it, with the help of the publishing options we have provided you. No coding skills are required.
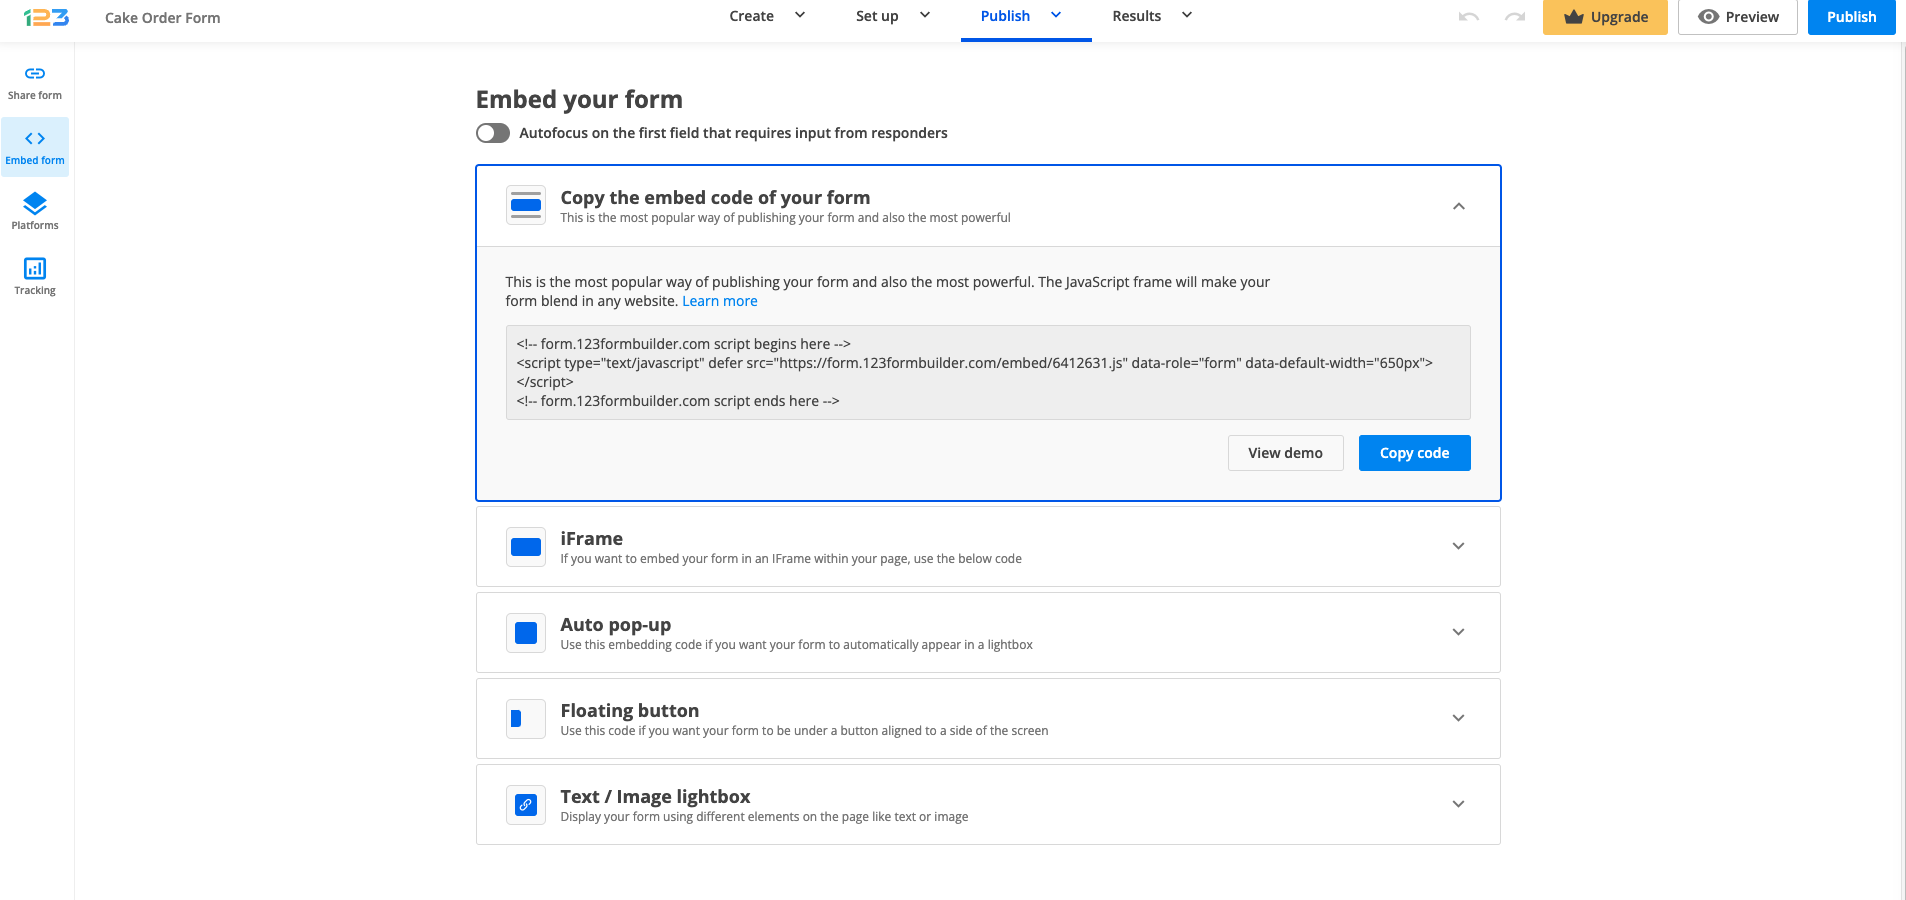
Go to the Publish → Embed form section of your online form and copy the JavaScript code. We recommend this option when it comes to publishing your web forms on any website. It’s compatible with many platforms and automatically applies changes made to your web form wherever it’s published, when modified in 123FormBuilder.
When you log in to Volusion, go to the admin section of your store. From there, go to Design → Site Content.

Create or edit a page where you want your web form included. Inside the page editor, hit the HTML embed button (symbol) from the Article Body. Now, paste the JavaScript code of your web form inside the article body and hit Save.
Hit View Live to see how the web form is displayed for your online store visitors. They can now submit the web form directly from this page and all submissions will be saved in the Submissions section of your web form in 123FormBuilder.
You can use the 123FormBuilder – iContact integration to associate form fields with custom fields built in your iContact account. In the Integrations section of your form within the form builder, go to the iContact app and click on Customize.
In the lightbox, scroll down to the Custom Fields subsection. Use the dropdowns on the right to associate form fields with iContact custom fields on the left. You’ll find here all the custom fields built into your iContact account.
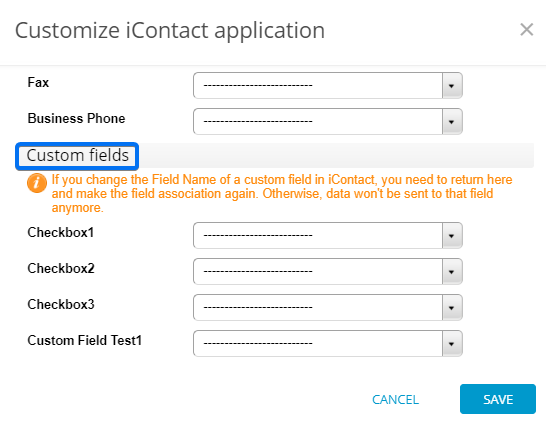
Hit Save and you are done. From now on, each new submission will send form data to your custom fields in iContact.
Important Note! If you change the name (not the label) of a custom field in iContact, you’ll need to return to the 123FormBuilder – iContact app to associate it again to your form field.
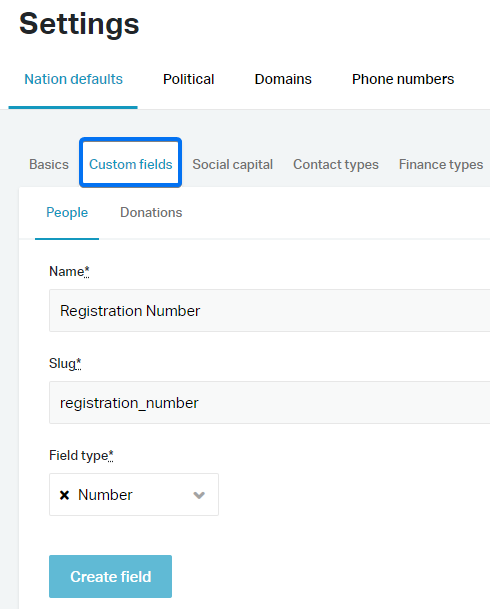
You can use the 123FormBuilder – NationBuilder integration to associate your form fields with custom fields created in your NationBuilder account.
To create a custom field, log in to your NationBuilder account, head over to the Settings → Nation Defaults → Custom Fields section and click on New custom field.
Important Note! The only field types you can create are Text, Number, Checkbox, and Multiple choice fields. For the integration to work properly, your form fields need to have the same field validations as your custom fields. This means that fields such as the dropdown list are not compatible with custom fields from NationBuilder.
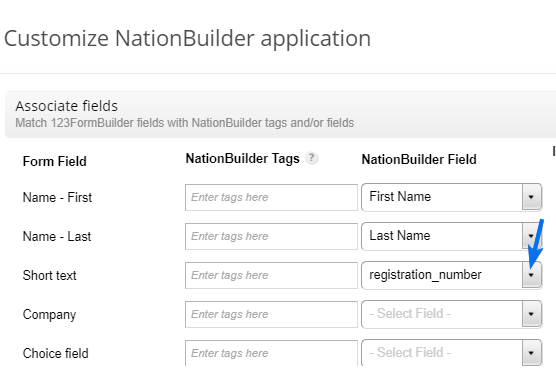
In your form builder account on 123FormBuilder, go to the Integrations section of your form and hit the Customize button of the 123FormBuilder – NationBuilder integration. Select the form field you want to associate with the custom field in NationBuilder and click on the dropdown list on the right. Scroll down until you see the Custom Fields group, where all the NationBuilder custom fields will be displayed below. Associate the custom field you want, save the changes, and you are done.
The 123FormBuilder – Salesforce Marketing Cloud integration allows users to send form data to their Salesforce Marketing Cloud lists, within seconds. Salesforce Marketing Cloud is a digital marketing platform, which focuses on helping marketers to better communicate with their customers, through a system of lists. This integration may be used even by Salesforce Marketing Cloud subusers that have access to a form builder account on 123FormBuilder.

Here’s how you can integrate your web form with the 123FormBuilder – Salesforce Marketing Cloud application:
1. First things first, if you want to use this application, you need to set the Email field from your form as required.
2. Then, go to Set up → Integrations and add Salesforce Marketing Cloud from the list.
3. Provide the username, password and instance identifier of your Salesforce Marketing Cloud account. To find your instance identifier, go to your Salesforce Marketing Cloud account → Setup → Company Settings → Account settings → find SOAP Service Endpoint and copy the string of characters starting with “mc”, as seen below:

Additionally, make sure that the option from Setup → Settings → Security → Security Settings → Enable Username and Password for Web Services – is set to yes.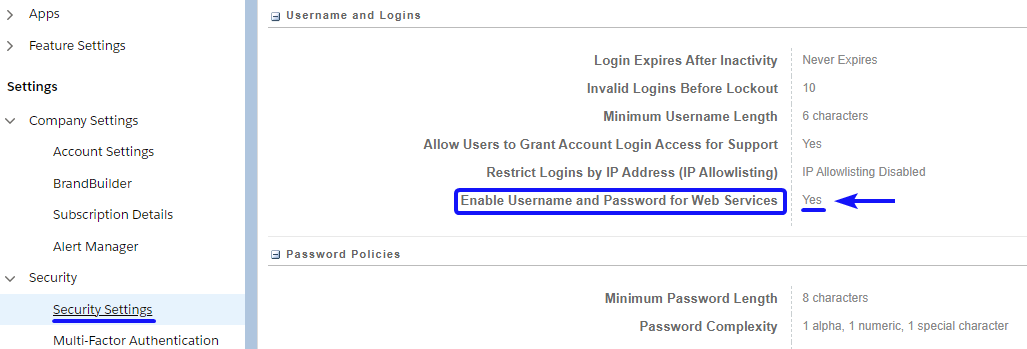
4. Click on Customize in the application box and associate Salesforce Marketing Cloud fields with 123FormBuilder fields. It’s mandatory that you make these associations:
- Subscriber Key

- Select your Data Extension
- Map all the required fields

5. In Subscriber lists select one or more lists from your Salesforce Marketing Cloud account, to which new contacts will be added at each form submission.

6. In Triggered actions select one or more autoresponders from your Salesforce Marketing Cloud account. Users will receive all of the selected autoresponders.
7. Optionally, in Error handling you can add your email address, in case errors occur after submission. If for any reason, the data doesn’t arrive in your Salesforce Marketing Cloud account, you will be notified right away.
This concludes the steps required for setting up the integration. Now, each time someone submits your form, the data will be collected into your Salesforce Marketing Cloud account, in your selected lists.
Important: If you haven’t selected a list in Subscriber lists, you can always find the contact in the All Subscribers section of your Salesforce Marketing Cloud account. Use the search bar to find the added email contact much easier.
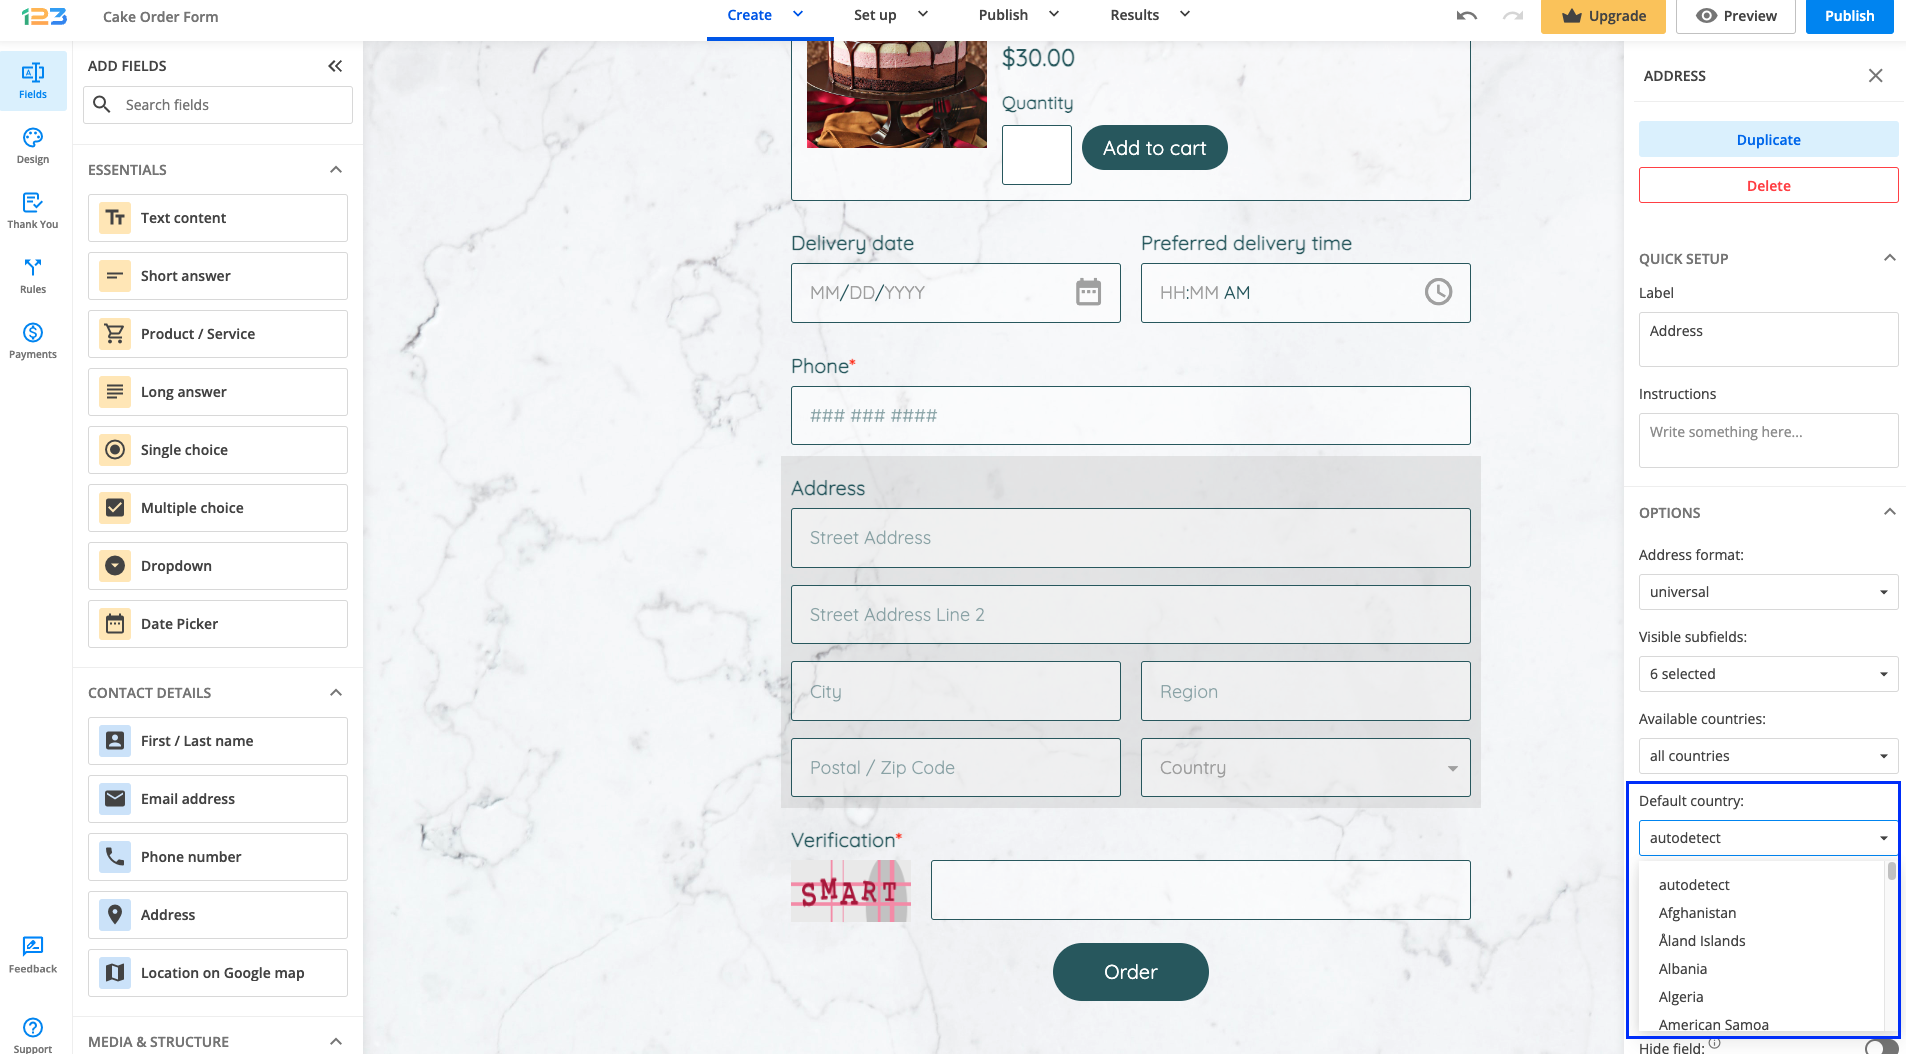
You can establish what default country appears on your form in the Address field. Add/Click on your Address field and in the left side panel, under Options, you will find Default country.
The default/first option is autodetect → with this option enabled, the form can detect the country where your respondents are located based on their IP addresses.
Related articles
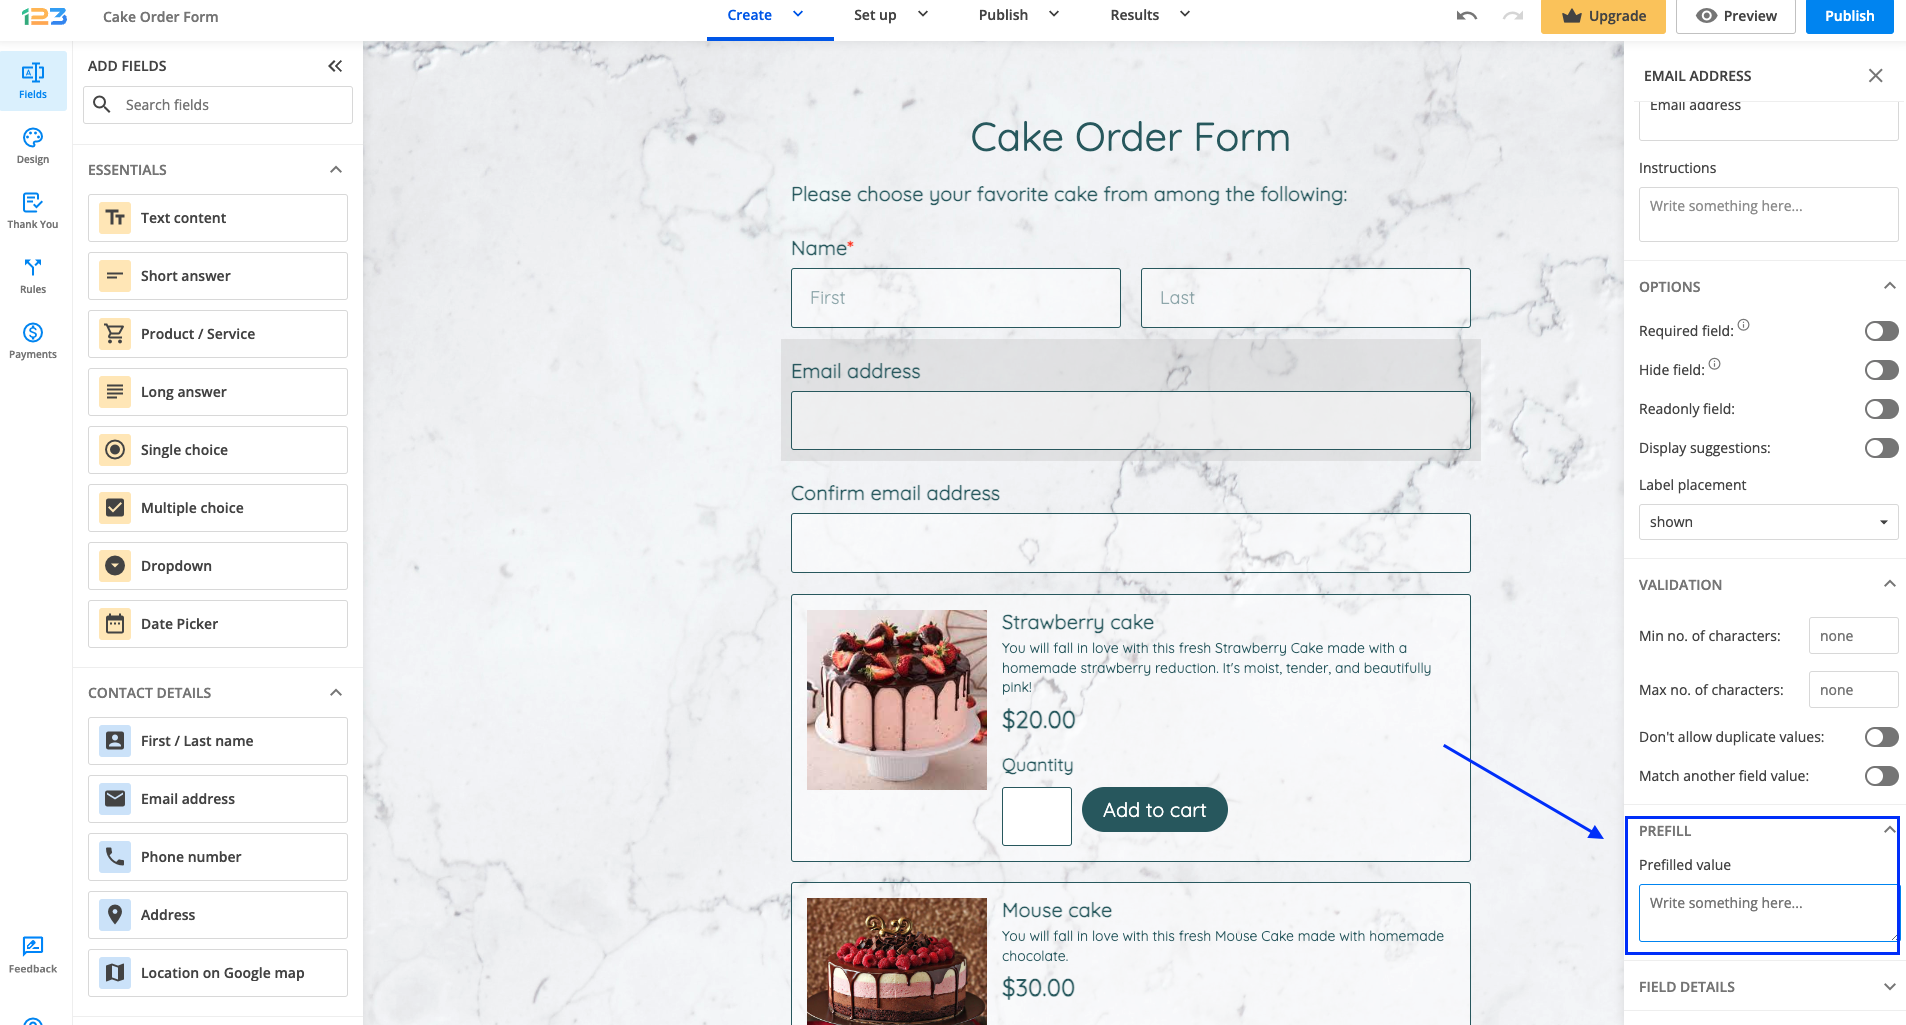
You can set up input default values for form fields in your Form Editor. Prefilled values help users fill out the form faster and make the overall experience friendlier.
To set a default field value, simply access your form builder account, choose your online form, and click on the field you are interested in to provide a prefilled value. Under the Prefill section, you will find an input text box, called Prefilled value.
Once you have provided a prefilled value, it will be displayed for your respondents on the form and they will be able to modify it if needed.
Use case
You can use input default values not only to provide input suggestions and examples but also to prefill the fields that users are probably not going to change. For instance, if you are building a registration form that primarily addresses participants from Boston, you can prefill the City field with the value Boston. Participants from other cities will still have the possibility to change the value of that field.
Particularities
First/Last name. The prefilled value that you specify for a First/Last name field must contain a space character if you want to have both First and Last name prefilled, as it contains two separate input boxes.
Date. For Date fields, you can use the default values today -1 week, yesterday, today, tomorrow, today +1 week, custom date. These will prefill the field based on the date at which users access your form. Custom date must have the format selected for the field.
Time. Default values for Time fields can be displayed on a 12-hour format or on a 24-hour format. The default time options are now – 1 hour, now – 1 minute, now, now + 1 minute, now+ 1 hour, custom time. When adding a custom time, make sure to respect the time format selected for the field.
Star Rating. You can add the number of stars that will be selected when the form is accessed. Type in the desired number of stars in the Default value section, under Options.
In this article, you will learn how to customize the footer of your email template within your 123FormBuilder form creator account.
When you open the default notification, you will see the generic email footer, which looks like this:
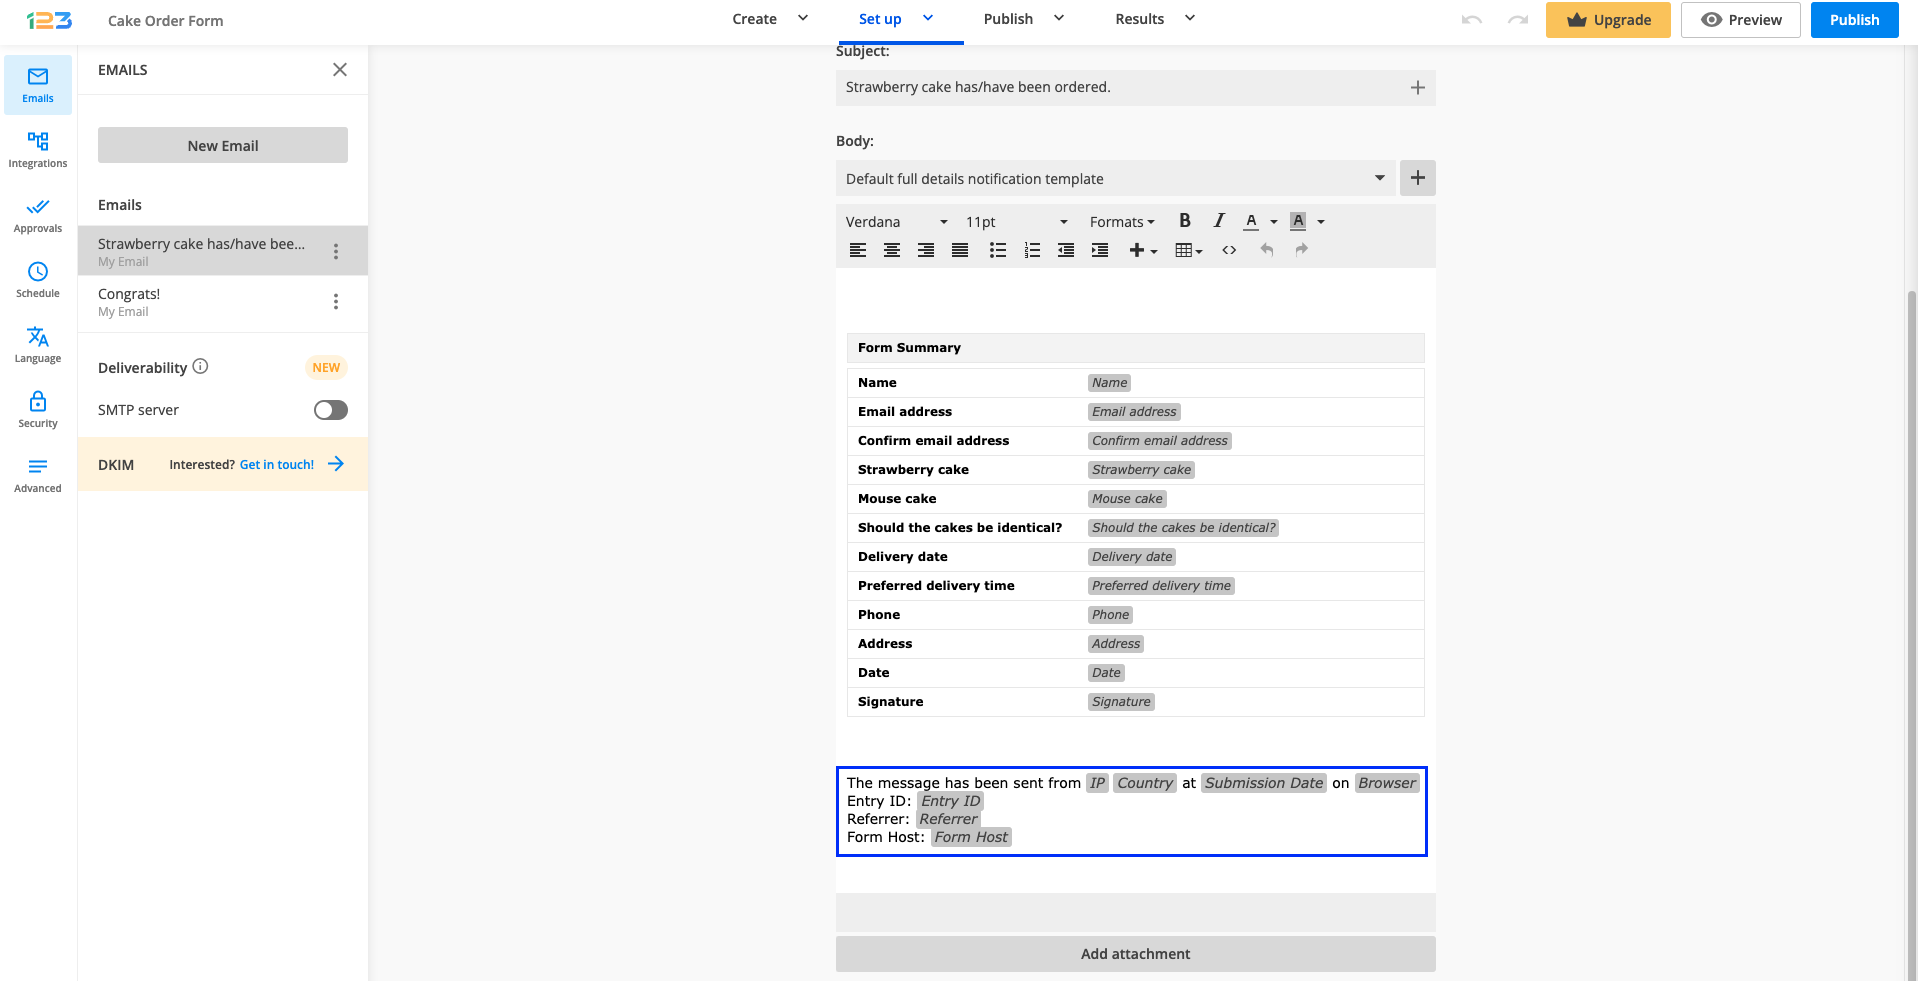
Here is what each variable from the footer does:
- IP: returns the IP address from the user’s browser.
- Country: based on the IP address. If the user is using a proxy or a VPN connection, it will not show the physical location.
- Submission Date: the date when the entry was sent.
- Browser: it will inform you of the browser type and version.
- Entry ID: the number of the submission made on the form. It starts with 1 and is incremented with one unit at a time. (1, 2, 3, 4, and so on).
- Referrer: is the URL of the web page from where the user arrived on the form.
- Form Host: is the web page or link from where the form is submitted. Basically, it is the URL where the form is located
Of course, you can add the user’s answers as well. To insert submission input into the footer, click on the plus sign displayed next to the template, and choose fields from the dropdown list (e.g. Email).
Related articles
In the Emails section of your form within the form builder, you can create and customize new email templates. This way, you have control over the content of the notification email that is sent to you and your form users when your form is submitted.
You can create new templates and edit them, in order for the notification email to contain the exact information that you want. You can set up any type of template, from a simple notification message to a complex message that holds all the submitted content.
In this article, we will focus on the Body section of your email templates.
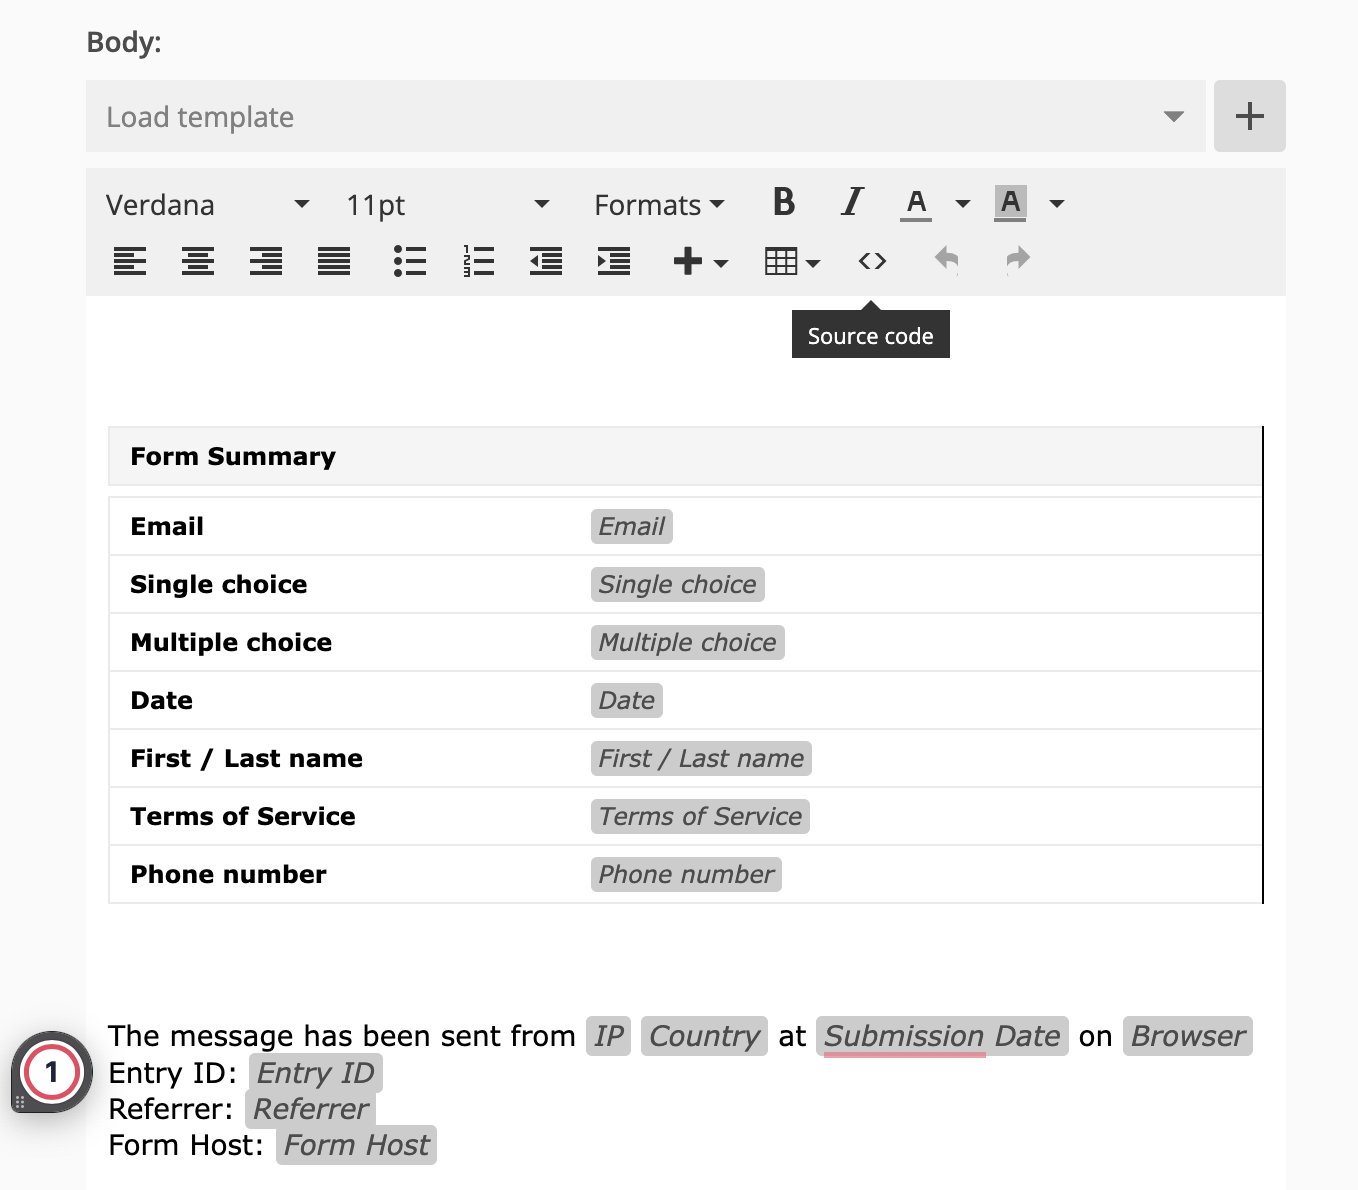
Click on Load template and choose one of the available templates (e.g. Default notification template).

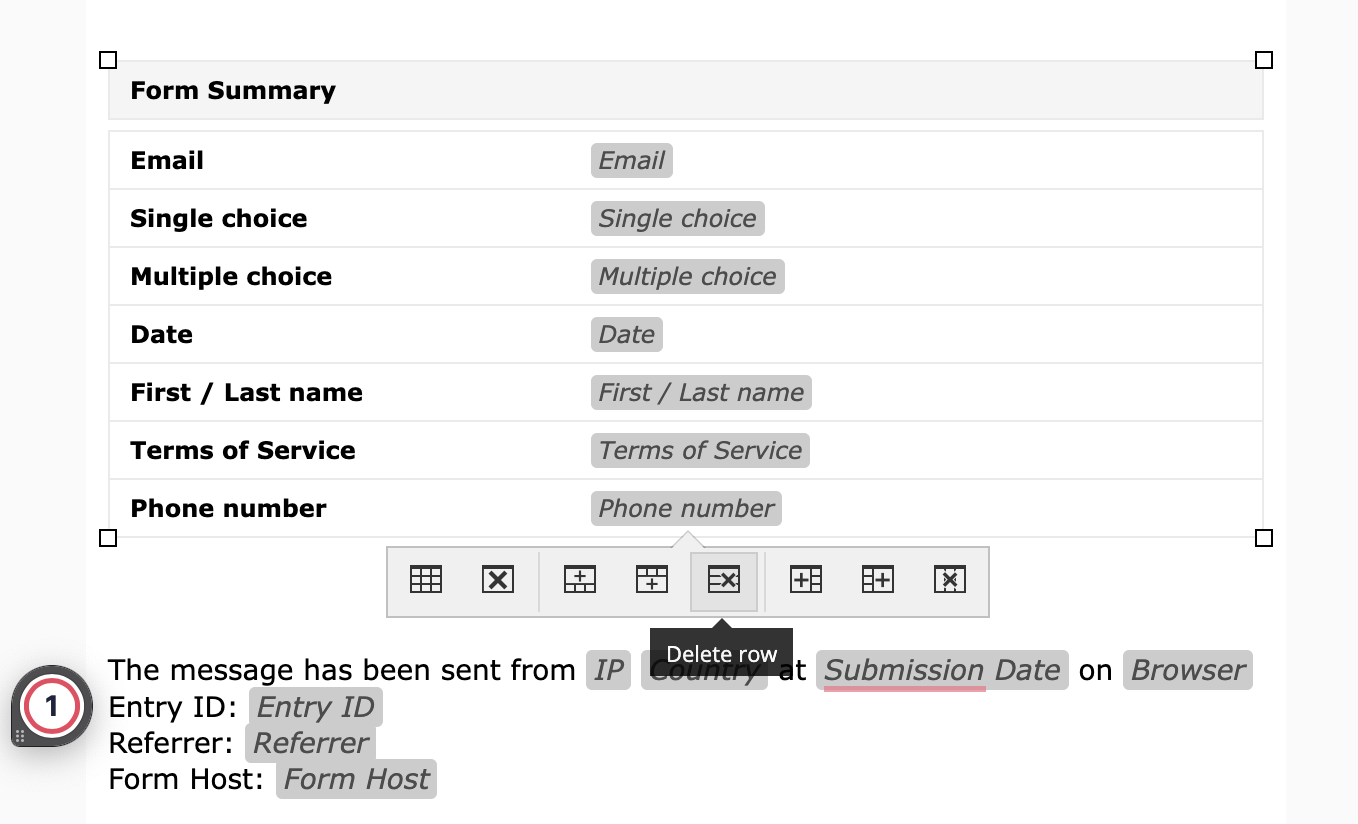
The default template contains an HTML table that renders user input. If you want to remove some of the form fields, delete the corresponding table rows.
If you want to replace the table with a simple message, then delete the table code by clicking the source code icon ( < > ) and type in your new message.
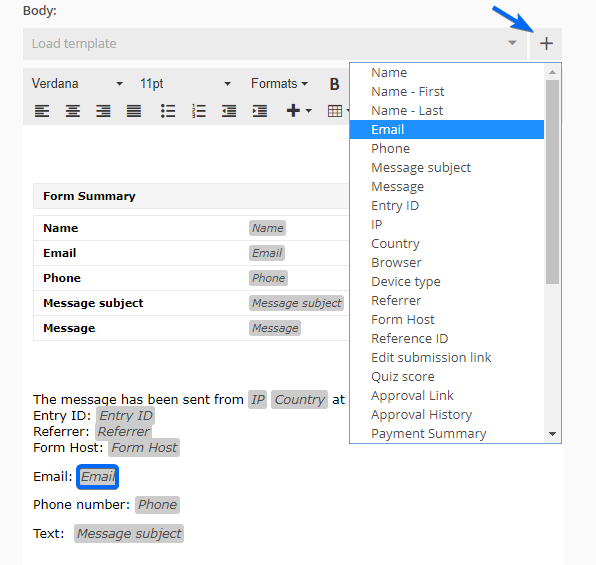
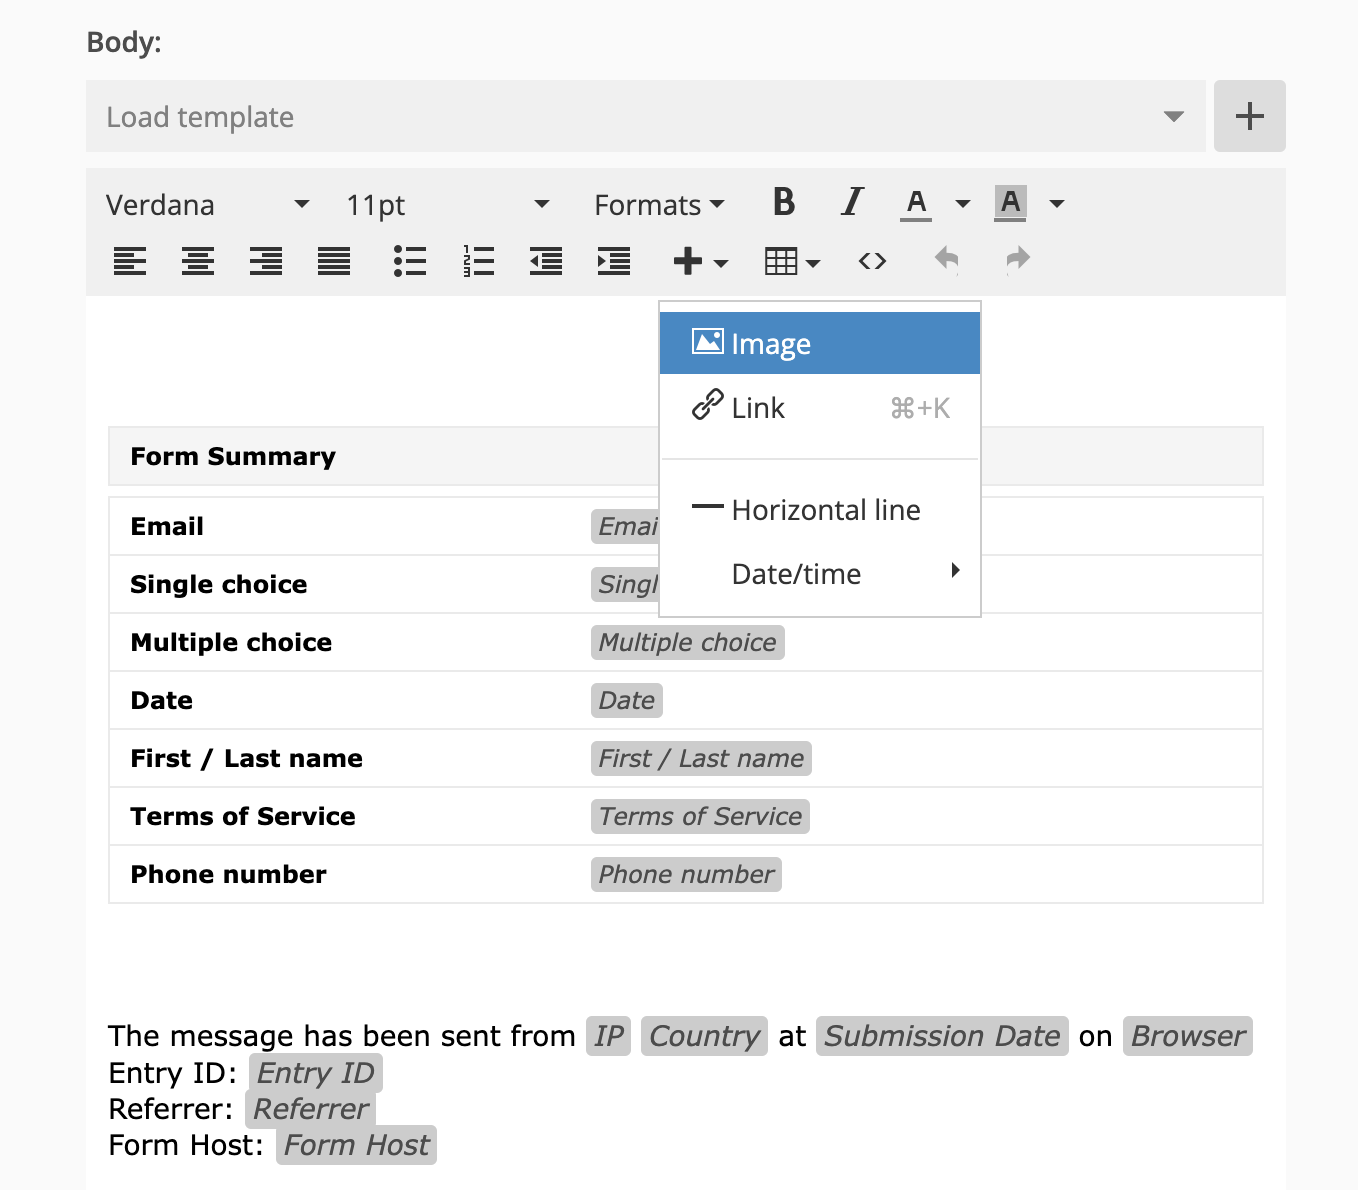
Customize the content of the email by styling the text (font, font size, color, alignment, and more). Click the plus sign from the top menu to add your own links and images.
To insert submission input into the template, click on the plus sign displayed next to the template, and choose fields from the dropdown list (e.g. Name). Make sure to type the label before, because the variable will only show the user inputs, not the label of your field.
Also, there are other options you can benefit from, such as receiving submissions attached as PDF files or send a file.
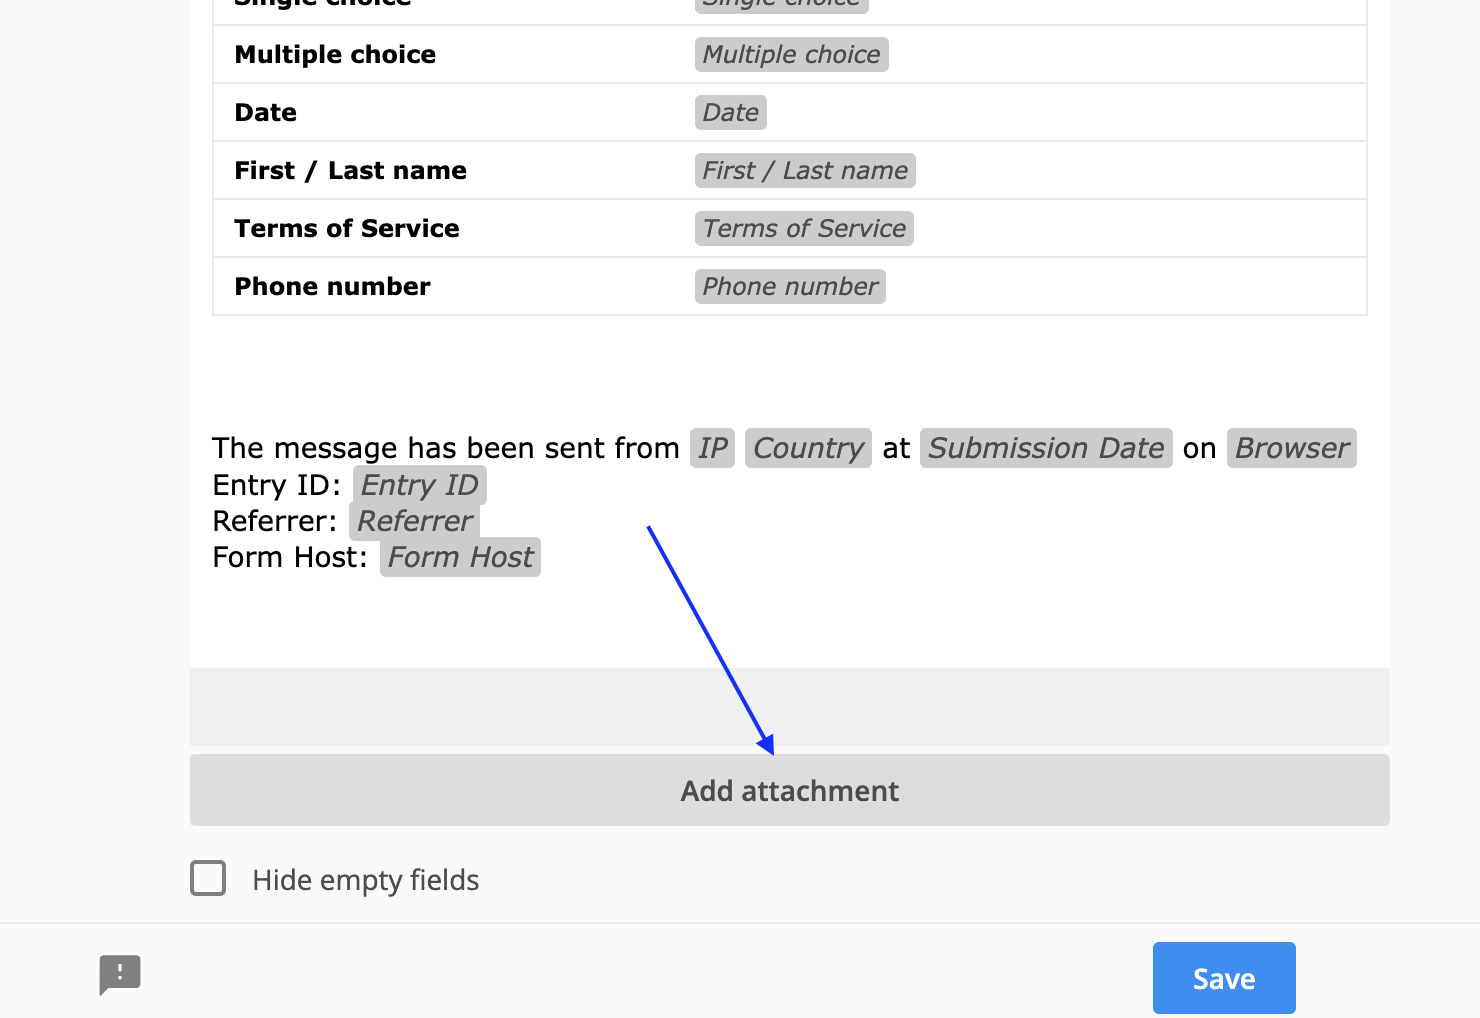
Hide empty fields: If you enable this option, the fields that haven’t been filled will no longer be included in the notification email. The hide empty fields option works with custom and default email templates.
When editing your form’s Emails within the form builder, you can customize the way email notifications arrive in your Inbox after each form submission. You can edit aspects such as the email address and name associated with the sender, the subject of the message, as well as the content itself.
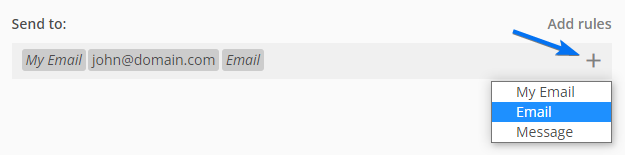
First things first, at Send to you will notice that My email appears. This is the email address associated with your 123FormBuilder account. To add another email recipient, simply type it in. To send emails to your form users, click on the plus sign and select an email field from the form.
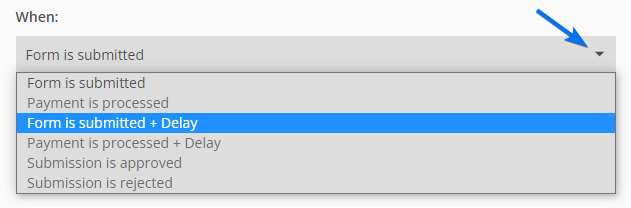
Next, choose When to deliver the email. You can select to send the email right after the submission or payment, based on the approval status or with delay (X minutes, days, weeks, months).
Collapse the Show From and Reply-to options section.

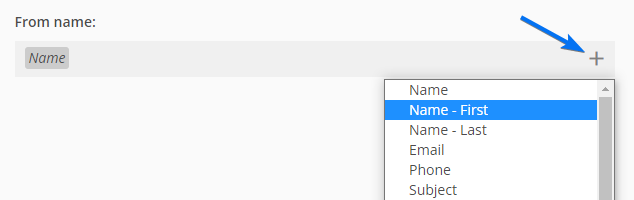
The first option refers to the name of the sender that is displayed in the first column of the email in your Inbox. Here you can associate a form field (e.g. Name – with the input provided by form users).
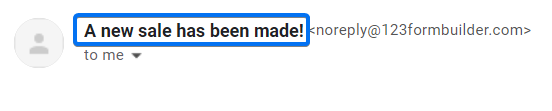
You can also type a custom text that will always appear when the form is submitted (e.g. A new sale has been made!).

The second option, From Email, refers to the email associated with the sender. We recommend choosing our default email address (noreply@123formbuilder.com) or enabling the SMTP option (send emails through your own email server). You can also choose noreply@myfor.ms (to simply remove any reference to our domain) or configure a custom domain to be the sender.

The option Reply to email sets the recipient to whom the message is sent if you reply to the email notification. Select the Email field from the dropdown in order to reply to your form users.

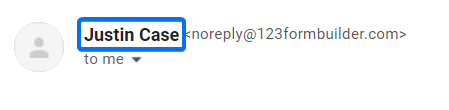
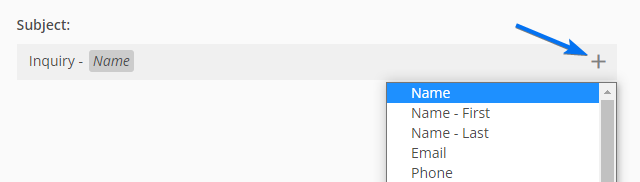
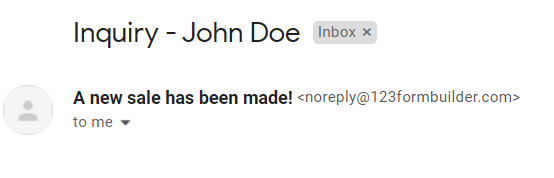
Subject refers to the title of the email, as seen in the example below. You can either add a custom text, the input of a form field, or both.
Example: Inquiry John Doe. Inquiry is typed and John Doe is the input provided by the user in the Name field, which is included in the message subject. Therefore, if another submission is made with the name Ana Baldwin, then the message subject will be Inquiry Ana Baldwin. Use the dropdown on the right to include a field in the message subject. Once the field is selected, it will be automatically included in the message subject as a tag.
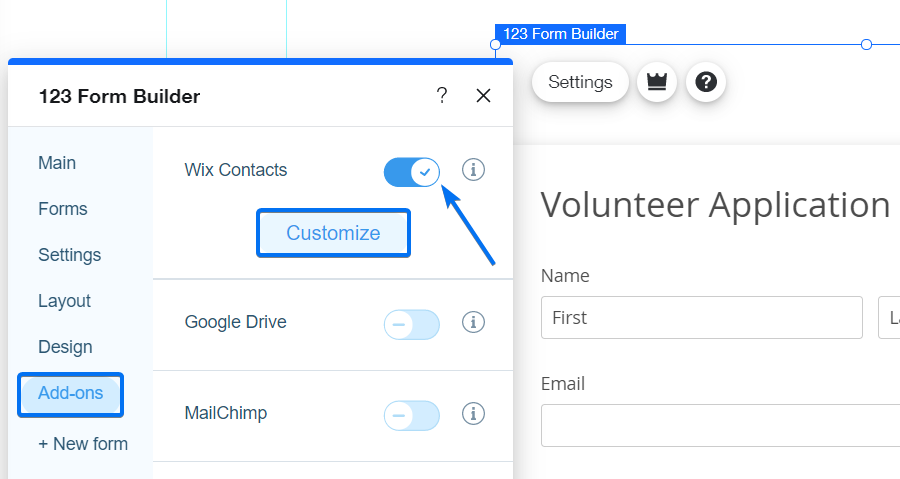
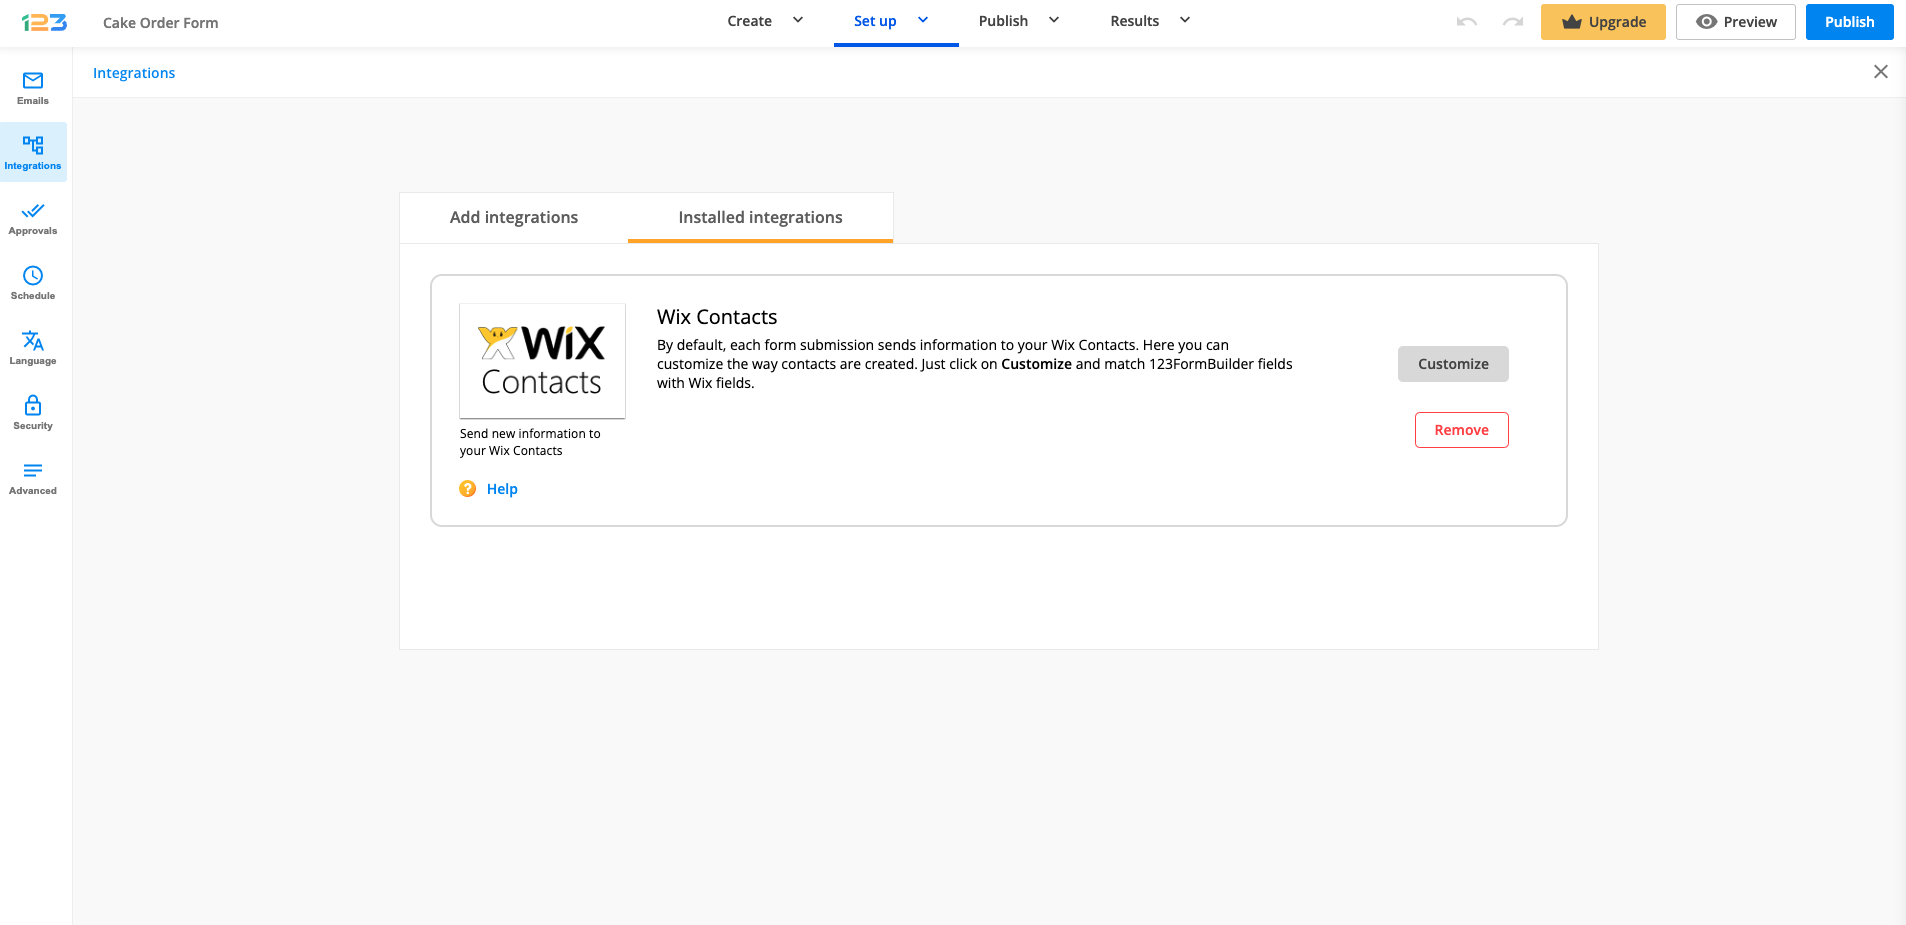
Use the 123FormBuilder – Wix Contacts integration to collect data in your Contacts on Wix, through form submissions. Interact with your website visitors, gather contacts, and establish new relationships in a quick and easy manner. The application is automatically enabled once your web form has been added to your Wix webpage.
Important Note
The integration works only when the online form is submitted on a Wix webpage.In the 123FormBuilder app from Wix, select the Add-ons tab, then click on the Customize button. The customization panel will open, where you can associate Wix Contacts fields with your form fields.
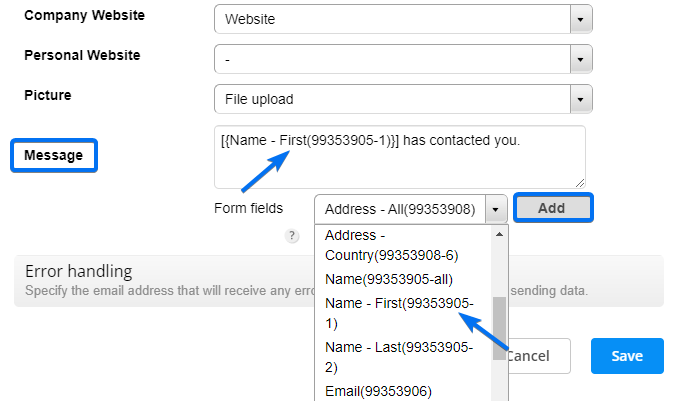
In the Customize window, you’ll find the Wix Contacts fields on the left and the form fields in the dropdowns on the right.
You may attach avatars to your contacts. Just add a File upload field on your form and match it with the corresponding Wix Contacts field (Picture) in the customization lightbox.

For the integration to work, it is necessary to map the fields with an asterisk next to them. That would be the Email field. Make sure to open the Form Editor of your form within the form builder and make your email field required.
The Message section allows you to add your own text and select other form fields. The field variable from the dropdown list will be replaced with the input of your users.
In the Error Handling section specify the email address that will receive any error messages that may occur while sending data. By default, the email address of your 123FormBuilder account will appear there.
In 123FormBuilder, you’ll find the Wix Contacts integration in the Integrations → Installed Applications section of your form.
A form that is integrated with your Top Producer account can send information about the lead type that is generated at form submission. To achieve this, you will need to add a new field to your form and set a default value for it. After matching our form builder fields with Top Producer fields, this value will be passed to your Top Producer list. Follow the step-by-step guide below to set this up.
1. Add a new field to your form. Label it any way you want. For example purposes, we will call it Lead Type.
2. Set a default value for the new field in your Form Editor. The values that can be set for this field are: Buy-New-Home, Buy-Resale-Home, Buy-New-Resale-Home, Sell Home, Rent.
Note: This value is the Role that can be specified for your Top Producer leads. When neither of the values above is passed to Top Producer, the default value, Buy-New-Home, is used.
3. Hide the field by ticking the checkbox Hidden in the Edit Field panel. This step is optional, but you probably don’t want form users to see the form field that will pass the lead type.
4. You are now done with the Form Editor. Next, go to your form’s Integrations section and enable the Top Producer integration, if you haven’t done so yet.
5. When matching fields, make sure to associate the Top Producer field labeled Role with the 123FormBuilder field that you have just added, Lead Type. Press Save and you’re good to go.
When a new form submission is made and information is passed from your 123FormBuilder web form to your Top Producer list, the role of the new lead will be the one specified in your Lead Type field. You can change this value and publish the form with different values on different pages (or share the form link using different values).
Most Popular
Frequently Asked Questions
Here is a list of the most frequently asked questions. For more FAQs, please browse through the FAQs page.