123FormBuilder Knowledge Base
Search our documentation platform for answers, service specifications and 3rd-party integrations.
Knowledge Base
When you update your payment details, the new method or details will be used for the next charges from then on.
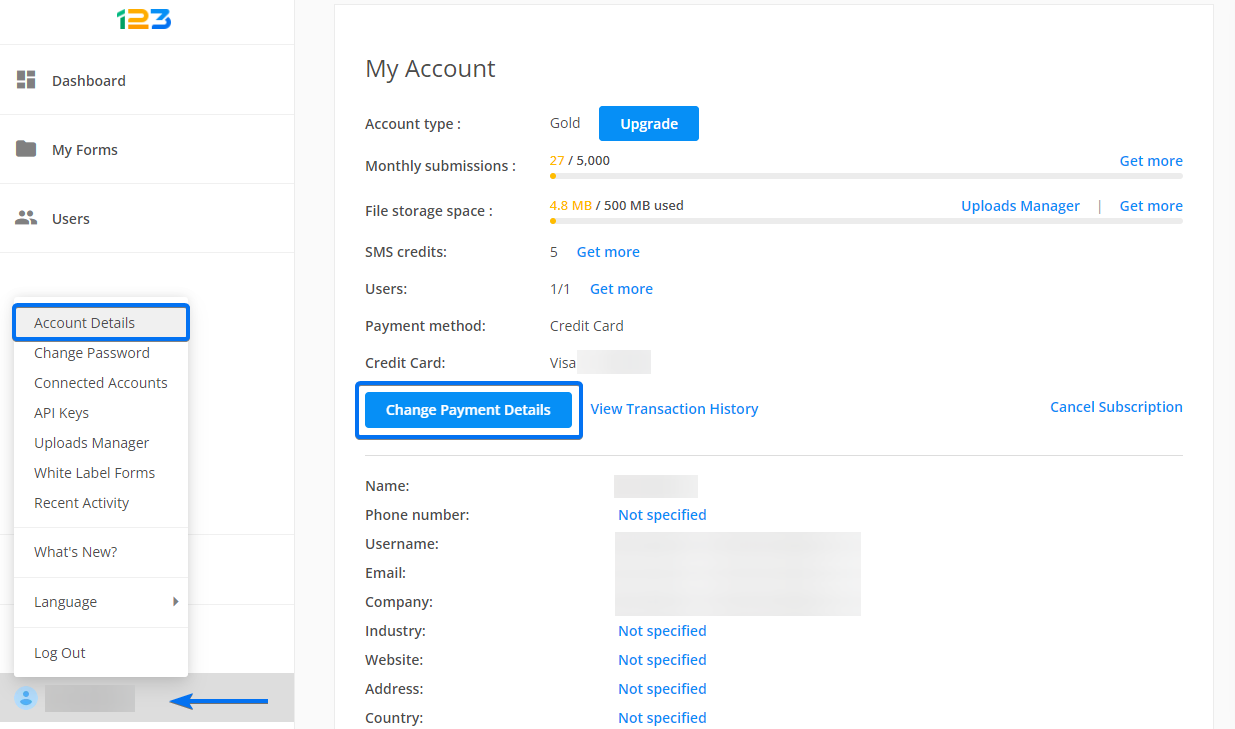
To change your payment details, select your username and click on Account Details within the form builder account. Afterward, select the Change Payments Details button. This will open your 2Checkout account.
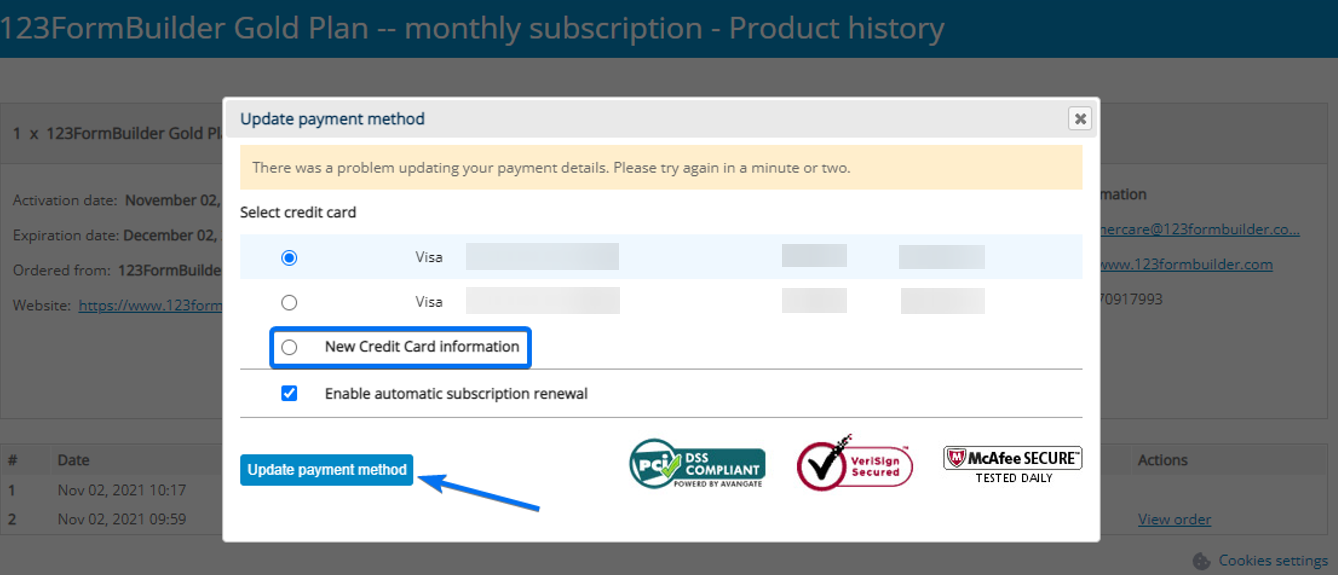
Once the lightbox opens up in 2Checkout, you can change the credit card information.
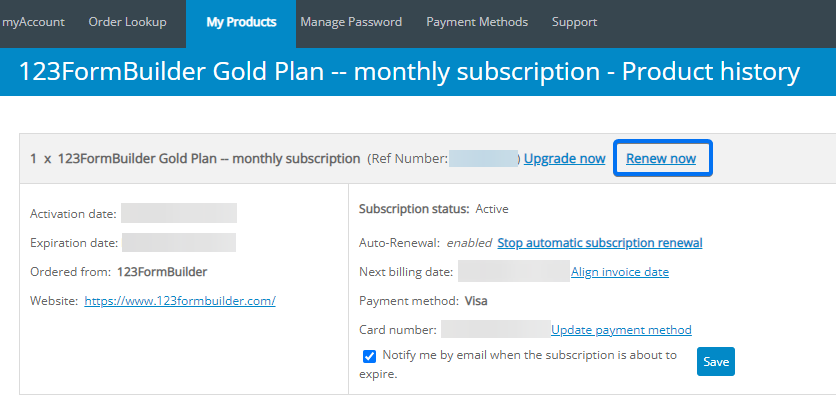
After you entered the new details, go to My Products and click on the Renew now button.
Important Note
You will need to manually renew your subscription each time a monthly/yearly payment fails to go through. This can happen for various reasons (insufficient funds, expired credit card, the bank declined the payment, etc).Related articles
Your form asks you to log in to your form builder account if its activity is set to Active only for me.
With the Active only for me option, only you or your sub-users can view the form. Therefore, your website visitors will receive the following message:

To check your forms’ activity, go to your Form Editor and select the Schedule section. From there, you can change the status from Active for me & my team to Always active, for example.
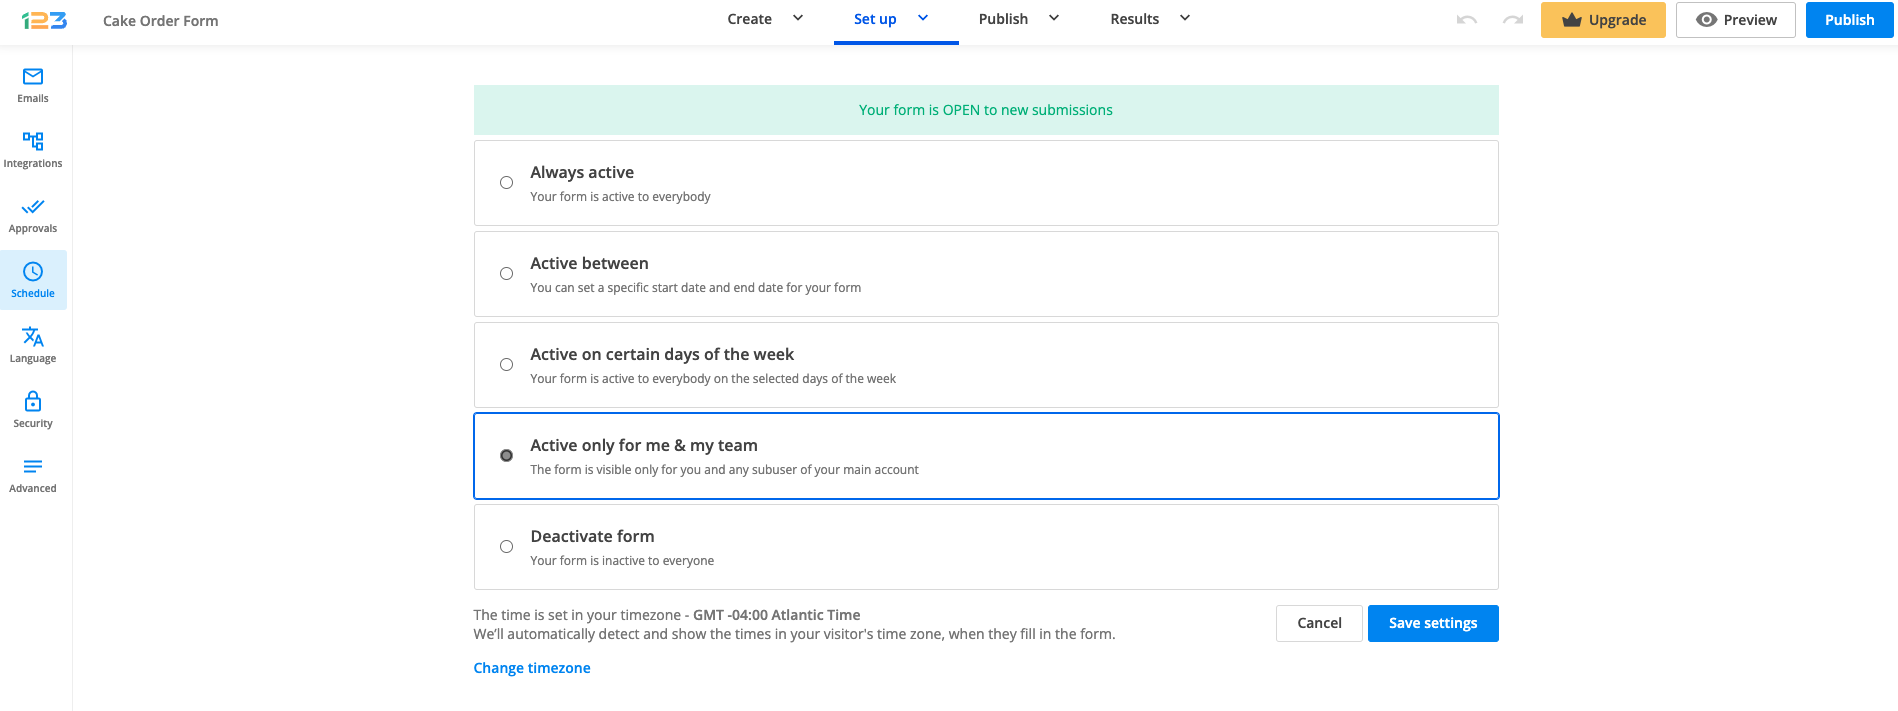
There you can choose the option that best suits your needs. If you want everyone to be able to access your form at all times, select the option Always active.
Related articles
There are seven types of email notifications that can be triggered when the form is sent. You can choose your preferred template from the Body dropdown in the forms Emails section. Below you can find further information about each email template.
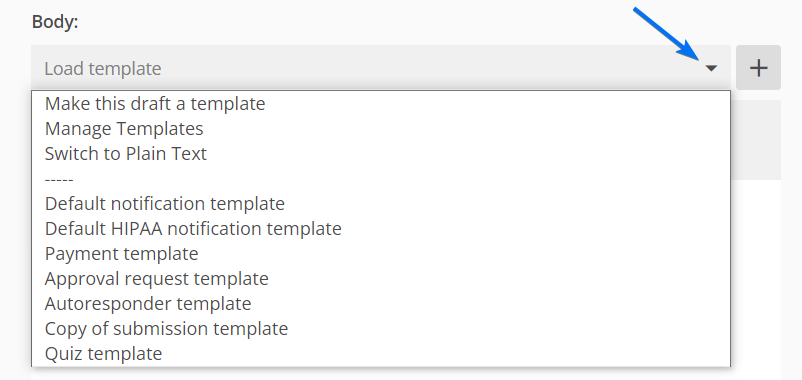
1. Default notification template. This is the message that is sent to your email address and recipients when somebody fills out your form. By default, the recipient is the email address used to create your 123FormBuilder account. You can change it or add multiple recipients in Emails → Send to.
2. Default HIPAA notification template. Due to HIPAA privacy laws, this email notification will not contain any information submitted on your form. It will just inform you on which form you have received a new entry.
3. Payment template. Choose to thank your customers for their purchase with this email template which also includes the payment summary.
4. Approval request template. The approvers will receive an email with a link to review the submission entries.
5. Autoresponder template. Your users will receive a confirmation message letting them know that their submission went through successfully. You can also use this template to provide users with further information.
6. Copy of submission template. This is a copy of the form submission, the exact same submission that you are receiving.
7. Quiz template. Lastly, the quiz email template contains the quiz summary and the points/percentage obtained.
Related articles
Your Salesforce account has an associated Authentication Token. This is a key that changes when you change your password. In order to integrate your 123FormBuilder account with Salesforce, you will need to use the Authentication Token. When setting up the integration in Integrations, paste the token on the third line of the Salesforce application box.
To reset or enable your Salesforce Authentication Token, follow these instructions:
- In your Salesforce account go to Settings → My Personal Information category.

- Select Reset My Security Token from the dropdown list and press Reset Security Token, in the right panel.

- You will receive your new Salesforce Authentication Token by email.
Important Note
This version of the API was deprecated. If you still need to automate your data collection processes, and retrieve collected data or make various operations related to your 123FormBuilder account through API calls, you can use our new and improved API v2. Please visit our developer documentation for more details.After you log in to your 123FormBuilder account, click on your username. From the list select the subsection API Keys and you’ll find yours listed. If the API Key is not displayed, you’ll need to press the Create now link and your API Key will be automatically generated.

The API Key can only be retrieved by the parent account. If you have sub-users, this section will not be available. Sub-users will need to contact the parent account to obtain the API Key related to the account.
There are cases when you might want to pass the value/input from one field to another, within the same form. Read below to learn how to achieve that by using a script added to your 123FormBuilder form.
In order to use on your own form the scripts examples we provide below paste the URL containing the script file into the Advanced -> Form -> Add a JS script to your form option. See our documentation on how to add JS to your form here.
Pass input between fields of the same type
This script will pass a field’s value to another field of the same type. It will work for input fields (Short answer, Email field, etc), as well as for choice fields (Single Choice, Dropdown etc).
(function(){
window.addEventListener('load', function(){
	var sourceControlId = 000000000, /** ID OF THE SENDER CONTROL **/
	targetControlId = 000000000, /** ID OF THE RECEIVER CONTROL **/

	sourceControlInstance = loader.getEngine().getDocument().getElementById(sourceControlId),
	targetControlInstance = loader.getEngine().getDocument().getElementById(targetControlId);

	sourceControlInstance.on('value-change', function(){
		targetControlInstance.setValue( sourceControlInstance.getValue() );
	});

	targetControlInstance.setValue( sourceControlInstance.getValue() );
});
})();
See how it works:
And yes, it works for choice fields too! See below:
What you need to do
You will need to replace the “00000000” from the script example above, with the IDs of your own fields. The first 0000000 will be replaced with the ID of the field from which the information will be copied. The second 0000000 will be replaced with the ID of the field to which information will be passed.
In order to find the ID of a field, right click on the field and use the Inspect option of your browser.
Tip: Copy and paste this script, in the same .js file, as many times as needed for each pair of fields on your form. Just make sure to always replace the field IDs with the ones of your fields.
Pass values between different field types
This script will allow you to pass an input/value from one field type to another. For example, pass from a Dropdown field to a Short answer field, from a Short answer field to a Long answer field, etc. Keep in mind that it does not work for any field types combinations.
(function(){
window.addEventListener('load', function(){
	var sourceControlId = 000000000, /** THE ID OF THE SENDER CONTROL */
	targetControlId = 000000000, /** THE ID OF THE RECEIVER CONTROL **/

	domAbstractionLayer = loader.getDOMAbstractionLayer(),
	sourceControlInstance = loader.getEngine().getDocument().getElementById(sourceControlId);

	sourceControlInstance.on('value-change', function(){
		domAbstractionLayer.setControlValueById(
		String(targetControlId),
		domAbstractionLayer.getControlValueById(
		String(sourceControlId)
		)
		);
	});

	domAbstractionLayer.setControlValueById(
	String(targetControlId),
	domAbstractionLayer.getControlValueById(
	String(sourceControlId)
	)

	);
});
})();
See how it works:
The same instructions as above apply.
Pass multiple values into a field/ Concatenate inputs from different fields
This script helps you collect values from different fields and put them together in a “summary” field (such as a Long answer field). It is very versatile and we will explain below how to customize it for your needs.
function joinValues() {
setTimeout(function() {
	var valueOne = loader.engine.document.getElementById(000000000).getProperty('value.value');
	var valueTwo = loader.engine.document.getElementById(111111111).getProperty('value.value');
	var valueThree = loader.engine.document.getElementById(222222222).getProperty('value.value'); //repeat the last line as many more times as needed ...

const joinedValues = valueOne + ": " + valueTwo + " - " + valueThree ;
		   loader.engine.document.getElementById(XXXXXXXX).setValue(({"value": joinedValues}));
}, 1000);
}

window.onchange = joinValues;
Here is a demo for an order form where we applied the script from above:
How to customize the script
The script has a few lines which are repeated, but on each line the “var” has a different name (valueOne, valueTwo, etc). You will need as many of those lines as fields you want to send data from. In our case, we repeated them three times, up to “valueThree”, because in our example above we have 3 fields from which we gather data. For a fourth field, add another line, right below the “var valueThree” one. You will change the name of the var to “valueFour” and so on.
For each of these lines, you will add the corresponding field’s ID. Therefore, 00000000 will be replaced with the ID of your first field, 11111111 will be replaced with the ID of your second field and so on.
Replace the “XXXXXXX” value with the ID of the field where you want to combine all the information (ideally a Long answer field).
const joinedValues = valueOne + “: ” + valueTwo + ” – ” + valueThree; – this is the line where we combine the information from all fields. In between quotation marks add any symbols or words that you need to separate the inputs. Make sure to add spaces too because with no space the inputs will print as this: valueOnevalueTwovalueThree
Tip
While the JS method works greatly when you need to transfer information from just a few fields into other, for a larger number of fields we recommend you to use our Database Manager app, available from the Enterprise plan. Using this app is possible to also prefill form fields with values from your own database (MySQL or Maria DB) or from a CSV file into form fields.Do you have other code examples you tried and would like to share with us in the comments below?
See more JS tips articles:
While our powerful form builder offers the ability to make calculations with the Formula field, set a minimum/maximum value for a number or change the accepted data format, to round automatically a number you will need to add javascript to the form. Luckily you are just in the right place to learn how to do that!
Rounding a non-integer number
Let’s take the following script as an example:
function roundResult() {
var result1 = loader.engine.document.getElementById(111111111).getProperty('value.value');
var roundedValue1 = Math.round(result1 * 1) / 1;
loader.engine.document.getElementById(111111111).setValue(({"value": roundedValue1}));
};

window.onclick = roundResult;
This script is used to change a fractional number (a number with decimals) into an integer (a whole number). For example, 3.123 becomes 3, while 3.789 becomes 4.
Change the numbers “111111111” with your own field’s ID (see how to find the field ID at pt. 2 here). Replace with the same field ID in both places, if you want the rounding to be in the same field. If you want to display the fractional number in a field and in another field display its rounded counterpart, then simply add the first field’s ID in place of the first 111111111 and the second field’s ID in the place of the second 111111111.
See how it works:
Rounding up and displaying only the first two decimals
Let’s say you need to display the prices on your form in a more currency friendly format. You want to avoid numbers such as 25.45678 and display this instead $25.46.
First, make sure you add the currency symbol of your choice with our Prefix option (learn how here).
Second, you will need to use this script on your Formula or Number field:
function roundResult() {
var result1 = loader.engine.document.getElementById(111111111).getProperty('value.value');
var roundedValue1 = +((Math.round(result1 * 100)/100).toFixed(2));
loader.engine.document.getElementById(111111111).setValue(({"value": roundedValue1}));
};

window.onclick = roundResult;
The same instructions apply as for the previous script.
See how it works:
In order to use these scripts on your own form, after you’ve added your own field IDs, paste the URL containing the script file into the Advanced → Form → Add a JS script to your form. See our documentation on how to add JS to your form here.
Note: The script examples provided above trigger the action to round the number when a click is made on the form page. You can however change that. E.g: instead of “window.onclick” you can use “window.onchange” so that the script is triggered when an input is changed in your form.
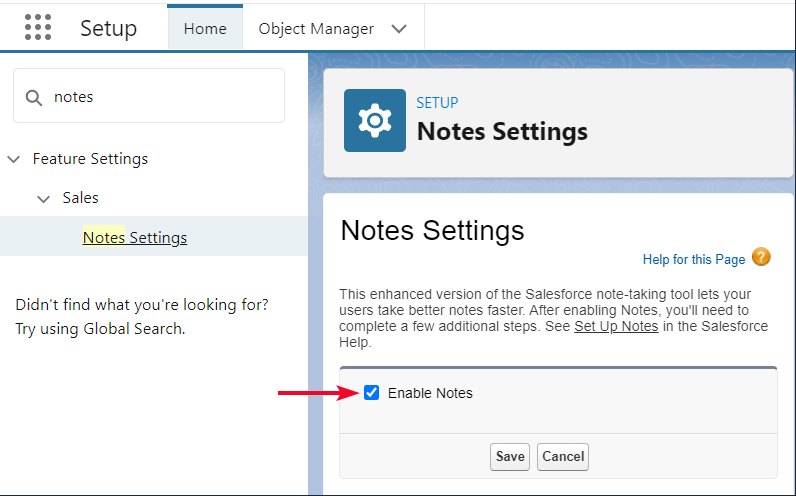
In Salesforce, there is on one side the older Notes and Attachments related list and on the other the split version of this, Notes related list and Files related list.
In order to send to the Notes related list specifically, enhanced notes related list has to be activated in the org:
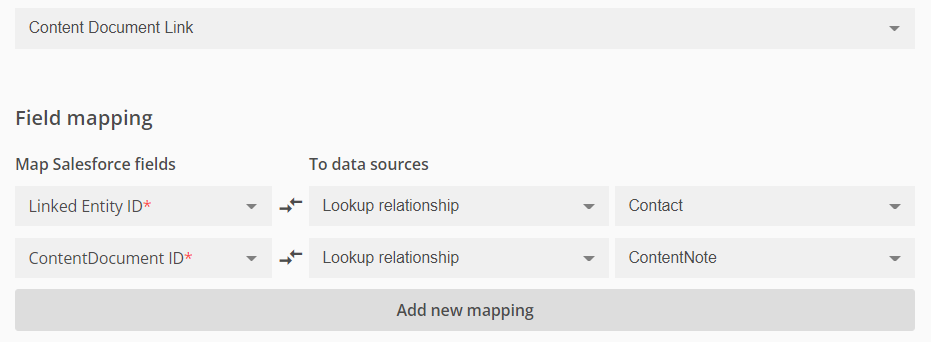
Two Primary object mappings are needed in order to generate a new Note:
- For the Note itself, map the object ContentNote as a Primary object, with the fields for Title and Content mapped with fields on the form. For Content specifically, you can use Custom value as Data Source and add one or multiple form fields.
- Add another Primary object mapping for ContentDocumentLink. This object mapping will connect the ContentNote with the object it pertains to. Here you need to map two fields:
- Linked Entity ID – here you add a Lookup Relationship mapping, selecting the object that the Note should fall under in the Notes related list.
- Content Document ID – this field is mapped to the ContentNote lookup relationship, as this refers to the Note itself.
Mapping for Content Note:

Mapping for Contend Document Link:
After installing the 123FormBuilder app and assigning the license, Salesforce users need to find our app in App Launcher and access the app in order to authorize it.
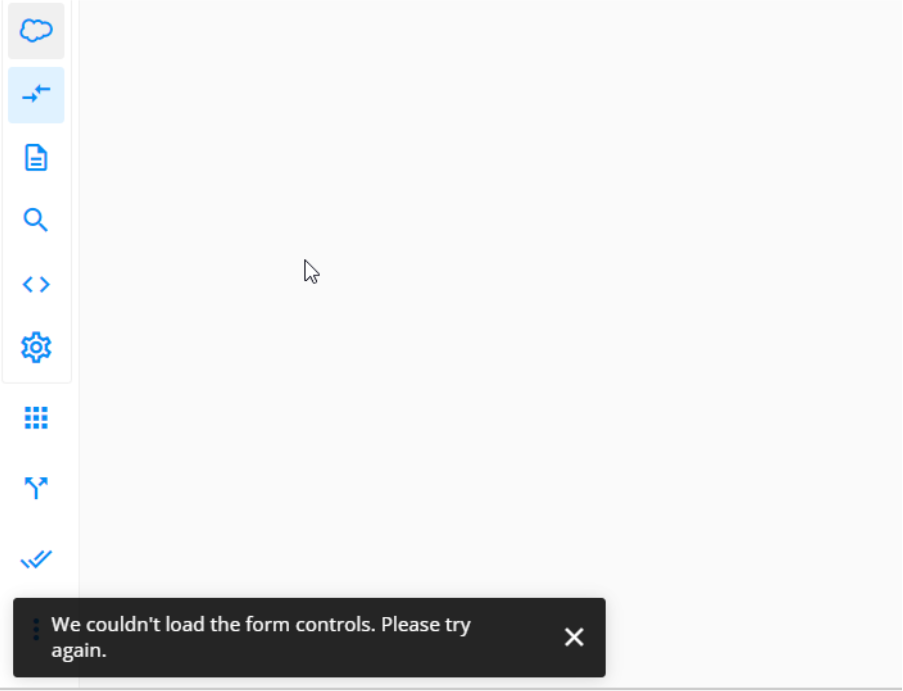
Some users may encounter the following error when trying to access the app: “We couldn’t load the form controls”
When does this error occur?
This error message appears when you are accessing Salesforce integration → Object Mapping section:
Also, when attempting to add a Primary Object in the dropdown menu – where your Salesforce objects should be displayed – the No match found message is displayed:
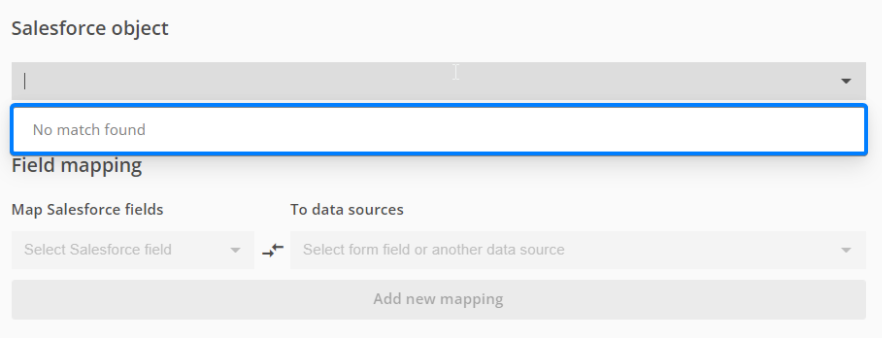
Why does this error show up?
API access is required for 123FormBuilder to pull data from your Salesforce ORG and list the objects. When a Salesforce user profile doesn’t have this permission called API Enabled you’ll receive those error messages.
How to solve this – Enable the API permission for the Salesforce user.
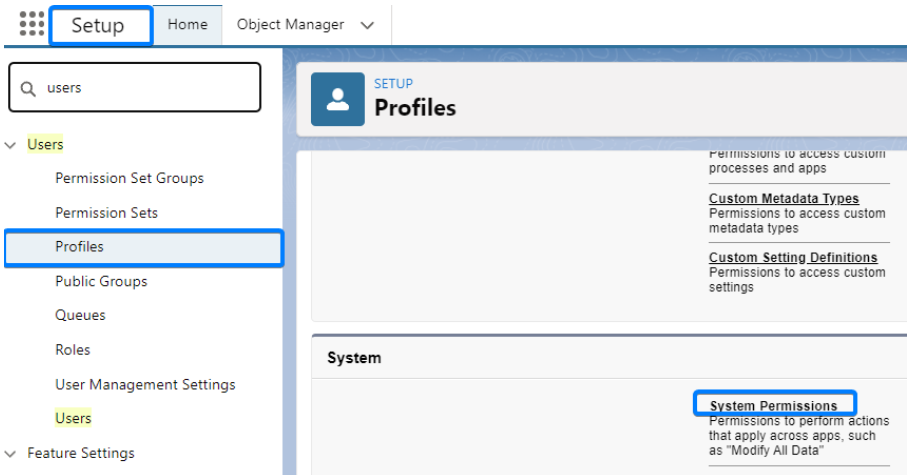
Follow these steps to enable the API permission:
- Go to Salesforce Setup – Users – Profiles
- Select your User Profile name
- Below the System category click on System Permissions
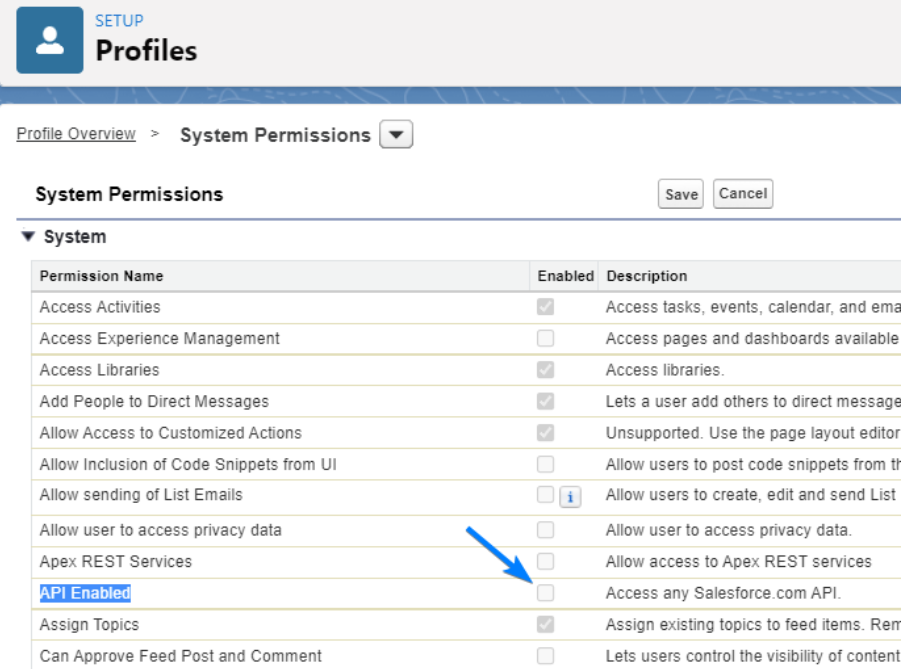
- Click on Edit. Tick the API Enabled permission.
Looking for more information on our integration with Salesforce?
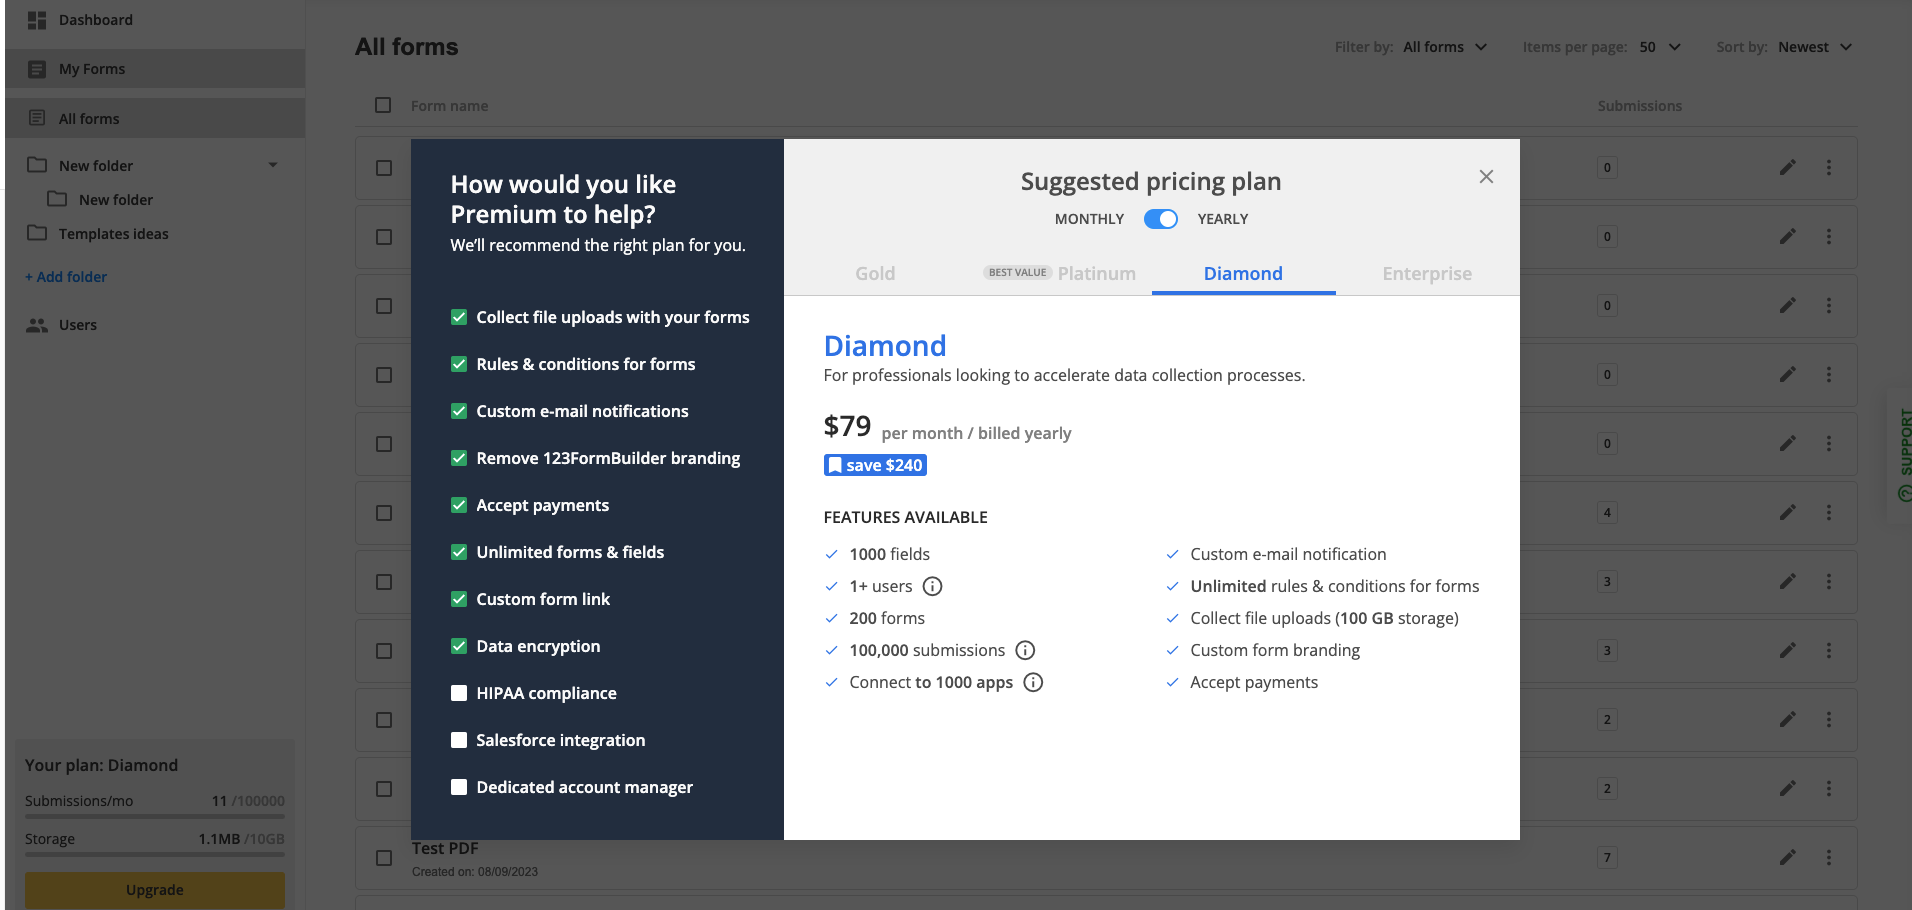
Take your forms to the next level with 123FormBuilder. In this article, we present all the features provided by the Diamond plan.
Account Features
- You can create 200 forms within your account.
- On each form, you can add 1000 fields.
- 100,000 submissions per month on your account. The submission limit is reset on the first day of each month.
- 100 GB upload storage.
- Add sub-users to your main account. You can purchase user bundles, assign Viewer and Group Admin roles and expand up to 10 sub-users. If you need more sub-users, get in touch with our Enterprise team for more information.
- Approvals option. Request approval from your team.
- Connect to multiple Wix sites.
- Domain aliasing.
- Data Encryption.
- Favicon.
- Create unlimited custom reports. Apply custom filters to your reports.
- No backlink to 123FormBuilder.
- Unlimited API calls.
- Live Chat Support.
Form Configuration
- Add up to 10 email recipients.
- Send 15 email notifications.
- Unlimited Likert Scale statements.
- Multiple publishing methods available.
- Track the form’s activity by adding your Google Analytics Profile ID and domain.
- Establish a multilingual form.
- Create an anti-spam form by adding our security options. You can protect your Inbox from spam by using Captcha verification images, limiting form submissions from the same IP to one per day, rejecting submissions coming from specific countries, and even limit the total number of submissions.
- Overview of the default report, which contains all form fields, shown in pie charts, in the order that they appear in your form.
- Add custom scripts on the form and on the Thank You Page.
- Attach a PDF file in the email notification. Plain PDF or PDF Layout.
- Branching & Conditional Logic. You can establish unlimited rules per form. Form rules, field rules, and notification rules.
- Create form calculations.
- Connect your Payment form to a Payment Processor.
- Attach a file in the email notification.
- Advanced features such as: save for later, edit submission, and preview submission.
- Custom Thank You Page.
- Quiz options.
- Send email notifications through your own SMTP server.
- Download Form Layout PDF for a submission.
- Download Plain PDF for a submission.
- Export submissions to CSV & Excel.
Third Party Applications
- NationBuilder integration
- Shopify Customers
- Wix Contacts integration
- Google Sheets integration
- Google Drive integration
- MailChimp integration
- Dropbox forms integration
- Unbounce integration
- AWeber integration
- iContact integration
- GetResponse integration
- Constant Contact integration
- Enormail integration
- Top Producer integration
- PipelineDeals integration
- Google Calendar integration
- Evernote integration
- Smartsheet integration
- Zendesk integration
- Google Groups integration
- Twitter tweet integration
- Campaign Monitor integration
- WordPress Posts integration
- Big Contacts integration
- Active Campaign integration
- Desk.com integration
- VerticalResponse integration
- Marketo integration
- WebHooks integration
If you do not find what you are looking for with the Diamond plan, you can contact the Sales department in order to discuss about the Enterprise plan. Also, you can always visit our Features Matrix for more information.
With 123FormBuilder, you can easily create complex forms to boost your business and collect data. There are different subscriptions types that you can choose from. In this article, we will go over all the features provided by the Platinum plan so you could decide if it is a right fit for you.
Account Features
- You can create 100 forms within your account.
- On each form, you can add 500 fields.
- 20,000 submissions per month on your account. The submissions limit is reset on the first day of each month.
- 10 GB upload storage.
- Add sub-users to your main account. You can purchase user bundles, assign Viewer and Group Admin roles and expand up to 10 sub-users. If you need more sub-users, get in touch with our Enterprise team for more information.
- Connect to multiple Wix sites.
- Domain aliasing.
- NEW Advanced Form Analytics – Insights
- Create unlimited custom reports. Apply custom filters to your reports.
- No backlink to 123FormBuilder.
- Unlimited API calls.
- Live Chat Support.
Form Configuration
- Add up to 10 email recipients.
- Send 10 email notifications.
- Unlimited Likert Scale statements.
- Multiple publishing methods available.
- Track the form’s activity by adding your Google Analytics Profile ID and domain.
- Establish a multilingual form.
- Create an anti-spam form by adding our security options. You can protect your Inbox from spam by using Captcha verification images, limiting form submissions from the same IP to one per day, rejecting submissions coming from specific countries, and even limit the total number of submissions.
- Overview of the default report, which contains all form fields, shown in pie charts, in the order that they appear in your form.
- Add custom scripts on the form and on the Thank You Page.
- Attach a PDF file in the email notification. Plain PDF or PDF Layout.
- Branching & Conditional Logic. You can establish unlimited rules per form. Form rules, field rules, and notification rules.
- Create form calculations.
- Connect your Payment form to a Payment Processor.
- Attach a file in the email notification.
- Advanced features such as: save for later, edit submission, and preview submission.
- Custom Thank You Page.
- Quiz options.
- Send email notifications through your own SMTP server.
- Download Form Layout PDF for a submission.
- Download Plain PDF for a submission.
- Export submissions to CSV & Excel.
Third Party Applications
- NationBuilder integration
- Shopify Customers
- Wix Contacts integration
- Google Sheets integration
- Google Drive integration
- MailChimp integration
- Dropbox forms integration
- Unbounce integration
- AWeber integration
- iContact integration
- GetResponse integration
- Constant Contact integration
- Enormail integration
- Top Producer integration
- PipelineDeals integration
- Google Calendar integration
- Evernote integration
- Smartsheet integration
- Zendesk integration
- Google Groups integration
- Twitter tweet integration
- Campaign Monitor integration
- WordPress Posts integration
- Big Contacts integration
- Active Campaign integration
- Desk.com integration
- VerticalResponse integration
- Marketo integration
- WebHooks integration
If you do not find what you are looking for with the Platinum plan, you can always select the features you are interested in from the left side panel and we will recommend the right plan for you.
Related articles
123FormBuilder offers different types of upgrade options to cover various businesses. In this article, we will enumerate all the Gold plan features so you could decide if it is the right fit for you.
Account Features
- You can create 25 forms within your account.
- On each form, you can add 250 fields.
- 5,000 submissions per month on your account. The submissions limit is reset on the first day of each month.
- 1 GB upload storage.
- Add sub-users to your main account. You can purchase user bundles, assign Viewer and Group Admin roles and expand up to 10 sub-users. If you need more sub-users, get in touch with our Enterprise team for more information.
- Connect to multiple Wix sites.
- Create unlimited custom reports. Apply custom filters to your reports.
- No backlink to 123FormBuilder.
- Live Chat Support.
- Unlimited API calls.
Form Configuration
- Add up to 10 email recipients.
- Send 6 email notifications.
- Unlimited notification rules.
- Unlimited Likert Scale statements.
- Multiple publishing methods available.
- Track the form’s activity by adding your Google Analytics Profile ID and domain.
- Establish a multilingual form.
- Create an anti-spam form by adding our security options. You can protect your Inbox from spam by using Captcha verification images, limiting form submissions from the same IP to one per day, rejecting submissions coming from specific countries, and even limit the total number of submissions.
- Overview of the default report, which contains all form fields, shown in pie charts, in the order that they appear in your form.
- Add custom scripts on the form and on the Thank You Page.
- Attach a PDF file in the email notification. Plain PDF or PDF Layout.
- Branching & Conditional Logic. You can establish unlimited rules per form. Form rules and field rules combined.
- Create form calculations.
- Attach a file to the email notification.
- Advanced features such as: save for later, edit submission, and preview submission.
- Custom Thank You Page.
- Quiz options.
- Send email notifications through your own SMTP server.
- Download Form Layout PDF for a submission.
- Download Plain PDF for a submission.
- Export submissions to CSV & Excel.
Third Party Applications
- NationBuilder integration
- Shopify Customers
- Wix Contacts integration
- Google Sheets integration
- Google Drive integration
- MailChimp integration
- Dropbox forms integration
- Unbounce integration
- AWeber integration
- iContact integration
- GetResponse integration
- Constant Contact integration
- Enormail integration
- Top Producer integration
- PipelineDeals integration
- Google Calendar integration
- Evernote integration
- Smartsheet integration
- Zendesk integration
- Google Groups integration
- Twitter tweet integration
- Campaign Monitor integration
- WordPress Posts integration
- Big Contacts integration
- Active Campaign integration
- Desk.com integration
- VerticalResponse integration
- Marketo integration
- WebHooks integration
If you do not find what you are looking for with the Gold plan, you can always select the features you are interested in from the left side panel and we will recommend the right plan for you.

Related articles
Most Popular
Frequently Asked Questions
Here is a list of the most frequently asked questions. For more FAQs, please browse through the FAQs page.