Knowledge Base
Collecting money via forms is an easy and fast way to grow your business. Our form builder provides a very simple way to receive payments with your forms through multiple payment processors. You will be able to accept donations, orders, and subscription fees easy as 1-2-3. Offline payment suggests that money is transferred at a later date. With an offline payment as a method, form users can pay by check, invoice, on-site or other options.
Both online and offline payments are important to consider when creating an order or registration form.
When you enable the payment integration, the form automatically redirects to the payment page. Form rules can redirect users to another webpage based on the user’s input. Form rules will have priority over the redirect to the payment summary page.
First, you need to establish the condition when to redirect to that webpage URL.
Open your Form Editor and add a choice field. In our example, we labeled it Payment Method and listed two options: Pay Online and Pay by Check. To ensure that the user checks one of them we mark the field as required.
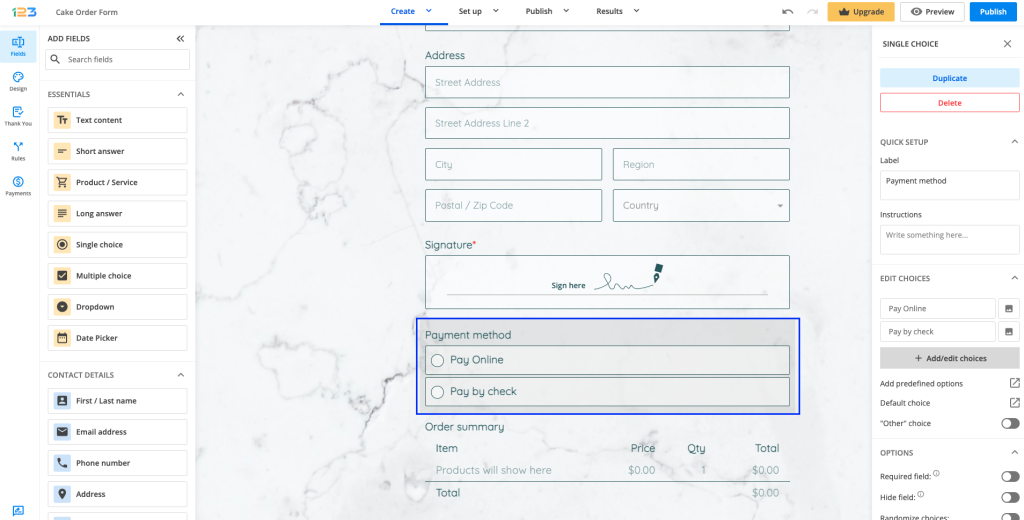
At this point, even if a user chooses either of those options, the redirect will still be made to the payment page.
Navigate to Rules and switch to the Form Rules tab.
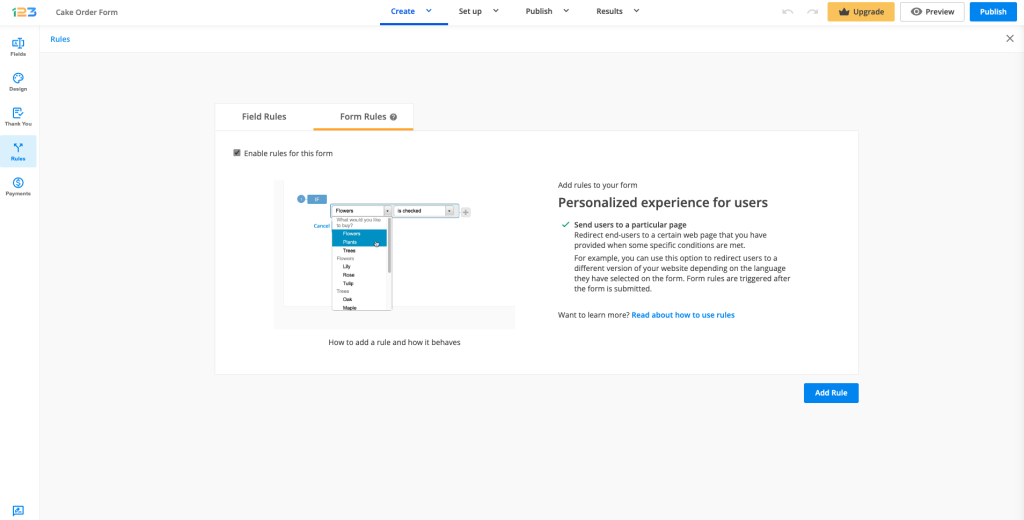
Create a new rule, like the following:
If Pay by Check is checked
Then redirect to ______ (paste your webpage URL)
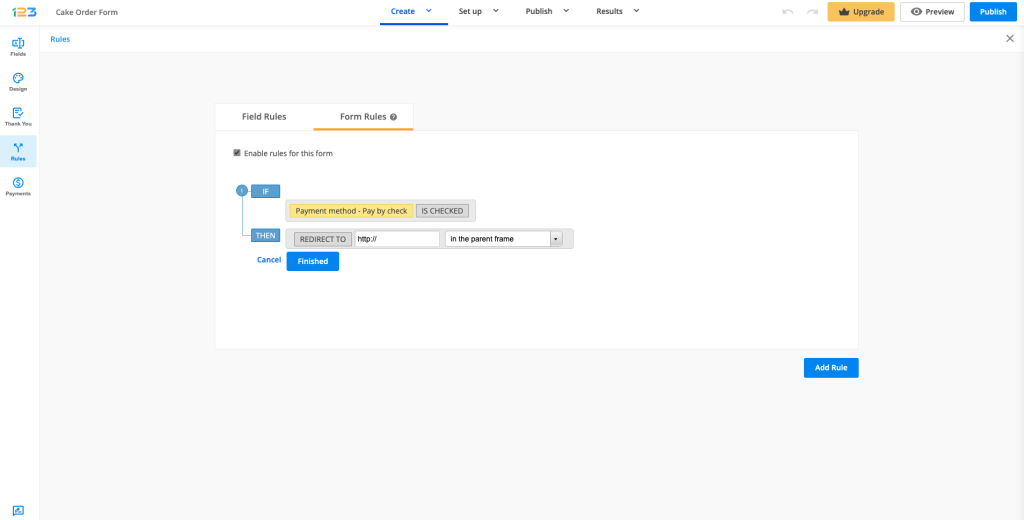
Each time Pay by Check is selected, the redirect to your webpage is made. When Pay Online is checked, the redirect will be made to the payment summary page.
That’s it! Now you have a form with both online and offline payment options.
123FormBuilder protects the data entered on any form. We do our best to track down and ban all the forms created by users of our service for data phishing purposes. That message appears on any free form to avoid phishing attempts and scammers. Phishing is a type of online fraud that can result in identity theft.
It is forbidden to create forms that request sensitive data, such as passwords, email credentials, or other credentials, from form users. Keep your passwords, financials, and other personal information safe and protected.
For order forms, we offer several user-friendly payment processors.
We don’t allow form owners to use another entity’s brand, title, logo, or name in a manner that may result in misleading form users.
We do not allow our services to be used for activities related to or promoting racism, pornography, segregation, religious hatred, or any illegal activities. We suspend and ban any kind of form that is violating our terms of service.
If you ever receive a form that is asking you to provide your personal information, such as your social security number, password, or account numbers, do not submit it. If you stumbled upon a form that seems suspicious, please contact us to take action against it.
Related articles
Your form submissions are stored on our servers. and are available to you in the Submissions section. This is where the information provided by your users is centralized so that you can get an overview of the submission status, analyze individual entries, and manipulate all data.
Each time a form is filled in and sent, a form submission is created. All entries received through a form can be found in Results → Submissions.

In this section, you are able to manage your form submission. Let’s take a look at what you can do.
- Edit a submission
- Print a submission
- Download as PDF
- Import/Export submissions
- Filter submissions
- Resend a submission
- Delete a submission
Editing a submission
Sometimes you need to edit the submission to add additional information about a person’s entry. It could be details about their order or registration. To do so, click on the entry. A pop-up window will appear that contains all the information. At the top menu click on Edit.
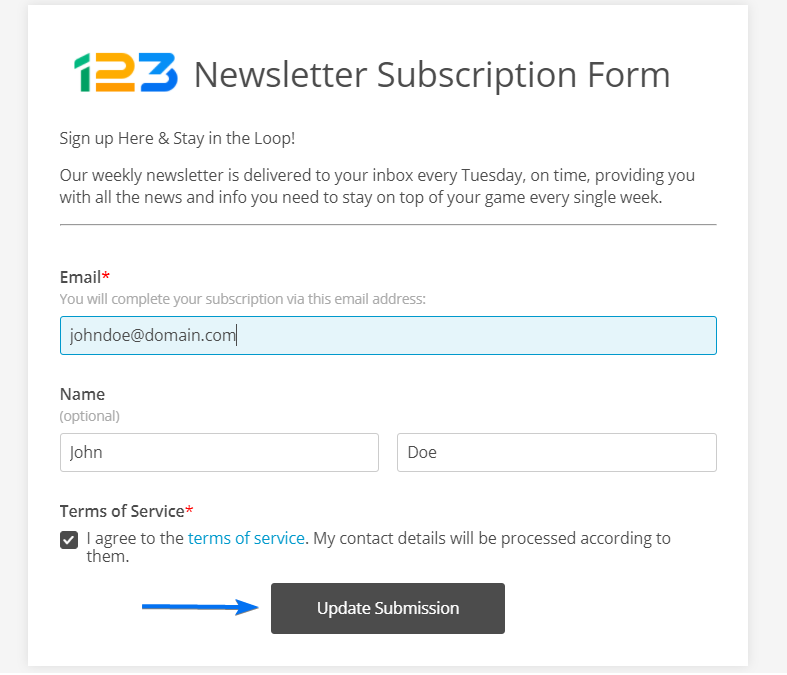
Once you finish editing the entry, click on the Update Submission button.
Printing a submission
Click on an entry and select the Print button. This will open the printing options of your browser. Keep in mind that the printing options are depending on your browser.
Downloading as PDF
You have two options to download your submissions:
- As Plain PDF
- As Form Layout PDF
The first one has a default template. The second one will include the layout of the form, as seen online with the data included inside the form fields. For more details check out our PDF article here.
Import/Export submissions
To export the submissions table in Excel or CSV format, click Export to and select the format you need. Afterward, enter the email address where you want to receive the download link. You need to be logged in with your email address and your 123FormBuilder account in the same browser in two separate tabs. This is an authentification step to ensure that the request is made by the account owner.
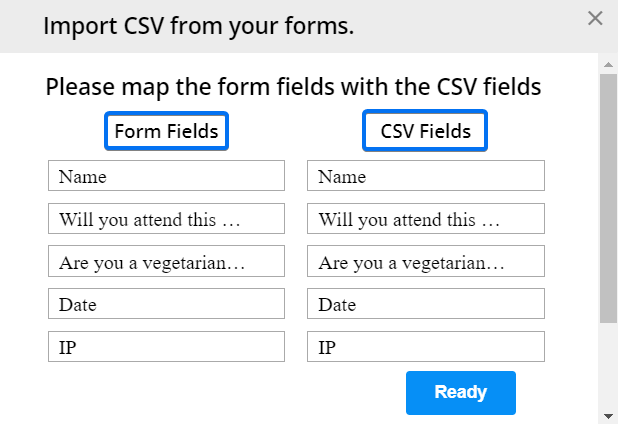
To import data, press the Import button. You can only import a CSV file in your forms Submissions section. The columns of your CSV file need to have the same name as your form fields. In the pop-up window, choose your CSV file. Afterward, map the form fields on the right side with your CSV fields on the left side. Once you’ve finished mapping them, click Ready and you’re done.
Filtering
Filter your submissions to display form entries that meet specific criteria. For more filtering operations click on Advanced Search.
In the Advanced section, you can choose which entries appear in the table, and which don’t by using the Show only and Exclude operators.

Resending
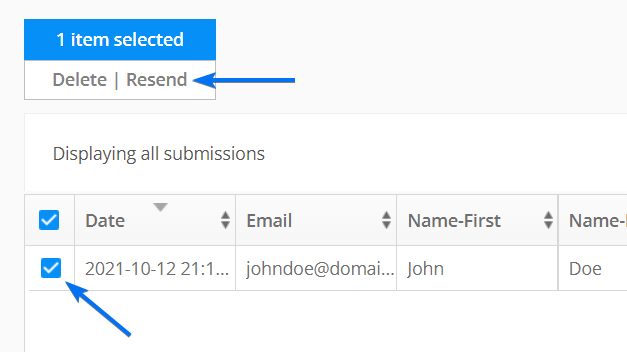
To resend a submission entry to your email box, click on the submission entry and press Resend. You can then choose to resend any of the Email templates created in your form’s Notifications section.
Deleting a submission
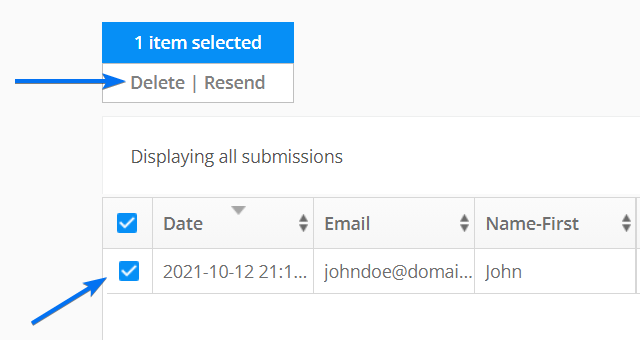
If you need to delete a submission, check the submission entry and select the Delete option.
Important Notes
- By deleting a form field in the Form Editor, all the data collected through that field will be lost and can not be recovered.
- We can restore deleted entries within 30 days since they have been erased. If you deleted an entry by mistake, feel free to contact us.
Related articles
In this article, you’ll learn how to customize the progress bar of your form using our online form builder.
Once you have created a multipage form by adding a New page/Page break, you will have, by default, a progress bar placed at the top of the page.
You can display the progress bar in multiple ways. To check out the different options, click on the progress bar placed at the top of the page. The Layout options will open on the right-side of the page.
a) Percentage: this shows the percentage of completion on the form
b) Steps: this is set by default
c) Page numbers
d) Hidden: you can choose to hide the progress bar
Below the Layout options, you can change each page’s title or disable them by turning off the Show pages titles toggle.

Extra customizations
If you want to bring extra customizations to the progress bar, you can always use custom CSS. Learn in this article how to add custom CSS to your form.
Here you can find some examples:
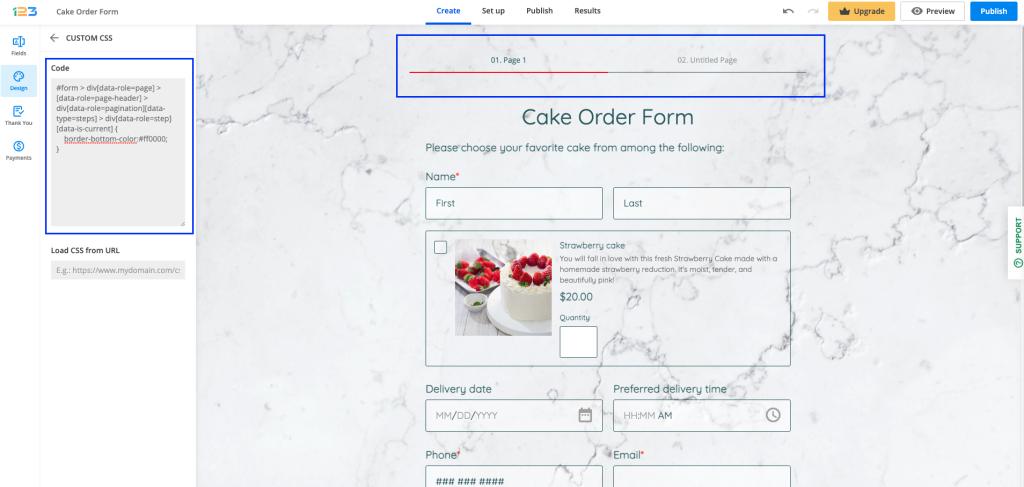
1. Changing the bottom line color
#form > div[data-role=page] > [data-role=page-header] > div[data-role=pagination][data-type=steps] > div[data-role=step][data-is-current] {
    border-bottom-color:#ff0000;
}
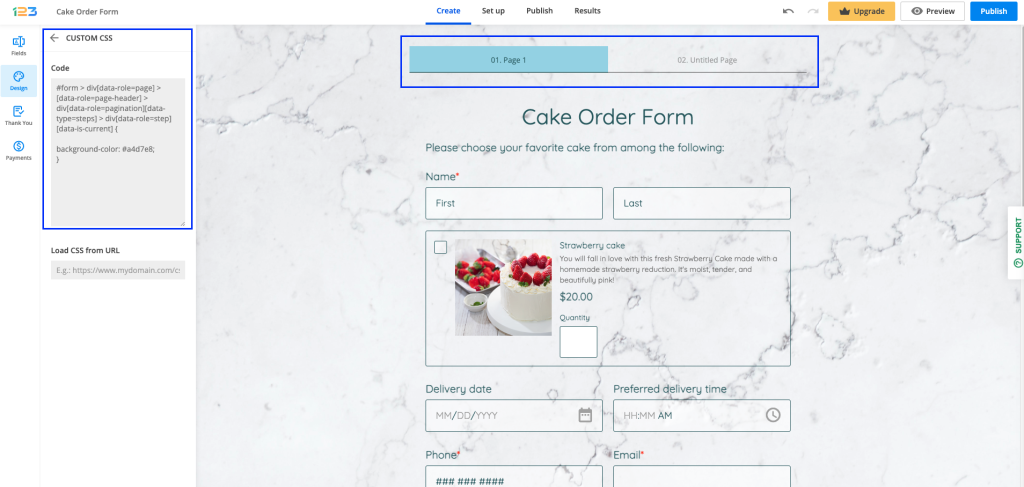
2. Changing the background color
#form > div[data-role=page] > [data-role=page-header] > div[data-role=pagination][data-type=steps] > div[data-role=step][data-is-current] {

background-color: #a4d7e8;
}
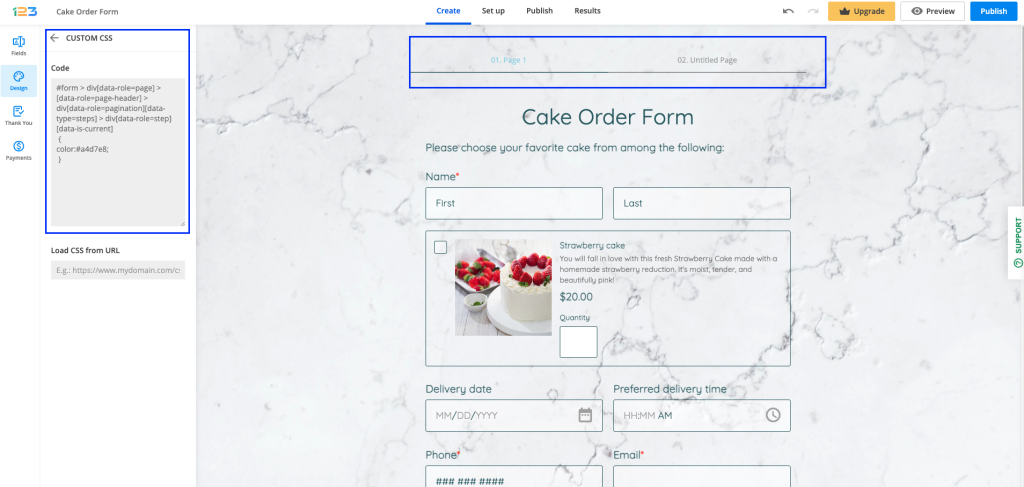
3. Changing the text color
#form > div[data-role=page] > [data-role=page-header] > div[data-role=pagination][data-type=steps] > div[data-role=step][data-is-current]
 {
color:#a4d7e8;
 }
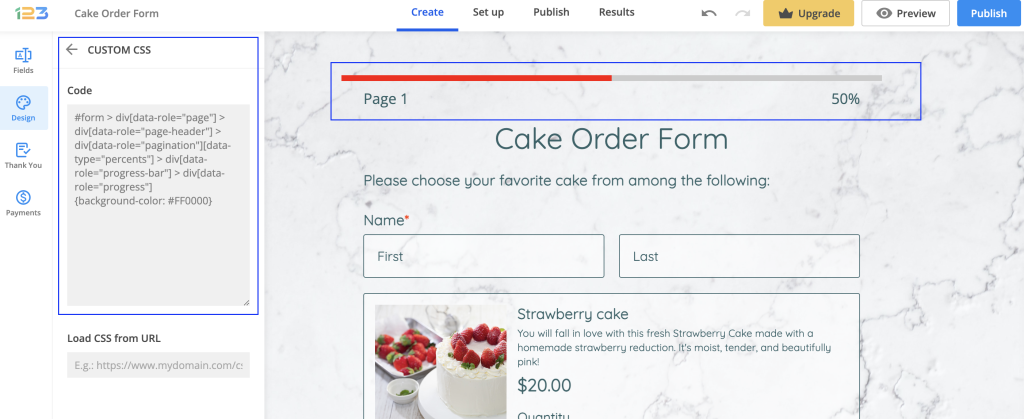
4. Changing the progress bar color
#form > div[data-role="page"] > div[data-role="page-header"] > div[data-role="pagination"][data-type="percents"] > div[data-role="progress-bar"] > div[data-role="progress"]
{background-color: #FF0000}
To learn more about multi-page forms you can also check out our tutorial here:
Related articles
One way to make your form more user-friendly is to divide the form into several sections, giving it more structure and making it easier for respondents to fill in.
Divider field
The easiest way to add a divider/separator to your form is to search for the Divider field.
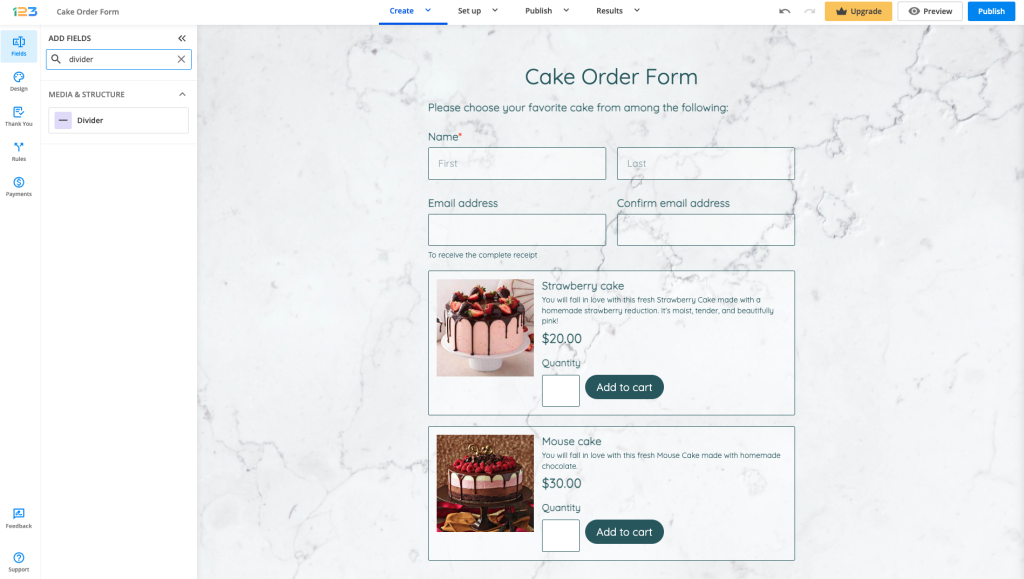
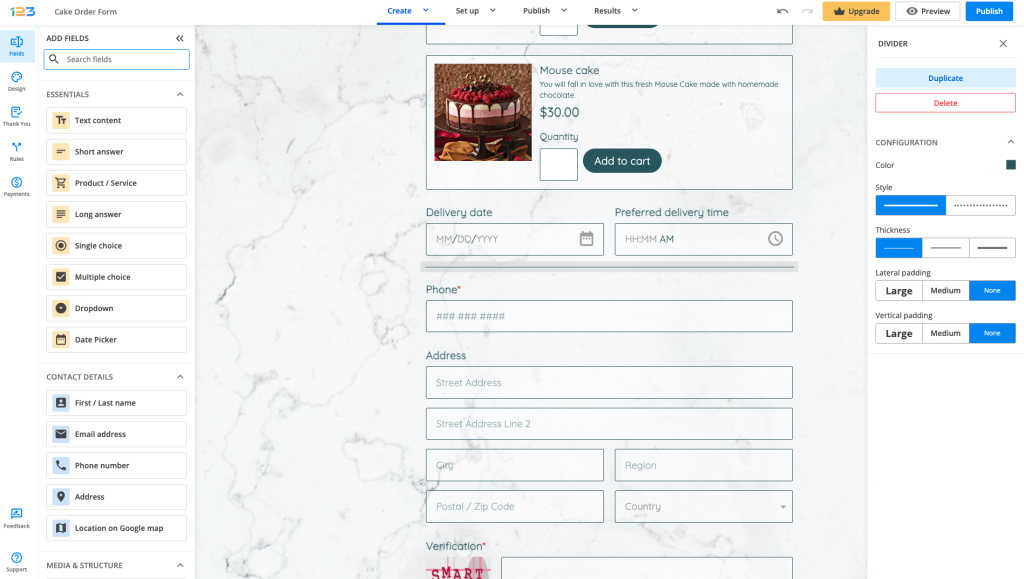
Once added to the form, on the right side panel you will see all the settings you can apply to it. You can change the color, and style (continuous line or dotted line), choose the thickness, and select the padding that suits your form.
HTML block field
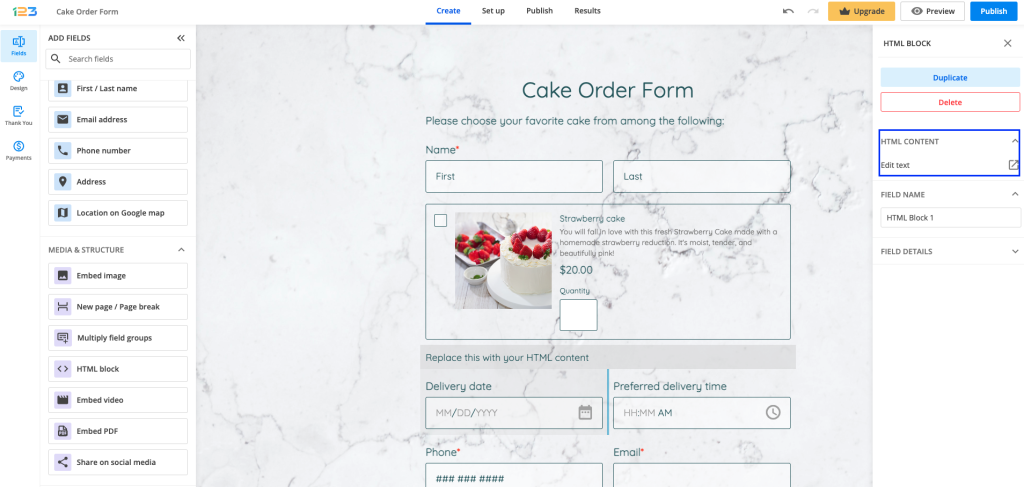
Before we created the Divider field, the old way of adding a divider/separator was by using the HTML block field.
With this method, once you add the HTML block field to your form, go to HTML CONTENT on the right-side panel and select Edit text.
You can remove or replace the default text. By clicking the + sign, you will find several options. Select Horizontal line to add a separator under the text in your HTML block.
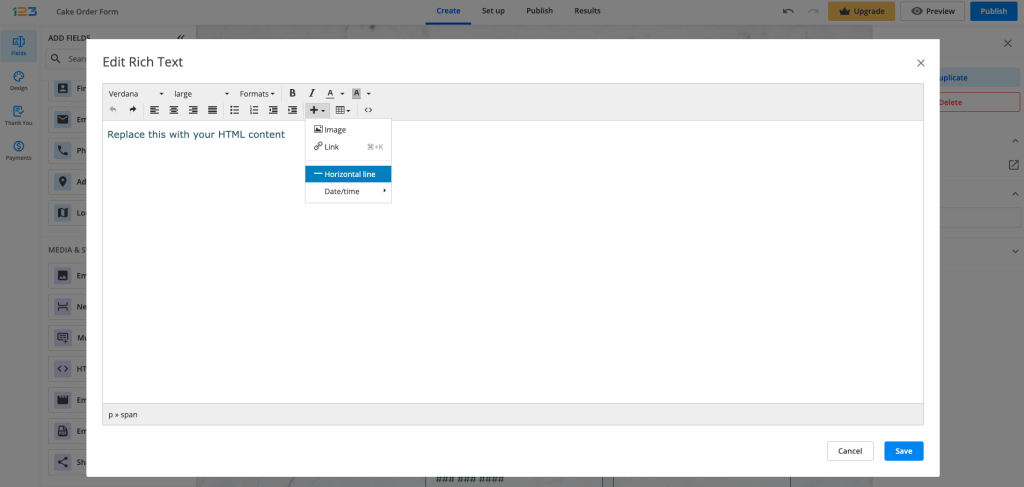
Click the Save button and there you go, you’ve just created a section in your form!
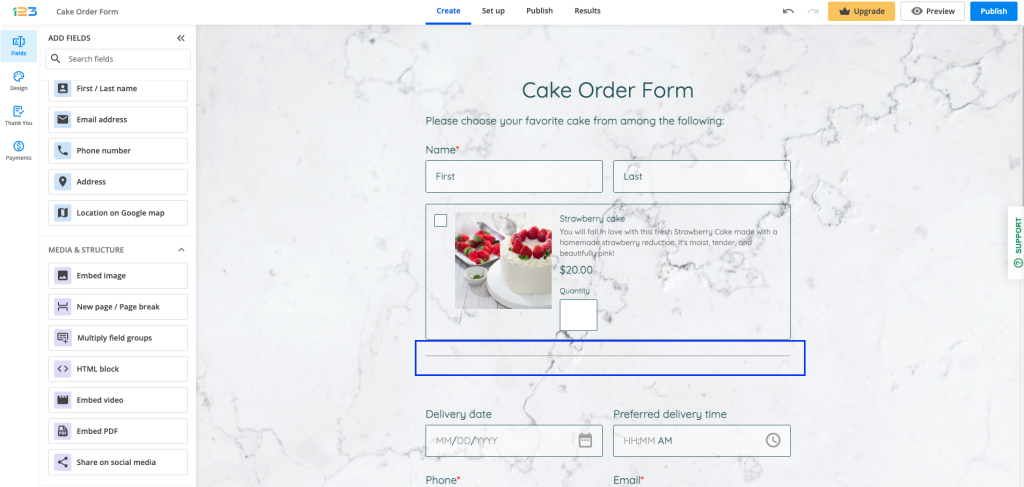
For more complex forms, take a few moments to analyze the structure of the form. Headings should be short and on point. Improve readability and comprehension by using white space in your form’s design.
Form users will identify the main points of each section more easily and focus on the key concepts of the form.
If you need to collect a considerable amount of data from your form visitors, you might also consider creating a multi-page form.
Related articles
Our form builder platform is available in the following languages:
- English
- Spanish
- Portuguese
- Russian
- French
- Dutch
- German
First, sign in and then click on your username. From the dropdown list click Language and choose your preferred language.
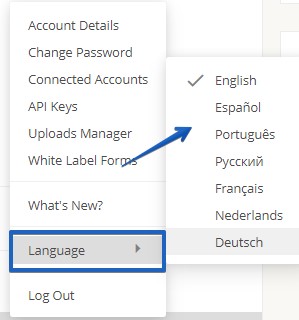
The changes will apply as soon as you select it. Now all your new forms will be created with the new language. Keep in mind this will not influence old forms, only the new ones created.
If your language is not listed, rest assured that we continue to work on supporting more languages for our platform.
The single-page form is great, however, for longer forms, it’s best to create multipage forms. Divide your forms into sections and this way users will not be intimidated by endless forms.
Having a multipage form is recommended for longer forms so that your respondents can stay focused and fill it in. However, if you decide to remove the multiple pages, here is how you can do it.
Removing a page
In the Form Editor, in the space between two pages, you will find an options bar with several tools to manage your pages. The options bar contains the page indicator for each page of your form, an Add page button, a Merge pages icon to combine the 2 pages, and directional arrows to move the page up or down the form.
Click on the Merge pages icon and voila! Your pages have been merged and now you have a one single page form.
If you combine them by mistake, drag and drop a New page / Page break field in the same place.
Related articles
If you want to help your respondents in filling out the form, you can make their job easier by adding a custom prefix in a field. This feature works only with Short answer field, Number field and Formula field.
Let’s take Number as an example. Select the field and in the left side panel, under Options section, you will find Add prefix inside the field. Once this is clicked, an additional text box appears where you can type in what prefix you want to be shown in the field. By default, it will be USD, but you can change it as you want.
Just keep in mind that the maximum length is 4 characters. It can be a combination of letters, digits, and special characters.
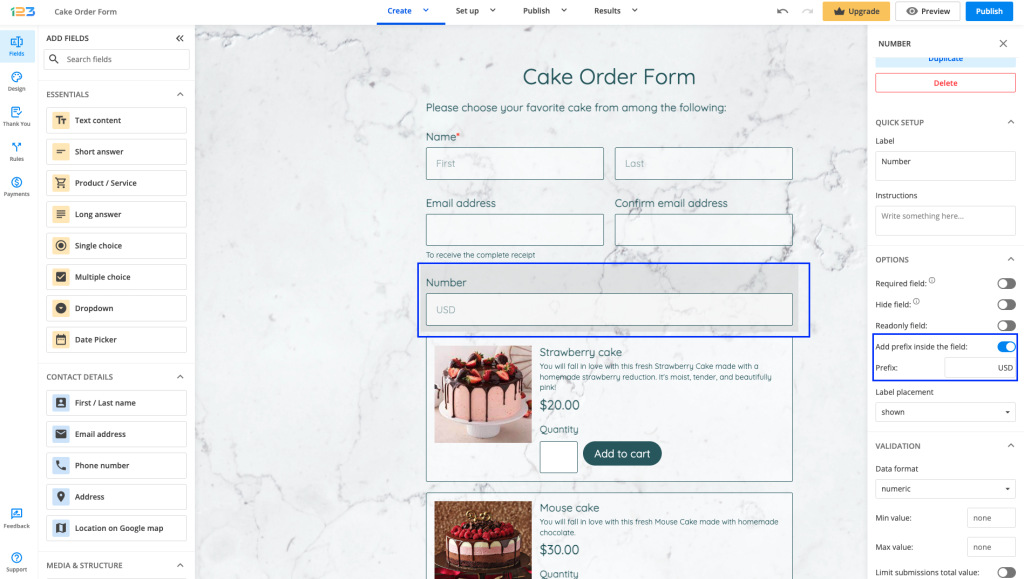
Each prefix is applied to a single field and influences only that field. In the Submissions Table, the prefix will be displayed in the label.
Related articles
When you enable certain settings on your form, it returns an error message that displays an image. In this article we will illustrate how to replace this image with custom CSS:
This image appears when you have enabled certain options such as country filter, IP limitations, accessibility of the form.
First, access your form builder account, select the form, and go to the Design section. Next, click on the Add custom CSS button. Here you can create and place all your CSS codes to stylize the form.
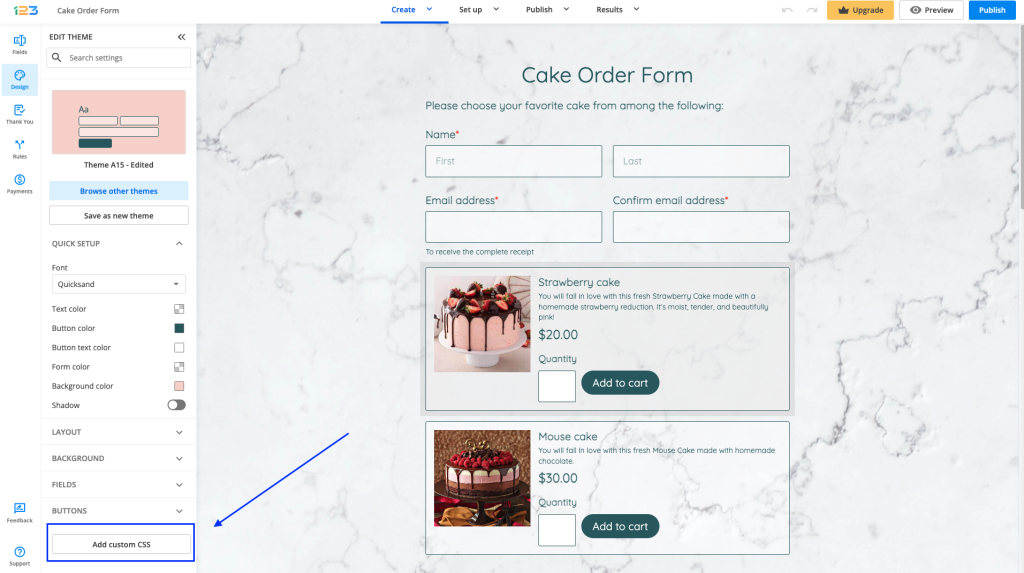
Here is the CSS code you need to use:
#error-img
{
content: url(https://cdn-main.123contactform.com/images3/logos/123-36px.png)!important;
}
Replace the URL with your own hosted image link and you’re done!
The interest in Americans with Disabilities Act (ADA) Standards for Accessible Design increased in the last few years. More and more companies are looking to have accessible websites for individuals with various disabilities or impairments.
123FormBuilder accommodates those who have hearing impairments or learning, cognitive, and other disabilities. Therefore, we developed accessible forms that are easy to use and navigate.
How to enable accessibility features on your form?
Open your web form, go to Set up -> Advanced, and switch to the Form tab.
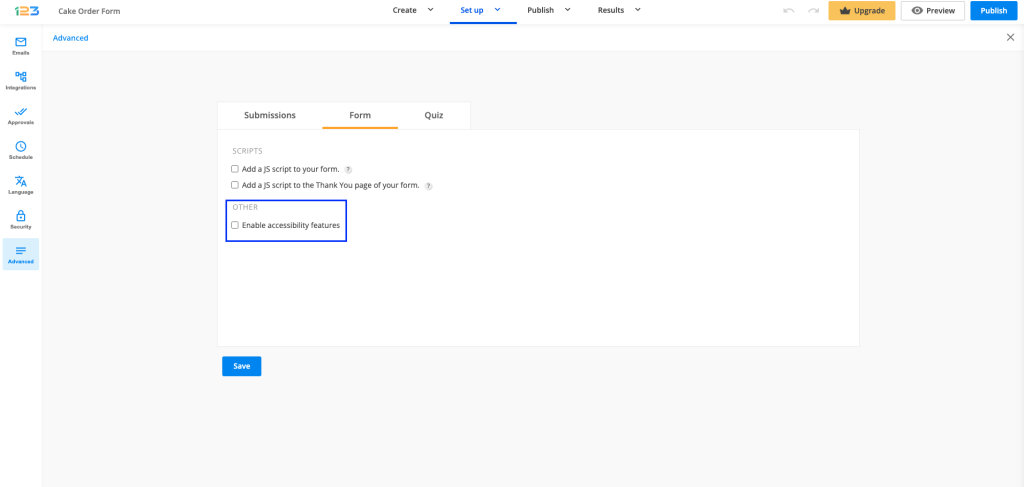
In the Other subsection, you will find the option to Enable accessibility features.
It is important to mention that the Autofocus option from the forms Publish -> Embed form section conflicts with the accessibility feature. The first one highlights the first input field. If your form has text above the first field, people with visual impairments will not be able to read it.
How users interact with the form
Users need the NVDA tool installed on their devices. Our forms are ADA compliant only with Mozilla Firefox. By pressing Tab on their keyboard they will navigate through each form element.
Here are some suggestions to make your forms more accessible:
- Keep the form organized.
- Avoid multi-page forms.
- Add alt text to your images.
- Avoid placing the label inside the field. It’s not recommended to use our Name and Address fields. Add Short text fields or Long text fields instead. Long text fields can assist users with limited dexterity.
- Embed videos should have captions.
- Choose the best contrast colors.
- Adopt a simple design.
- Improve readability and comprehension by using white space and heading fields.
- Screen readers will check the headings in the order of their size, not in the order they have been placed on the form. Therefore, make sure to use the appropriate headings in the appropriate order.
Error prevention (for legal and financial forms)
On forms used for legal commitments or financial transactions, for the forms to be ADA compliant, you must ensure that the user can review and reverse their submissions.
Here are a few ways that can help you do so:
1. Allow respondents to edit delivered submissions at a later time. You can enable this feature from the forms Set up -> Advanced -> Submissions tab.
With this feature enabled, users will receive a link via email which they can use to make changes to the data they have submitted.
2. Allow respondents to preview the submission summary before sending the form. This feature can be found in the same section mentioned above.
3. Add a checkbox before the Submit button. Users will need to select the checkbox to confirm that they have reviewed their input and agree to the legal commitment or transaction that is about to take place.
You can use the Terms of Service field with an agreement text such as “I confirm that the input is correct and I am ready to submit”.
When you first access the Reports section for a form in our form builder, you see the default report, that contains all form fields, shown in pie charts, in the order that they appear in your form. However, there are four types of reports that you can create:
- Chart
- Data Table
- Number
- Text
In this article, you will learn how to use the Number widget. This report type allows you to create various functions between the numeric inputs from your submissions section. For example the average age of your form users, how much money you have received through the whole form, the number of people registering to an event, etc.
To get started, click on the New Report button and name your report. Next, choose the Number widget.
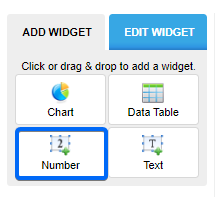
Once clicked, you will see the report’s options in the left-side panel.
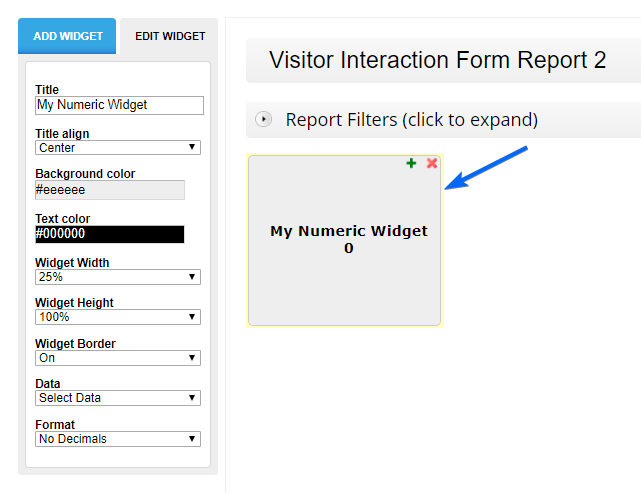
You will notice that there are several options available for customizing your reports. We will focus more on what you can calculate. Keep in mind that you can use this widget only with Number fields.
Field Inputs
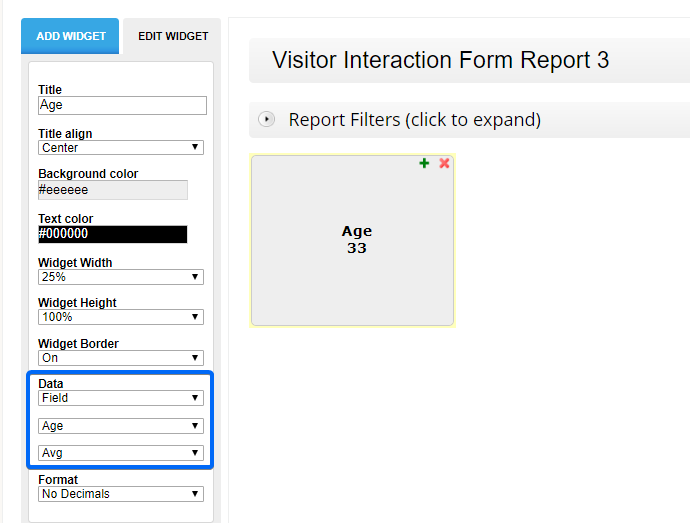
Navigate to Data and choose the Field option. Next, select your number field.
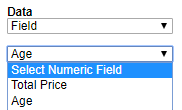
In the next step choose the function you need in the report:
- Count
- Max – show the maximum number
- Min – show the minimum number
- Sum – total the numeric inputs
- Avg – calculate the average number
- Median – compute the middle number of a set of data
- Std – measure how spread out numbers are
In the example below, we calculated the average age of form users.
Form Stats
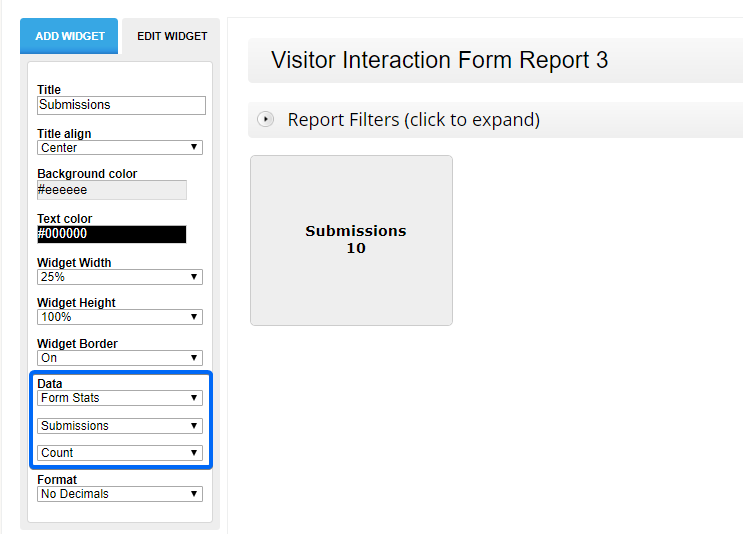
Navigate to Data and choose the Form Stats option. In the next step select Submissions from the dropdown list. This will count how many entry submissions you currently have collected.
Related articles
A Likert scale field is a rating system used in survey forms that aim to measure people’s attitudes, opinions, or impressions. Form users are asked to rate your statements thus helping you to analyze data and create statistics. This rating service is more useful than a simple Yes/No question.
Looking for a rating system that fits your form building needs? Then use our Likert scale creator.
Likert scales
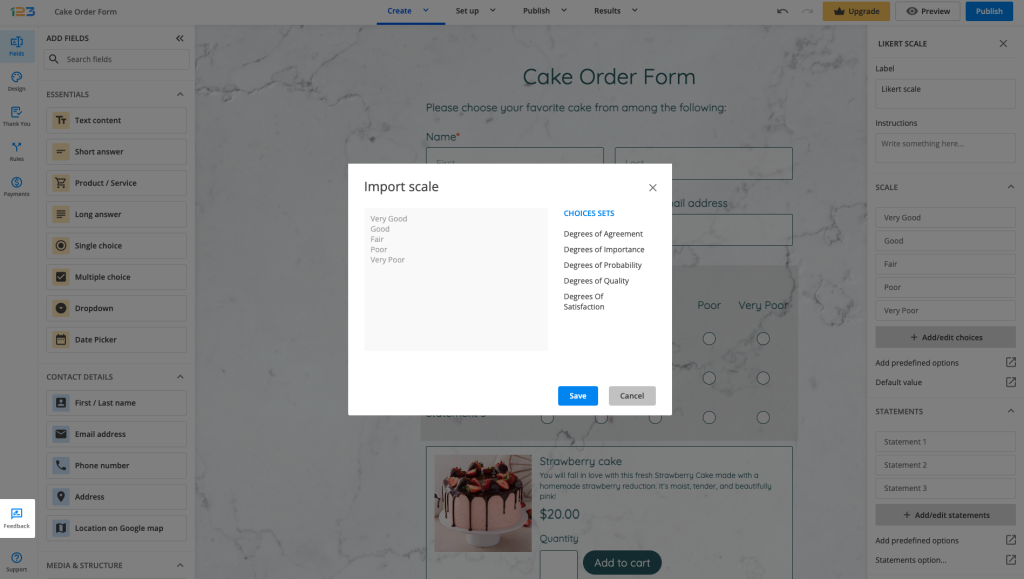
In our form builder, in the Scale section of your field, you can measure the frequency, quality, importance, level of satisfaction of certain statements, and many others. In the left side panel you will find Add predefined options. Here we listed sets of choices that you can choose from:
- Degrees of Agreement
- Degrees of Importance
- Degrees of Probability
- Degrees of Quality
- Degrees Of Satisfaction
You can opt to add your own choices. There is no limit, however, most of the time only between 5 or 7 response options are used.
Likert statements
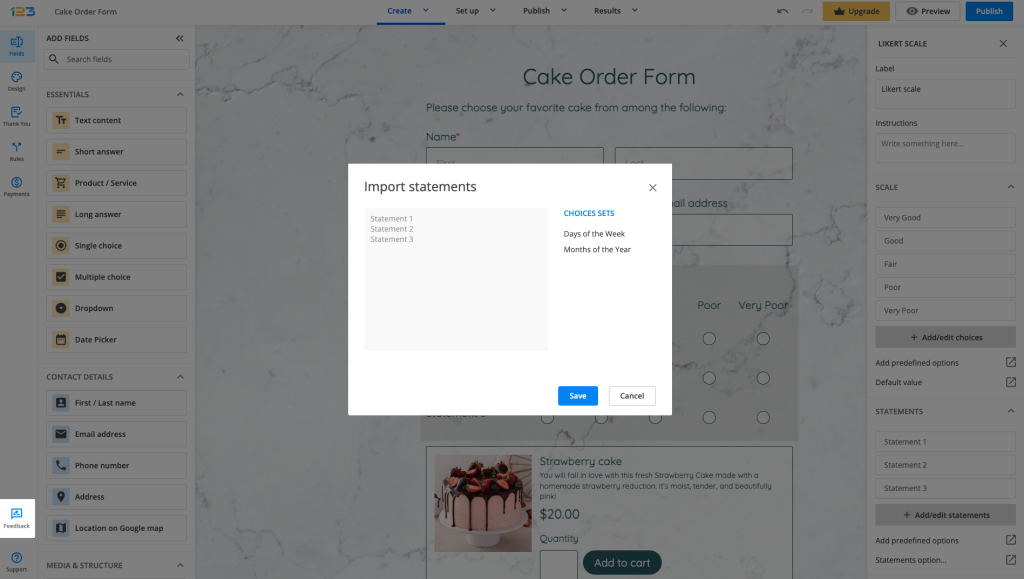
Here you type the topics that will be measured using the scale. Find out the respondent’s option of the quality and efficiency of your products/services. Receive feedback regarding areas that can improve your business.
In the left side panel, under Statements section, you can find each default statement that can be renamed or you can choose to Add predefined options:
- days of the week
- months of the years
Most Popular
Frequently Asked Questions
Here is a list of the most frequently asked questions. For more FAQs, please browse through the FAQs page.

