123FormBuilder Knowledge Base
Search our documentation platform for answers, service specifications and 3rd-party integrations.
Knowledge Base
To learn how to create an online quiz you can also check out our tutorial:
Test your respondents’ knowledge using our online quiz maker.
With 123FormBuilder, you can predefine correct answers by selecting the desired field and on the right side panel you will find Quiz options.
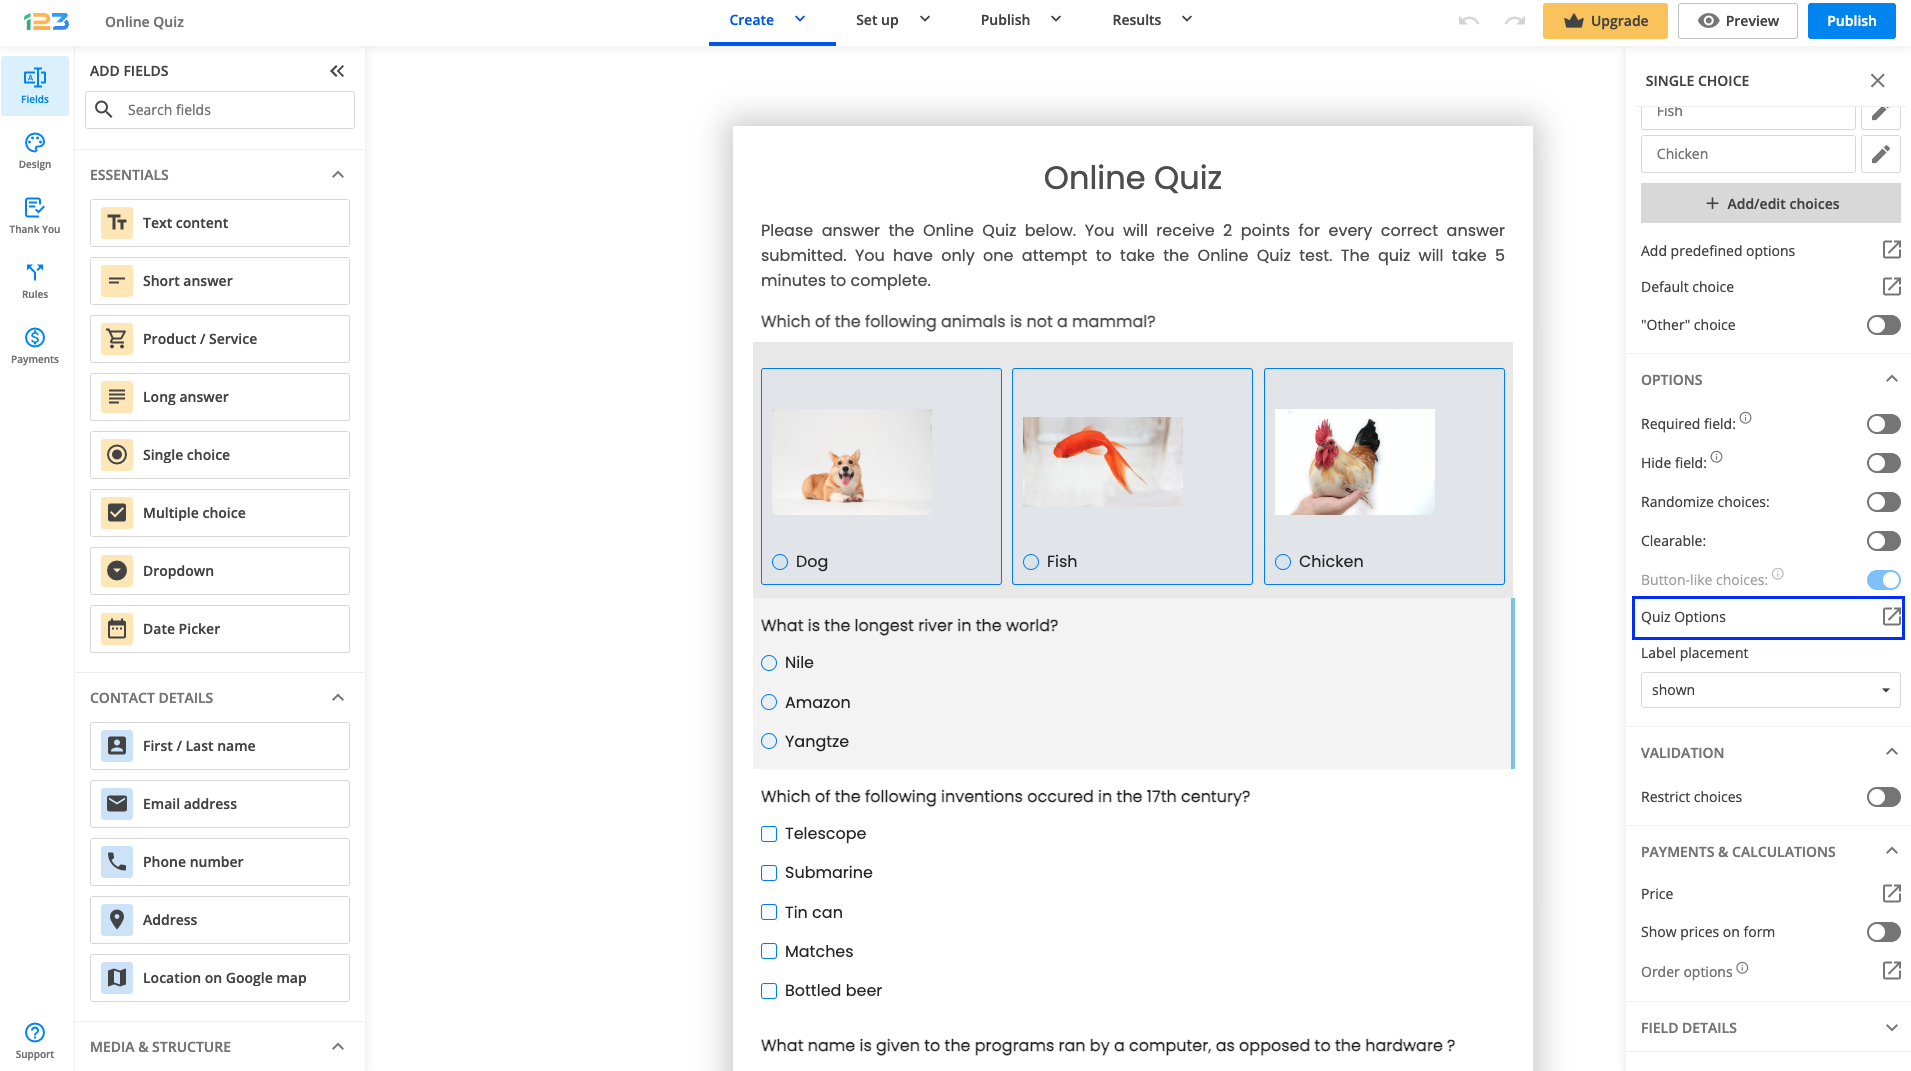
Here you can select which answering option is the correct one and assign points to it.
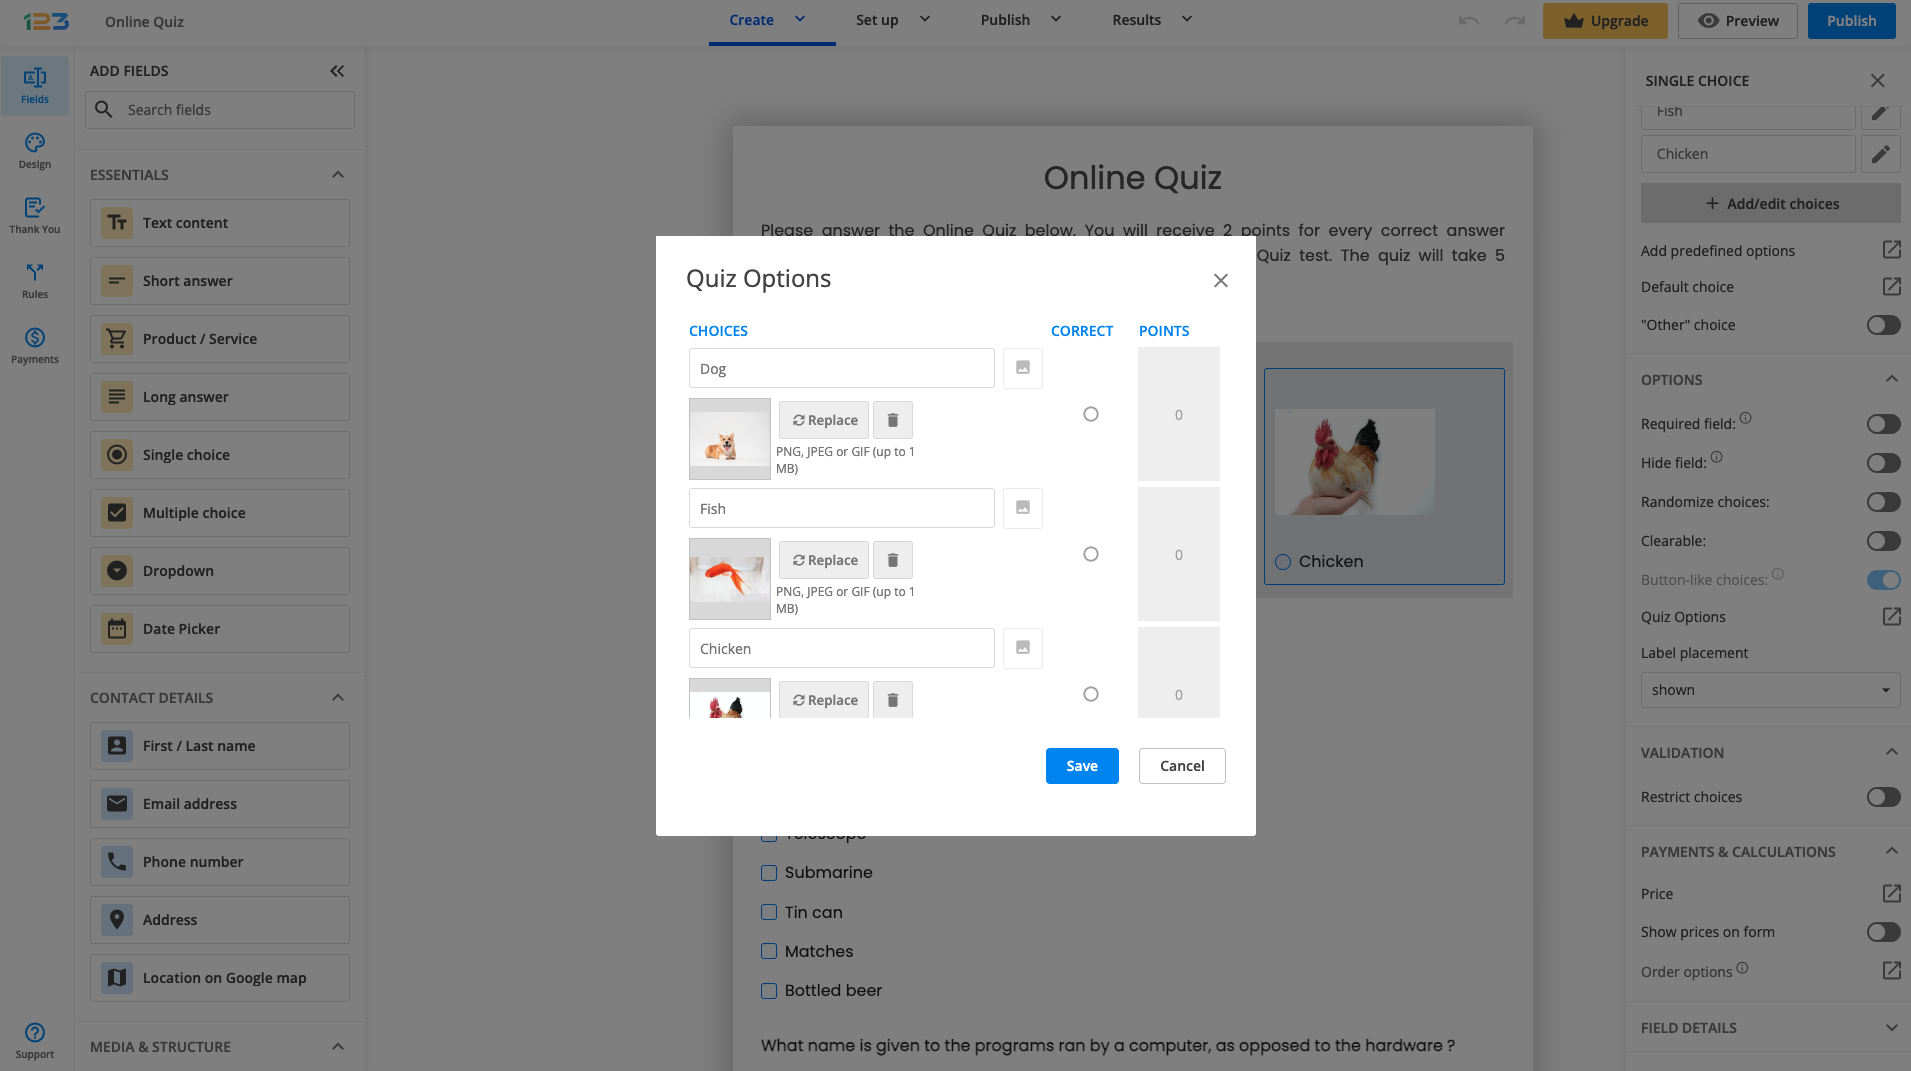
The fields that support Quiz options are Dropdowns, Single choice fields, and Multiple choice fields. You can even use images as choices on your Online Quiz Form.
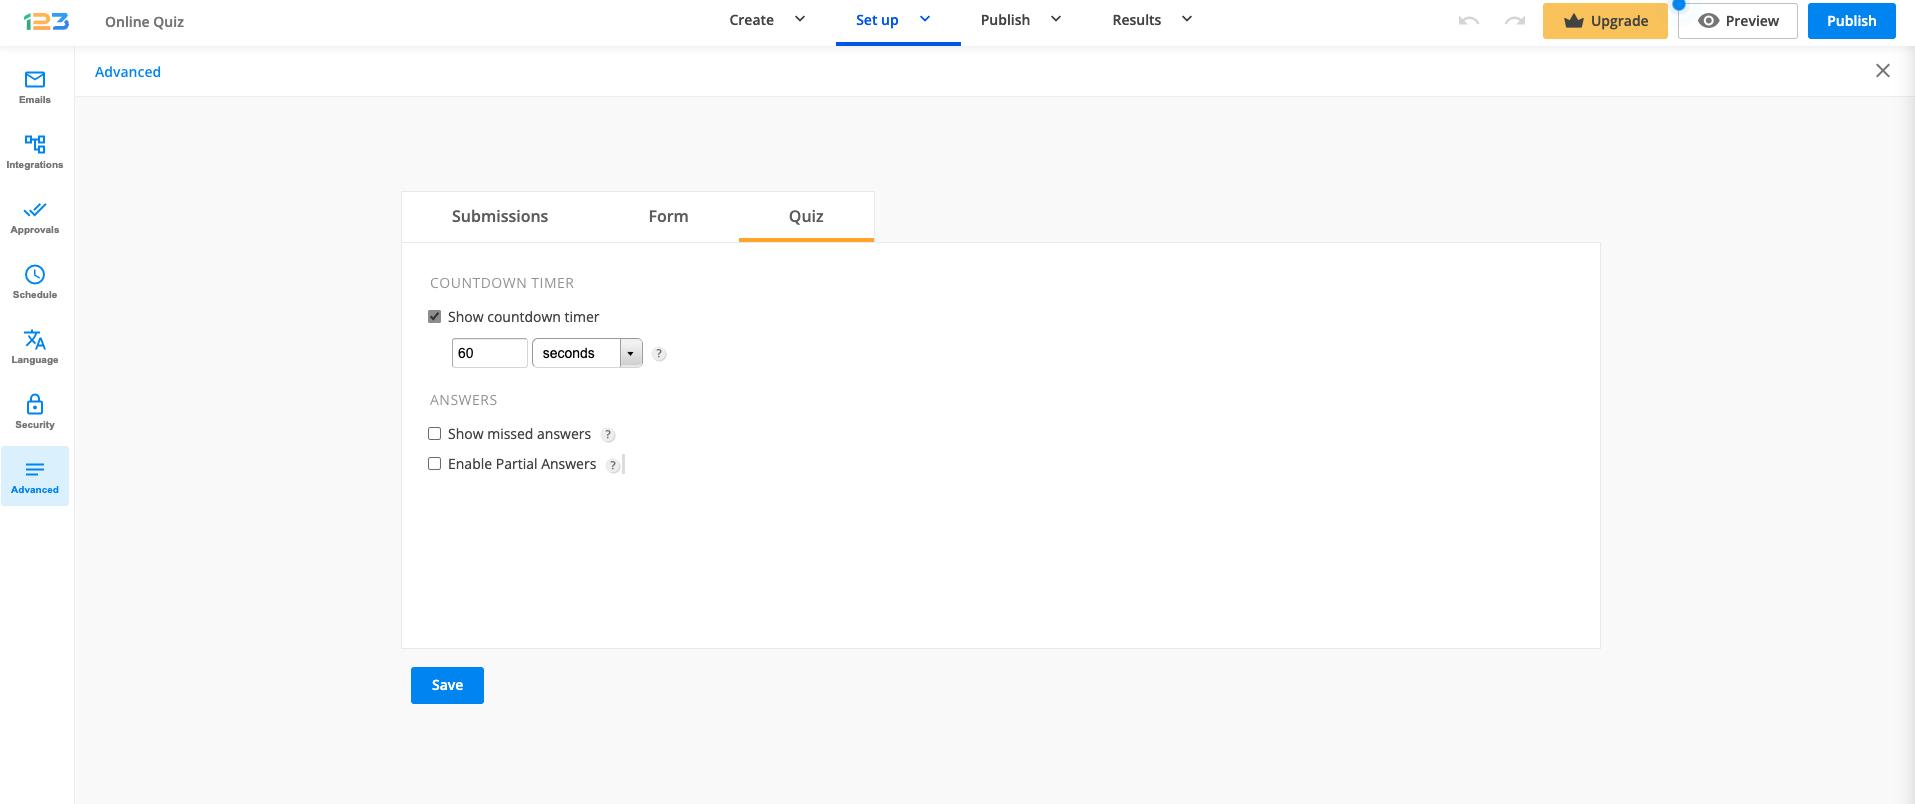
Furthermore, you can add a Countdown Timer to your form and include partial answers with or without deduction to calculate the percentage of correct answers. Upon submission, users can view their results, view the answers they’ve missed, or receive their results by email.
To enable the Countdown Timer, show missed answers and partial answers, access the forms Advanced → Quiz section.
Additionally, to send the quiz results via email to your form respondents, visit the Emails section. When setting up the email notification, all you have to do is to select the Quiz template, as shown below:

If you wish to Show Quiz Results, go to the Thank You section. After selecting Show Quiz Results, you can customise the message that is going to be shown to your respondents.
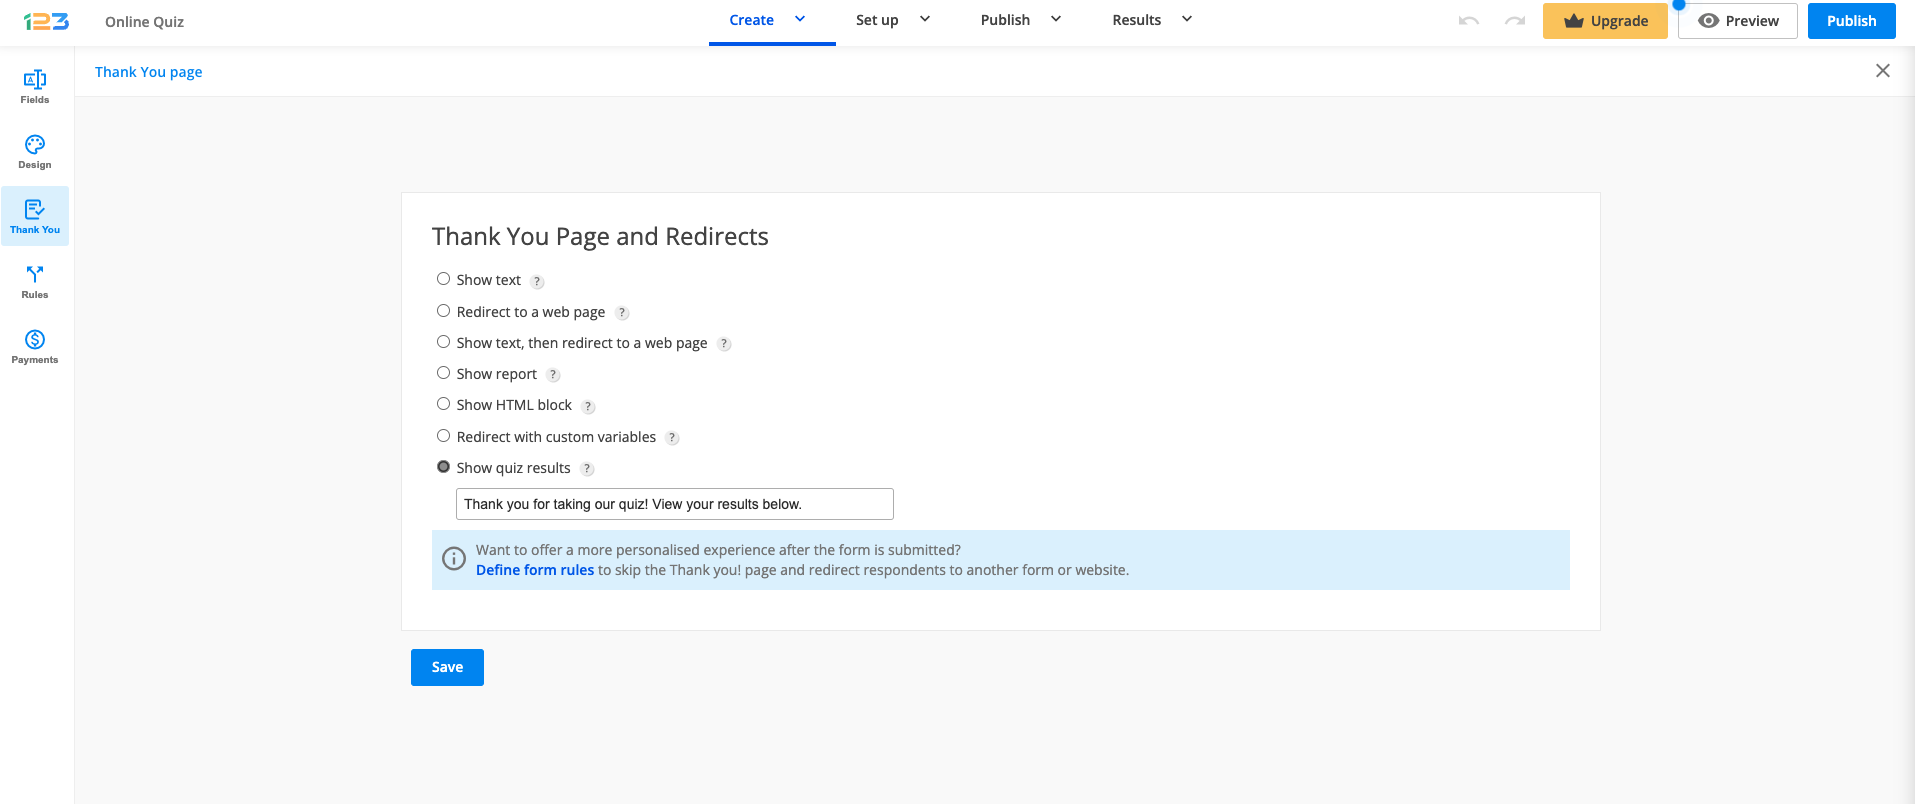
Please note that quiz results cannot currently be displayed on the new Thank You page. We are working on adding this feature soon.
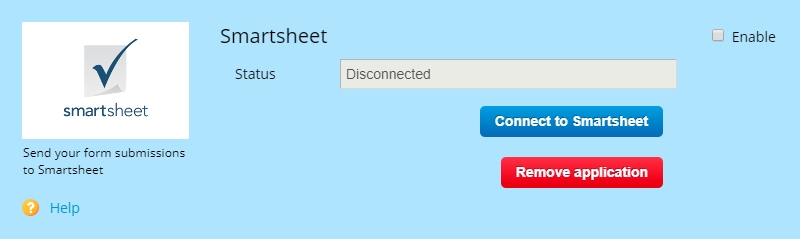
Smartsheet integration allows you to send form submissions to a document. All submissions for one form will appear in the same file. You can add this application by going to Integrations and searh for Smartsheet using the search bar. Press Connect to activate the integration for your web form.
You’ll be redirected to a separate page where you’ll need to enter your Smartsheet account credentials (if not already logged in on the same browser).
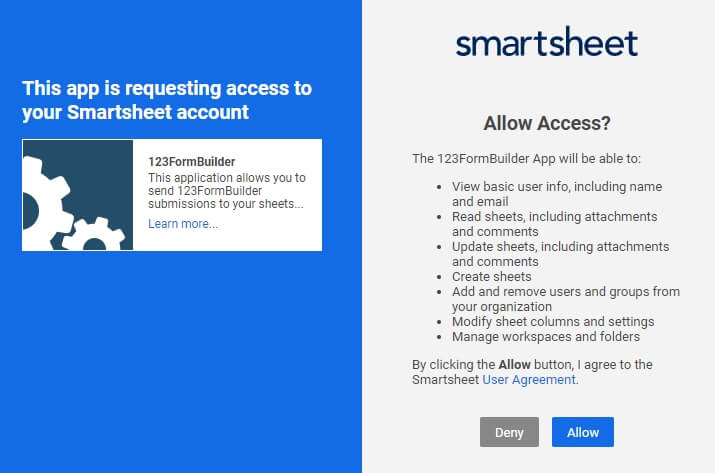
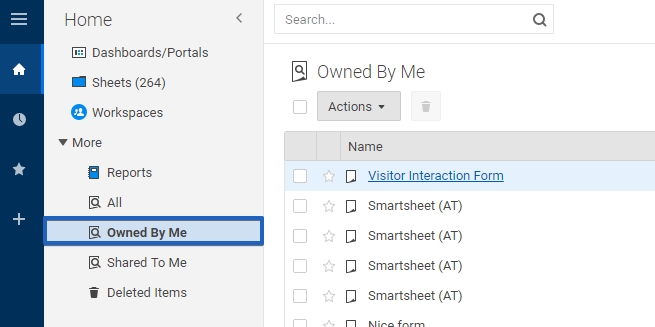
In the end, click on Allow to let your two accounts communicate. When you check your Smartsheet account after submissions were made, you will see that you’ve got a new document with the name of your form showing each submission’s input on one row (the newest submission is the top row). You can locate it in the Home tab, under the Owned by me category. Open the document to see your submissions added to the content.
Note: Uploaded files through your online form will be sent as download links in a column with the name of the File Upload label. They will not be added in the Attachments column from Smartsheet. Once you have clicked the link, the download will start automatically.

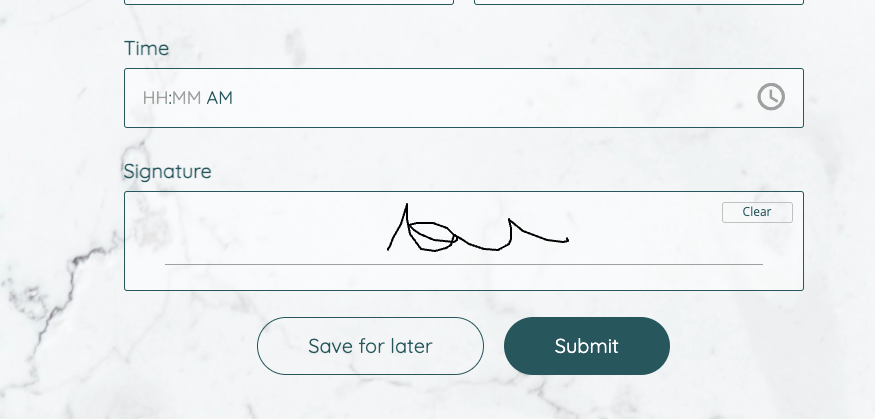
123FormBuilder gives you the ability to create electronic forms of any kind and add electronic signatures to them. Use the Signature field to get an electronic equivalent of the handwritten signature from your respondents. Now you can close deals with your partners online, without having to arrange a meeting for this purpose only.

Once the Signature field has been added to the form, in the right side panel you will find different customizations that you can apply to it.
Below you can find the major functionalities of the Signature field and how you can put them into use:
Signature box size
The Signature field size can be adjusted to fit the layout and design needs of your form. By default, the Signature field is set to Small. You can choose from two additional sizes: Medium and Large from the Signature box size option on the right-side panel.

Signature complexity
Under the Validation section, you can set the Signature complexity to extra-low, low, medium, or high. Use this option to avoid receiving overly simplified shapes, such as a bare line, instead of signatures. High complexity requires at least one letter for most cases.

Clear
Once respondents have interacted with the Signature field, a Clear button will appear in the bottom right corner so they can erase the signature and try again.
Electronic signature and Email Templates
If you choose to receive email notifications for each submission, the Signature will be sent over as an embedded image. If you select the plain text template, then the Signature field will be sent as a Yes/No answer (meaning if the form was signed or not).
Electronic signature and Submissions
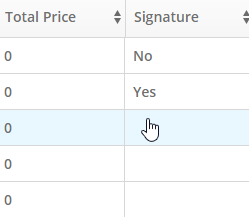
In the Submissions table, the Signature appears as YES/NO (meaning the form is signed or not signed).
Editing the Form Submissions
As a form owner, if you edit a submission containing a signature, the signature is cleared. We have implemented this security feature to protect the signatures provided by form users.
We are also compliant with the UETA and ESIGN Acts when it comes to using the Digital Signature field on your forms.
Important Note
We recommend checking with your legal counsel in order to ensure that the electronic signature will be accepted for your purposes.Collect payments through PayU order forms! Build your custom order forms with 123FormBuilder and integrate them with PayU, one of the most popular payment processors in Eastern Europe.
PayU is available in 10 countries. For the moment, based on the requests coming from our users, we have integrated our service with PayU Romania.
Setting up PayU integration
1. Click New Form from your account dashboard and start creating your payment form.
You can use choice fields (single/multiple choice and dropdown lists) to display the products on sale or, even better, Product field.
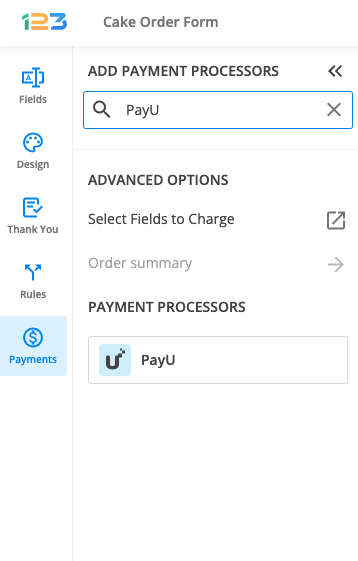
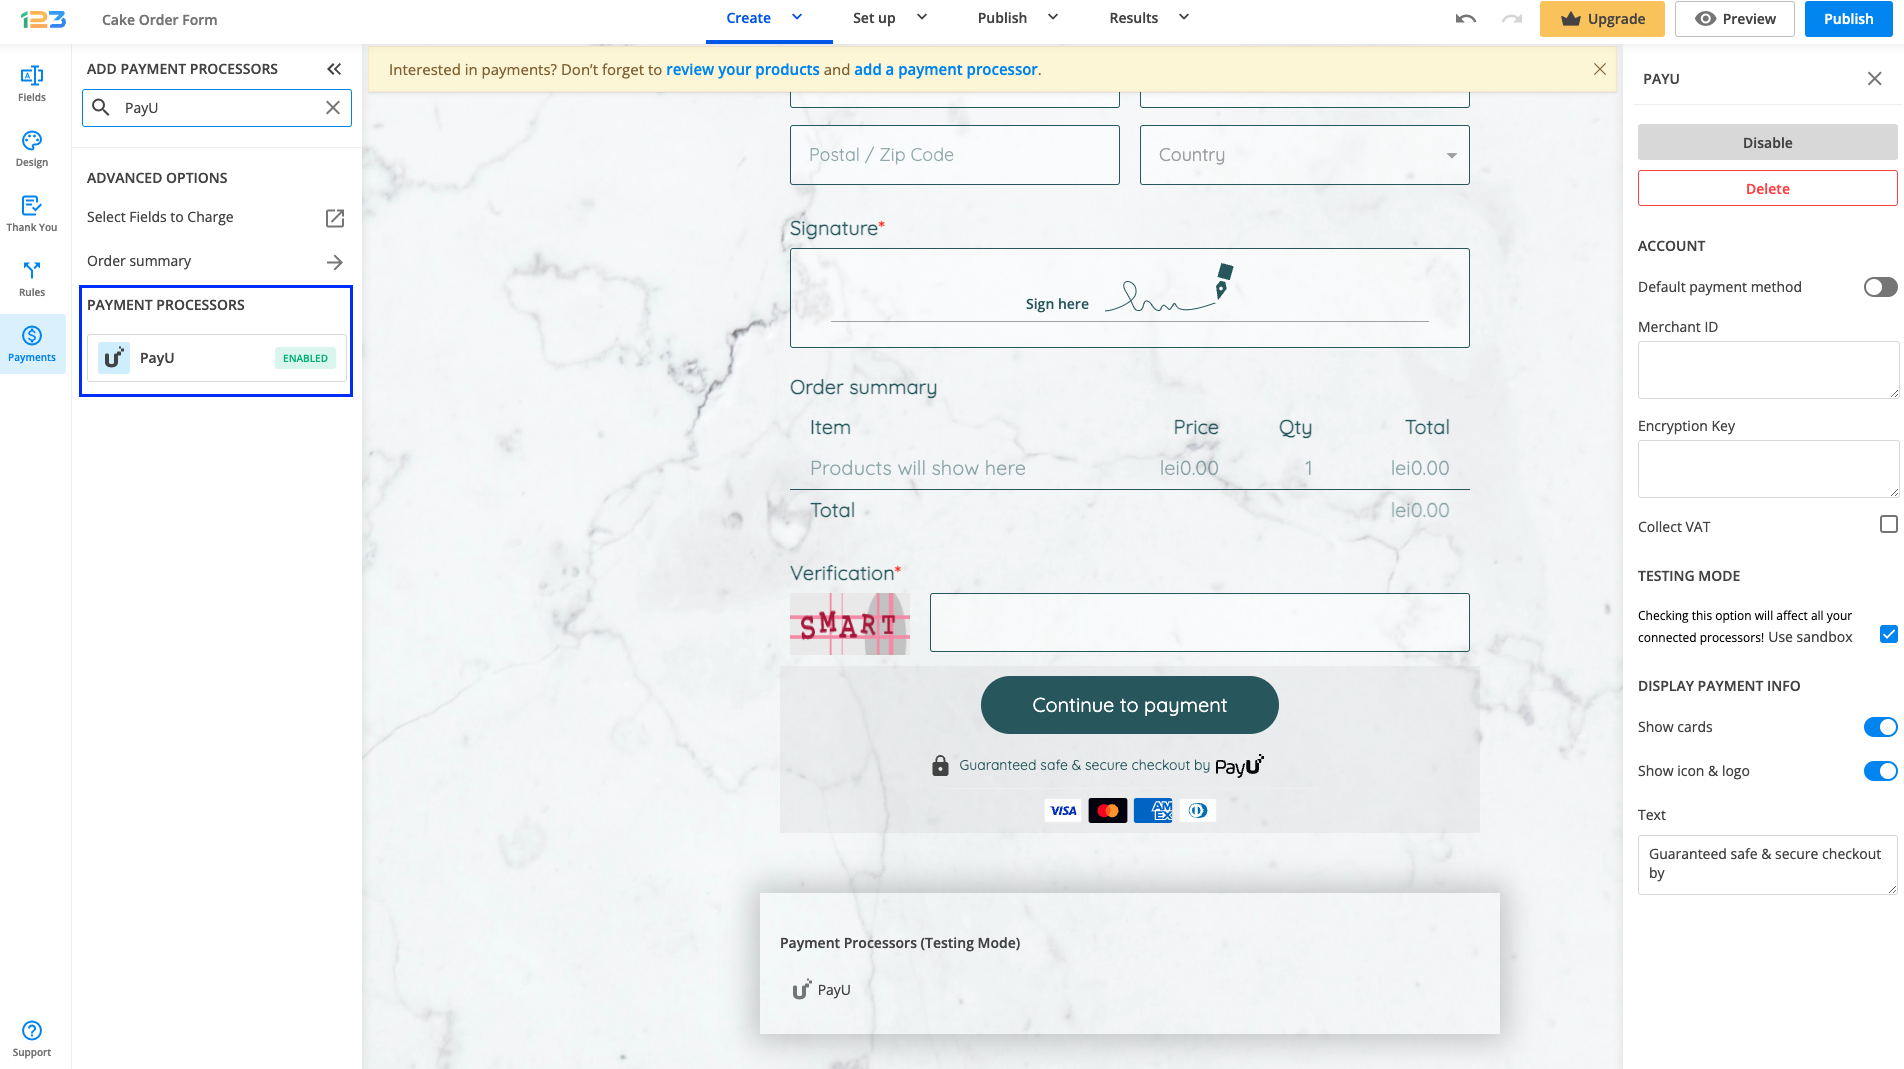
2. In your Form Editor, in the left side panel, you will notice the Payments section. By using the search bar, you can quickly find PayU.
3. After adding PayU on your form, you will notice a couple of changes: the PayU payment processor has a tag near its name & the settings panel opens up to the right side of the page.
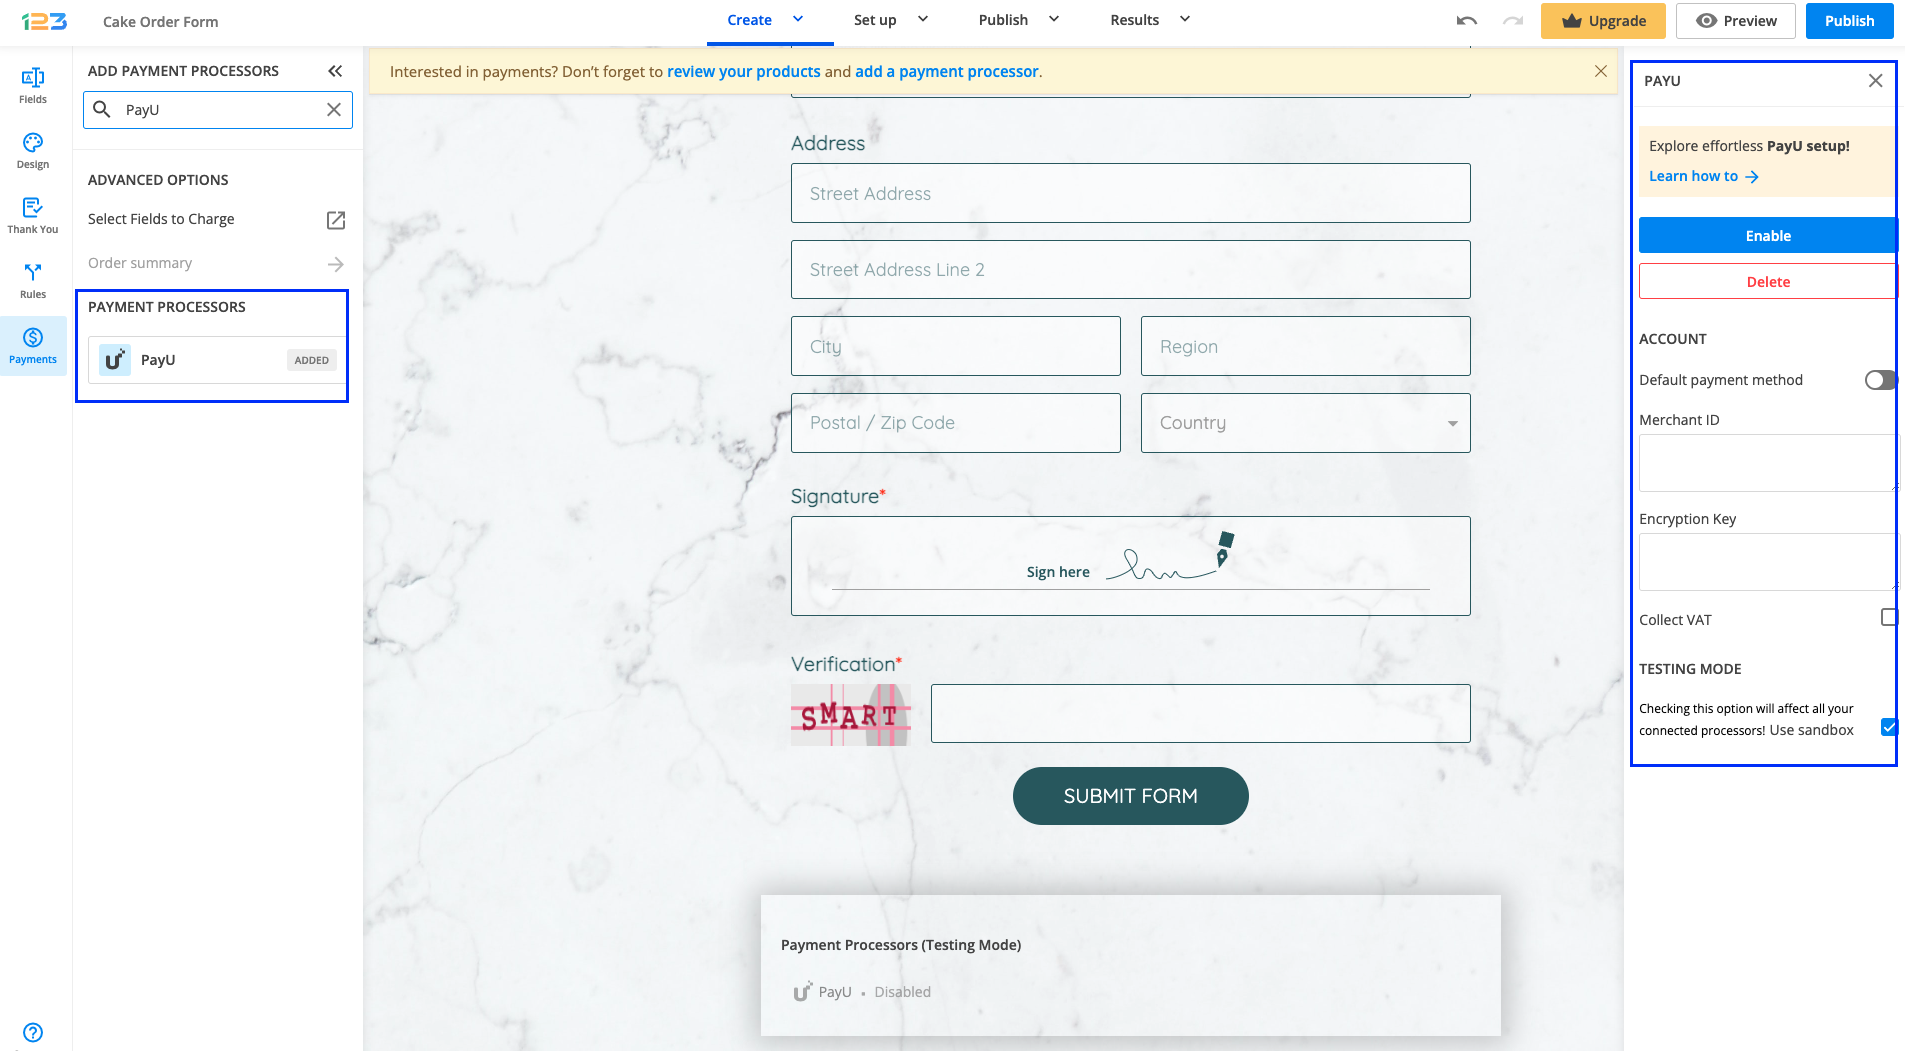
4. In order to set up the PayU integration, you have to provide your Merchant ID and Encryption Key.
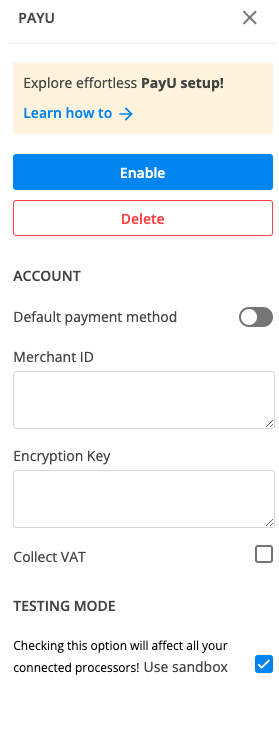
5. Enable the payment integration by clicking on Enable button. By enabling PayU, you will notice a couple of changes on your form.
The PayU payment processor on the left side panel has an Enabled tag on it so you could easily scan which payment processor is enabled.
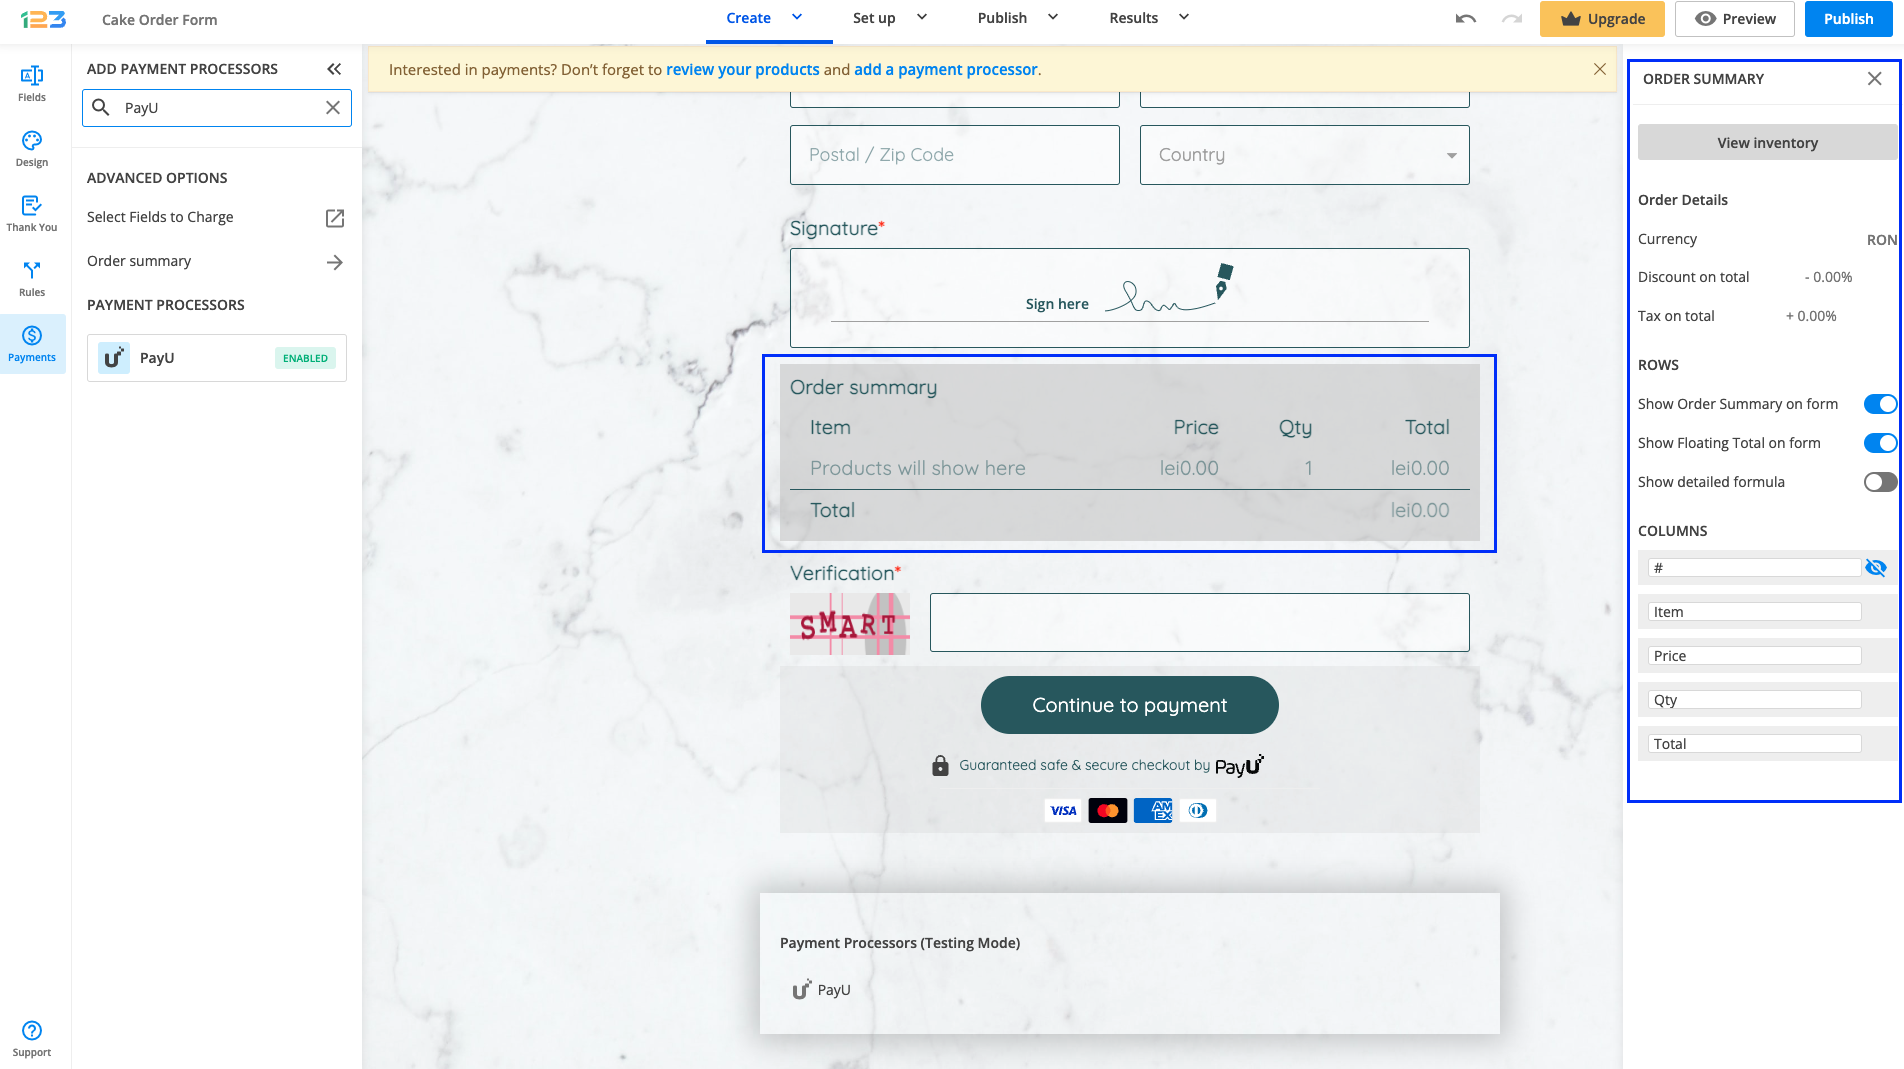
Another change is that on your form it will be displayed an Order summary. Here will appear all the products your respondents select on the form, together with the price per option, quantity and the total price. If you want to customize the order summary, all you have to do is click on it and the available settings appear on the right side panel.
Another change is related to the Submit button. Once your payment integration is enabled, the Submit button is changed to Continue to payment. Below it, we are displaying a disclaimer together with the PayU logo so that respondents are aware they are proceeding to a payment.
Also, the accepted cards by the PayU integration are visually displayed so that respondents know from the start what is the accepted payment method.
You can customize the action bar (everything that is related to the submit button, additional buttons, disclaimer, etc) by simply clicking on this area.
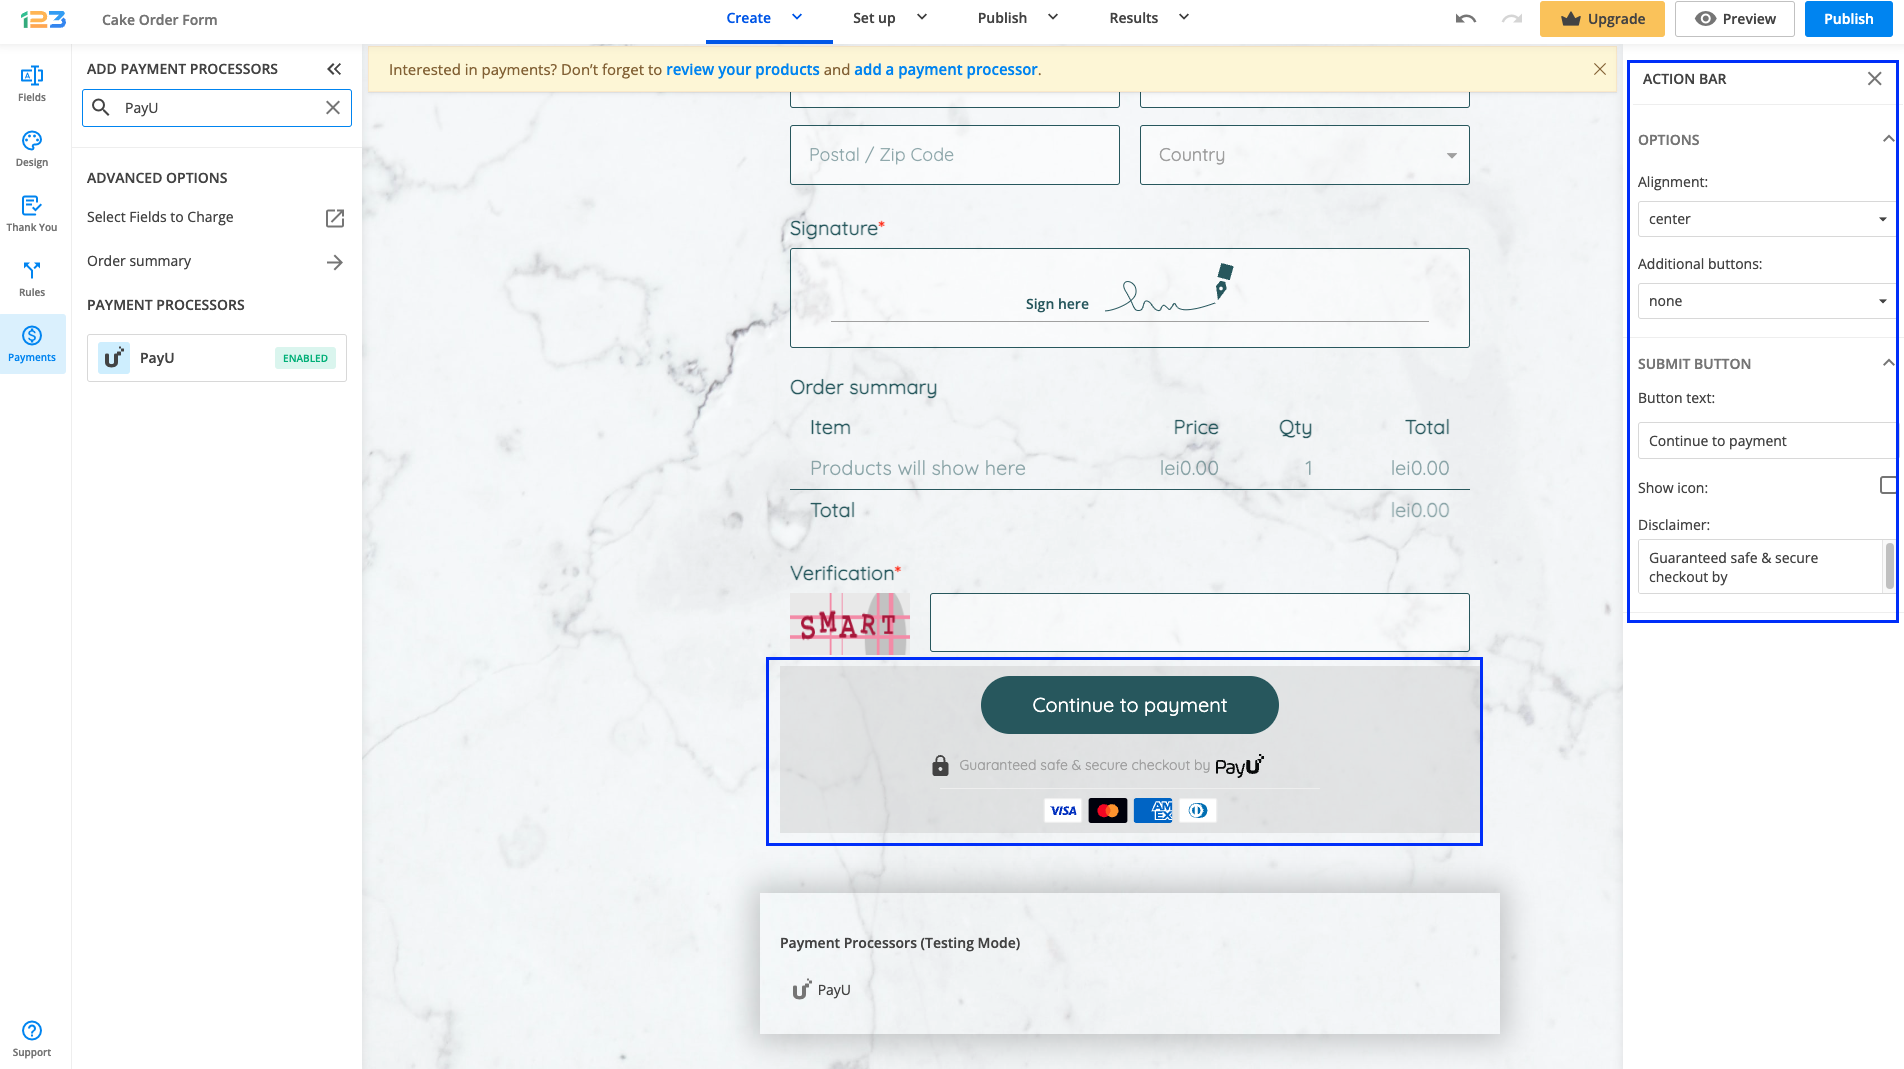
Another change that you might have noticed is that we are displaying a disclaimer text, together with the logo & icon of the payment processor and the accepted cards. By default, all these settings are enabled, but you can change them. All you have to do is click on the payment processor and go to Display payment info.

That’s it! Your order forms with PayU integration are very easy to build and configure. And don’t forget that they are entirely secure in our order form creator.
How to retrieve the Merchant ID and Encryption Key?
You can find them both in your PayU account. Log in and go to Account Management → Account Settings. Scroll down until you reach the Instant Payment Notification (IPN) section. The Vendor Code is your Merchant ID and the Key Coding is your Encryption Key.
Paste these two in the PayU integration on your form, click on Enable and you are all set up. After placing their orders, users will be redirected to PayU, to pay the amount calculated in the form.
Note that the currencies accepted for payment through this integration are USD, EUR, and RON.
If you do collect VAT, have a look at the VAT settings in your PayU account and select one of the three options available. They can be found in the Account Management → VAT Settings section.
You can choose to collect VAT from customers in your country, from customers in the European Union, or from all customers worldwide.
You can associate Salesforce custom fields with the fields in your form. Follow the simple steps below:
1. Create the custom fields in your Salesforce account. Watch Salesforce’s video tutorial on how to create Salesforce custom fields.
2. Go to your form builder account on 123FormBuilder and enable the Salesforce integration in the Integrations section.
3. Click on the Customize button and scroll to the bottom of the lightbox that shows up. Tick the checkbox that says I want to use custom fields. All your custom fields will appear below, on the left side.
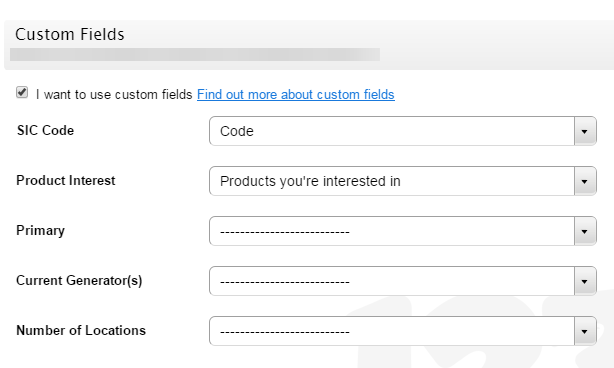
Use the drop-down lists on the right to associate your form fields with the Salesforce custom fields on the left.
Important Note! Custom fields are not the same as custom objects. A custom object can include one or more custom fields, but a custom object cannot be associated with a form field in the 123FormBuilder – Salesforce application settings.
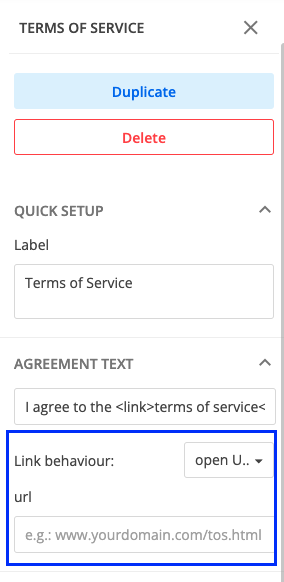
In order to request your respondents’ agreement, you can use the Terms of service field. Once you have added the Terms of service field on the form, in the right side panel you will find some customizations that you can bring to the field.
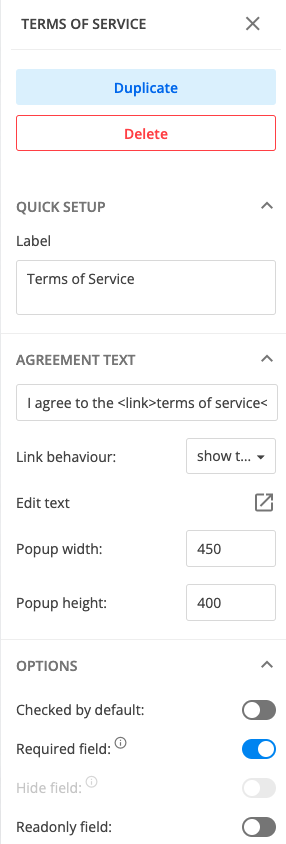
Agreement text
You can change the default text in order to match your needs. Don’t delete the HTML tags (link) from the Agreement Text section. It needs to have this structure < link > your text< /link > for it to function properly. If you copy this, make sure to delete the blank spaces.
Link behavior
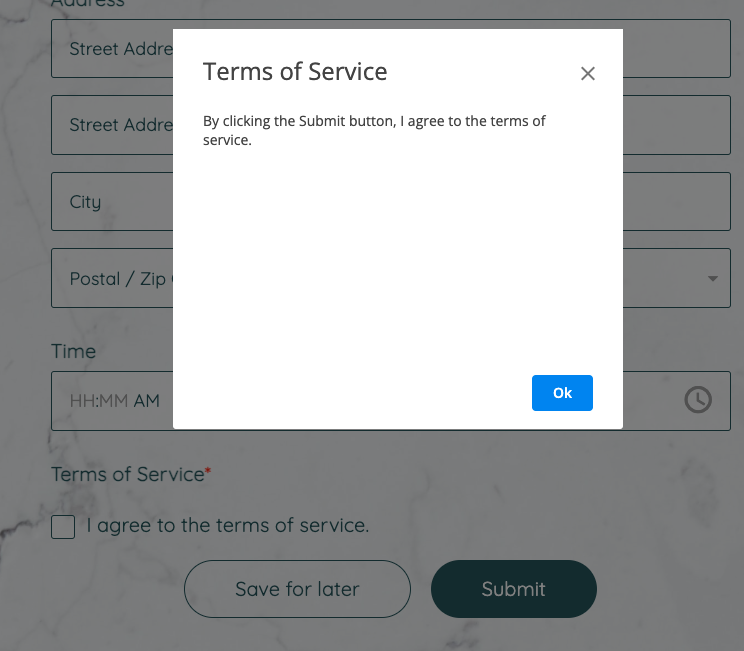
By default, the link behavior will be set on show text.
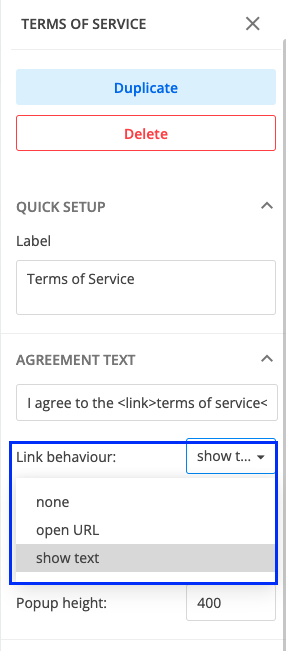
This means that your Terms of service will appear in a lightbox on the form when your respondents click on the provided hyperlink in the Agreement text.
If you choose Open URL, an additional text box will be available in the right side panel where you have to provide the URL to where your respondents will be redirected to a new tab to read your terms of service.
Related articles
Important Note
This version of the API was deprecated. If you still need to automate your data collection processes, and retrieve collected data or make various operations related to your 123FormBuilder account through API calls, you can use our new and improved API v2. Please visit our developer documentation for more details.Here you can learn how to use the POST Webhook API of our HTML form generator.
The POST Webhook API page is useful in integrating a form with an external application. More precisely, the form submission is the “trigger” and the webhook URL is the resulting “action”.
The logic behind performs a POST action, so it only outputs whether the operation was successful or not.
The webhook URL is specified by the webhookUrl POST parameter, which has to be previously set using urlencode() in PHP or an equivalent function in another language.
Page URL Example:
https://app.123formbuilder.com/api/forms/[FORM ID]/webhooks.xml?apiKey=[API KEY]&webhookUrl=[YOUR URL]
The above does the exact same thing that the 123FormBuilder – WebHook application does from the Applications section of your form. Also, you cannot link more than ten applications to your form via Webhook.
If you find this method to add Webhooks to your forms much useful, go ahead and create your URL. If not, then try the 123FormBuilder – WebHook integration as described in our step-by-step documentation.
For more details about API – POST Webhook, check out this article from our Developer Center.
Important Note
This version of the API was deprecated. If you still need to automate your data collection processes, and retrieve collected data or make various operations related to your 123FormBuilder account through API calls, you can use our new and improved API v2. Please visit our developer documentation for more details.The Retrieve Submissions Count API page has the simplest output: an XML document with a root element containing a numeric value.
You can obtain the Page URL from our knowledge base for developers.
For more advanced capabilities, we highly recommend you to use API V2.
Important Note
This version of the API was deprecated. If you still need to automate your data collection processes, and retrieve collected data or make various operations related to your 123FormBuilder account through API calls, you can use our new and improved API v2. Please visit our developer documentation for more details.If you’re using our HTML form generator, here’s where you can learn how to retrieve submissions using the 123FormBuilder API.
The Retrieve Submissions action is a little more complex than the others. It returns details about the submissions of a certain form.
You can obtain the Page URL from our knowledge base for developers.
The pageNr and pageSize POST parameters can be used to determine the pagination in cases of forms with many submissions. By default, pageNr is 0 and pageSize is 25. When stated explicitly, the pageSize value must be between 25 and 100.
pageSize represents the number of submissions displayed on one page.
pageNr multiplied by pageSize represents the number of the submission with which displaying will start.
The submissions in the output can be ordered by the sort parameter, which can have one of the following values: ASC or DESC. Submissions are sorted chronologically, in ascending order (oldest → newest) or in descending order (newest → oldest).
For more advanced capabilities, we highly recommend you to use API V2.
Important Note
This version of the API was deprecated. If you still need to automate your data collection processes, and retrieve collected data or make various operations related to your 123FormBuilder account through API calls, you can use our new and improved API v2. Please visit our developer documentation for more details.Here’s how you can retrieve field information using the API of our HTML form generator.
The Retrieve Fields API page outputs information about the fields of a certain form.
You can find the Page URL in our knowledge base for developers.
The XML output contains <fields> as the root element, with zero or more <field> sub-elements that, in turn, have the following sub-elements:
- fieldId
- fieldTitle
- fieldInstructions
- fieldType
- fieldObject
- fieldValues
- fieldRequired
For more advanced capabilities, we highly recommend you to use API V2.
Important Note
This version of the API was deprecated. If you still need to automate your data collection processes, and retrieve collected data or make various operations related to your 123FormBuilder account through API calls, you can use our new and improved API v2. Please visit our developer documentation for more details.Here’s how you can retrieve web forms using the API of our HTML form builder.
The Retrieve Forms API page retrieves details on any form that belongs to the current user. The user is determined by the apiKey parameter.
You can find the Page URL for this request on our knowledge base for developers.
The XML output contains <forms> as the root element, with zero or more <form> sub-elements that, in turn, have the following sub-elements:
- formId
- formName
- formEmails which has email sub-elements
- formCreated
- formDateStart
- formDateEnd
- formEncoding
- formRedirectMessage
- formRedirectUrl
The Retrieve Forms operation can also be used for subuser accounts.
{subusers-email-address-encoded} is the email address associated with the subuser’s account, which has the PHP urlencode() function applied.
For more advanced capabilities, we highly recommend you to use API V2.
Important Note
This version of the API was deprecated. If you still need to automate your data collection processes, and retrieve collected data or make various operations related to your 123FormBuilder account through API calls, you can use our new and improved API v2. Please visit our developer documentation for more details.The 123FormBuilder API is built mainly for programmers who want to retrieve data from their form builder accounts and, implicitly, from their forms.
An API call consists of performing a cURL GET operation on the desired API page. There are also additional parameters that have to be sent through cURL POST. All parameters are presented below.
There are 2 available output formats: XML and JSON. In case of an error, the appropriate message is displayed under a tag or key.
Browse our knowledge base for developers for more information.
You must use the HTTPS protocol for all the API URLs in your script. That doesn’t mean that the URL of your script must also start with https://
Parameters
The most important POST parameter is apiKey. This is required for any API call. You can find your API key in the My Account → API Keys section of your 123FormBuilder account.
To add the API key to your URL, at the end of the link add ?apiKey={YOUR API KEY}.
Here is an example:
https://app.123formbuilder.com/api/forms/{form-id}/submissions.{xml/json}?apiKey=xxxxxx-xxxxxx-xxxxxxxxx
The API provides the following operations:
Use the links above to find out more about each action. As for the API Responses received when using our API Key, consider reading this article.
A Basic free account can perform up to 100 API calls per day. For unlimited API calls/day, check our Gold, Platinum, and Diamond subscriptions.
For more advanced capabilities, we highly recommend you to use API V2.
Most Popular
Frequently Asked Questions
Here is a list of the most frequently asked questions. For more FAQs, please browse through the FAQs page.