123FormBuilder Knowledge Base
Search our documentation platform for answers, service specifications and 3rd-party integrations.
Knowledge Base
What is Stripe?
How does Stripe work?
Is Stripe secure?
Is Stripe international?
What payment methods does Stripe offer?
Does Stripe charge any transactional fees?
- Processing fees: They have processing fees that vary depending on the country and payment method used. For example, in US, the processing fee for credit and debit card payments is 2.9 + $0.30 per transaction.
- International fees: Stripe may charge additional fees for processing international transactions, such as cross-border fees, currency conversion fees or fees for processing payments in a foreign currency.
- Dispute & Refund fees: Stripe may charge a fee for handling disputes or processing refunds.
It is important to note that the fees charged by Stripe may vary depending on the specific details of each transaction. More detailed information about Stripe’s fees can be found on their website.
How can I integrate Stripe with my online form?
After connecting your account, go back to our Form Editor and enable the payment integration. You can set up different billing information, such as requiring billing address from your customers, make the payment a recurring one and setting up the frequency.
Related articles
What is PayPal?
How does PayPal work?
Is PayPal secure?
Is PayPal international?
What payment methods does PayPal offer?
Does PayPal charge any transactional fees?
- Domestic transactions: within the same country, PayPal charges a fee of 2.9% of the transaction amount plus a fixed fee based on the currency used
- International transactions: for transactions that involve a currency conversion or cross-border transfer, PayPal charges a fee of 4.4% of the transaction amount plus a fixed fee based on the currency used.
- Micropayments: for transactions under $10, PayPal offers a micropayment fee structure that charges 5% of the transaction amount plus a fixed fee based on the currency used.
It is important to note that fees may be subject to change and may vary by country and region. PayPal provides detailed fee information on its website.
How can I integrate PayPal with my online form?
You can easily connect your PayPal email address and choose the necessary settings: currency, perform calculations to take into account taxes or discounts, set the payment as a recurrent one or even mark it as a donation.
After testing the form with the PayPal in sandbox mode, you are ready to collect those submissions and money!
Related articles
Step by step guide on PayPal integration with 123FormBuilder
Definition
Key differences
PayPal Checkout is a payment solution that allows you to add a PayPal Checkout button. Respondents can choose to pay with a PayPal account or with a credit or debit card.
As pros, it is worth mentioning that PayPal Checkout is easy to integrate and offers a streamlined checkout process, besides supporting a wide range of payment methods and currencies.
As cons, they have limited customization options for the checkout button and payment process, and the transaction fees for some types of transactions are high.
PayPal Pro provided additional features such as fraud detection. It is mostly designed for businesses that want more control over the payment process and the ability to customize it to fit their specific needs.
As pros, PayPal Pro has a customizable payment processes and has additional features such as fraud detection.
As cons, their montly fees are higher compared with the other PayPal products and they offer limited support for international payments.
PayPal PayFlow is designed for businesses that need a more advanced payment processing solution with features such as fraud detection, recurring payments and customizable checkout pages.
As pros, PayPal PayFlow offers advanced payment processing features and customizable checkout pages.
As cons, they require higher transaction fees compared to other PayPal products and might need technical expertise to integrate customise.
Summary
What is PayU?
How does PayU work?
Is PayU secure?
Is PayU international?
What payment methods does PayU offer?
Does PayU charge any transactional fees?
How can I integrate PayU with my 123FormBuilder form?
Related articles
The Product field can help you create customized forms allowing your customers to select and purchase products or services without leaving the form.
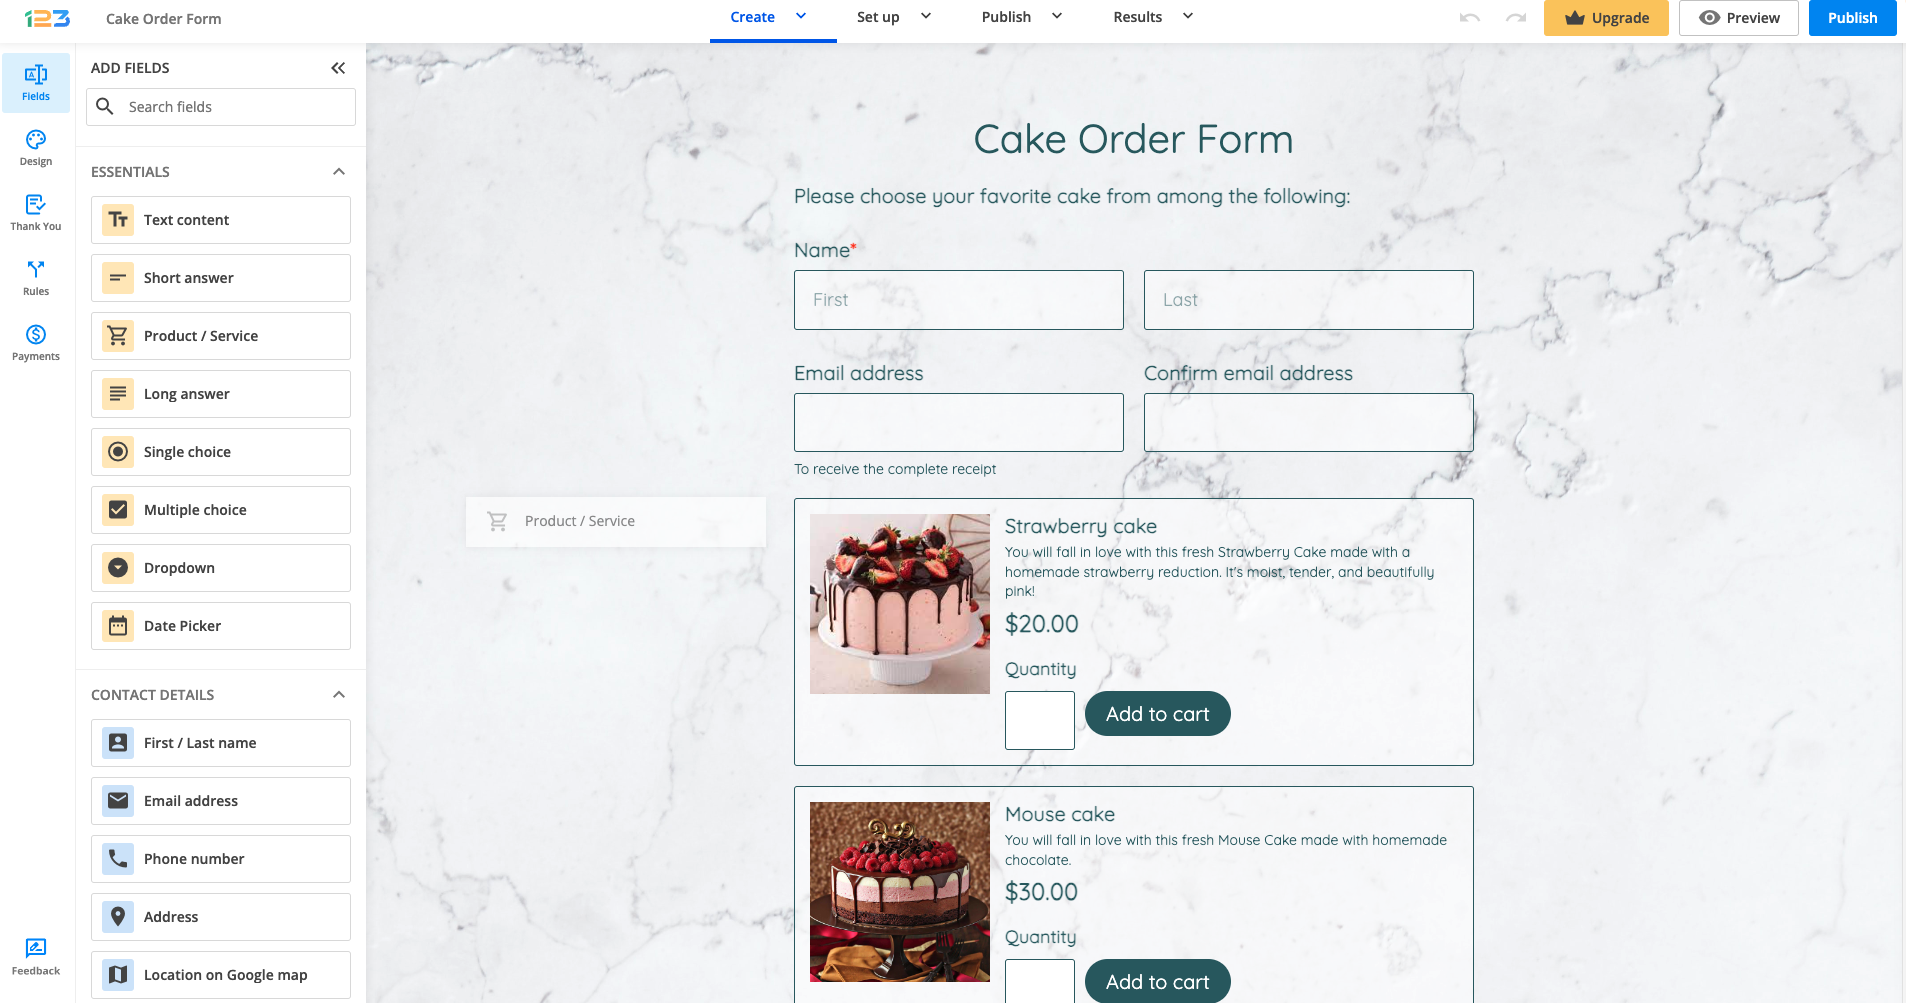
You can do various things with the Product/Service field in order to streamline your process. Let’s start with a cake order form as an example, where our respondents can order a Strawberry cake, a Mousse cake and/or a Vegan cake.
Email notifications
You can set up different email notifications that can help you with your orders. Based on the respondents’ cake selection, you can send email notifications to different email addresses. This can be done by creating email rules. All you have to do is click on Add rules in the Emails section.
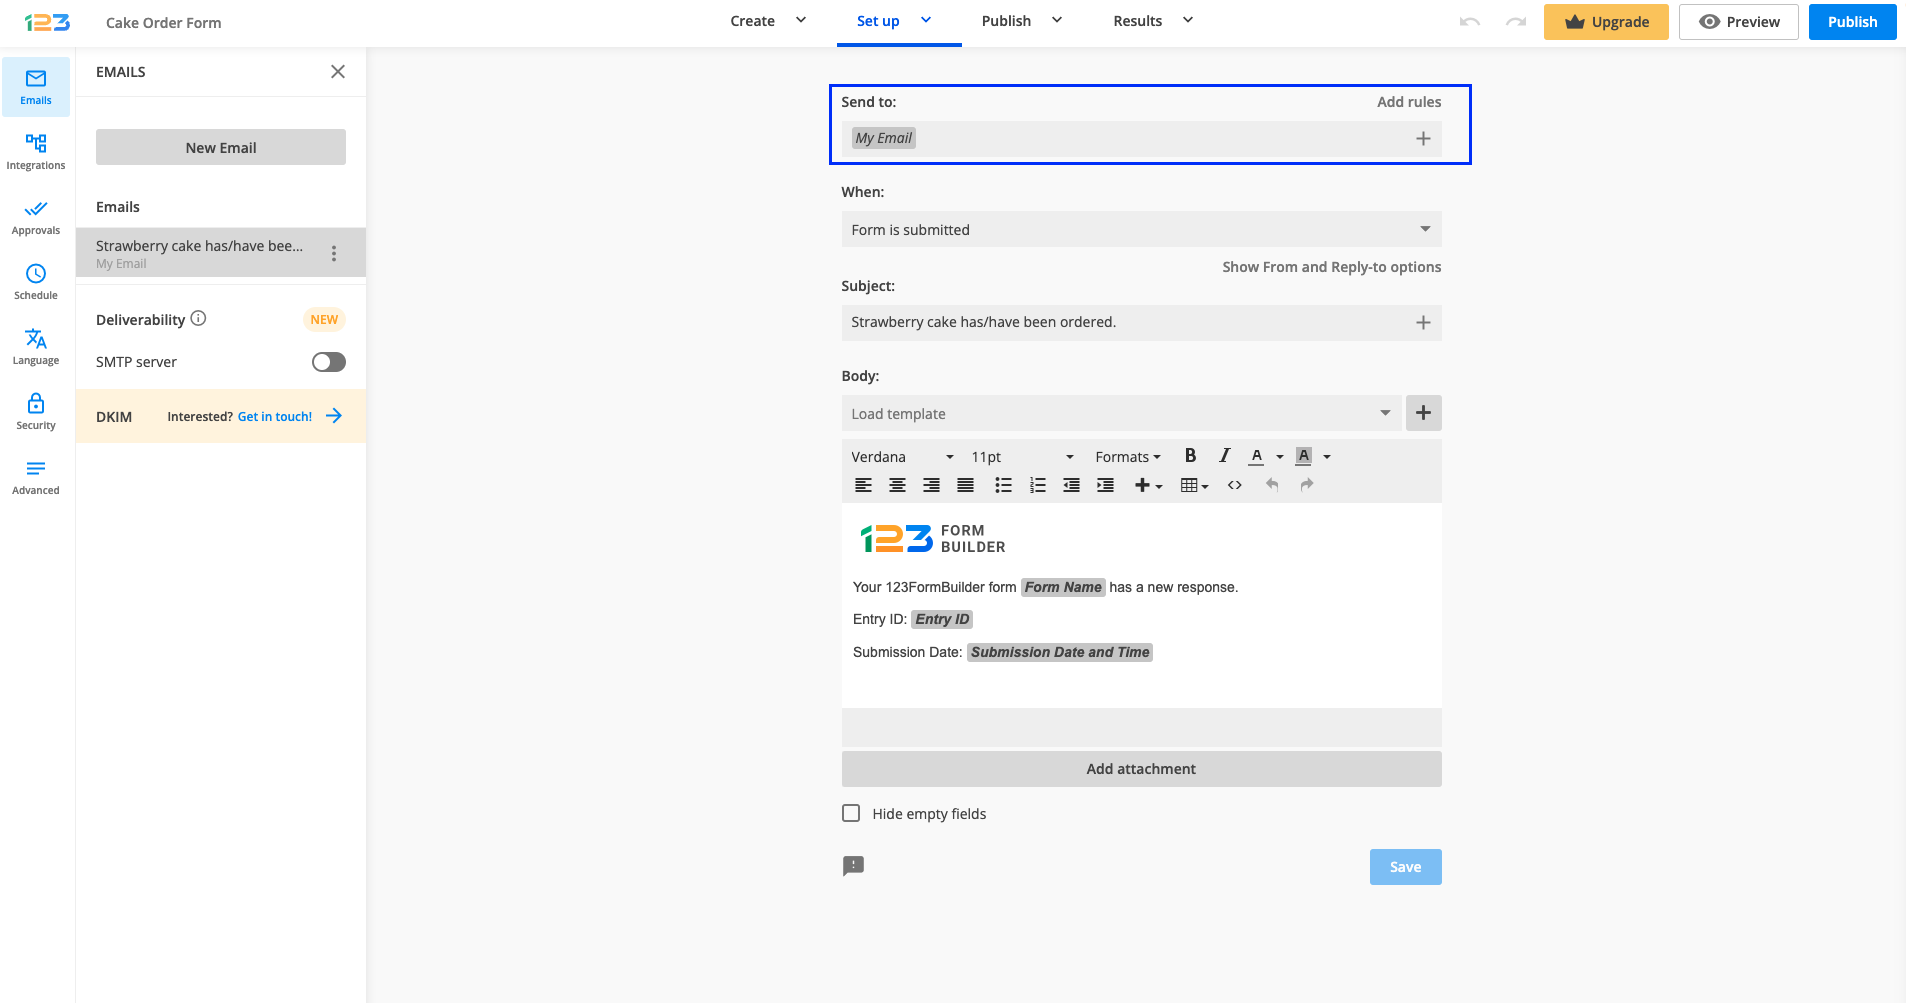
Afterward, you can create your email rules one by one. If you want to send an email to a specific email address only if your respondents have selected Strawberry cake, all you have to do is:
a. input the email address to “Send to”
b. set the condition: If Strawberry cake is
c. set the second part of the condition: is 1.
Therefore, when a respondent selects Strawberry cake, then an email notification is sent to that specific email address.
If you are using the Quantity selector for your Product/Service field, keep in mind to update your email rules. Respondents can select multiple items from the same product/service, so this has to be reflected in the email rule. For example, if your respondent selects 2 Strawberry cakes, then the below email notification is not sent, as the condition is set to 1 Strawberry cake.
If you want to cover all scenarios, then you have to update your email rule as below:
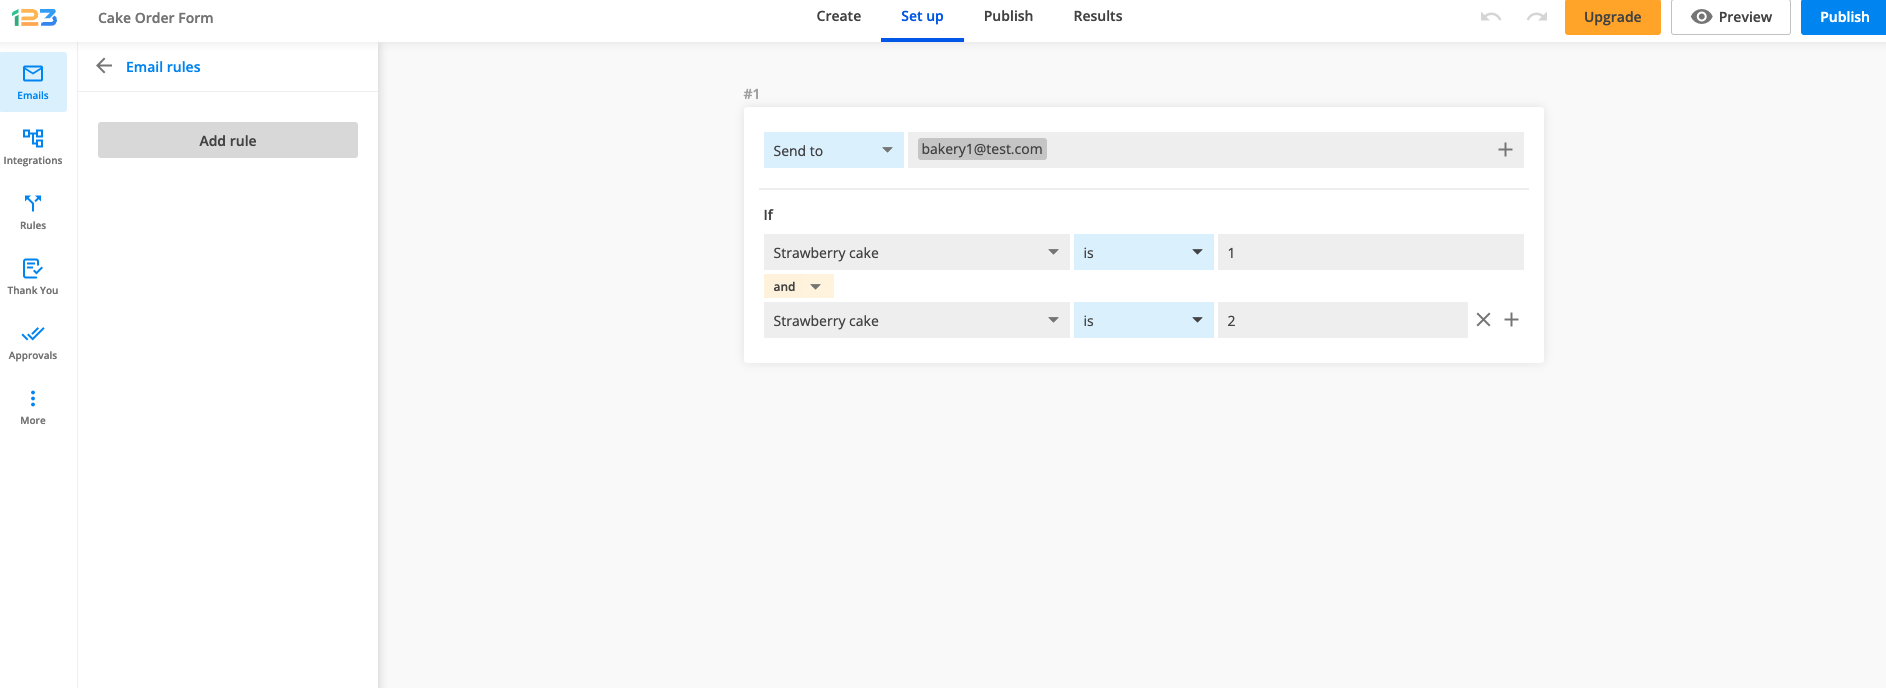
The same principle applies to all your products. Keep in mind that you can select different logic operators: is, is not, contains, and so on.

When it comes to the email notification, you can easily customize it as you wish. For instance, you can add the Product/Service field to your email Subject.
Consider this scenario: you want to send an email notification when a Strawberry cake is ordered. Create your subject line and pipe in the quantity of a specific product within the subject line by clicking on the + sign.
If your respondents have ordered 2 Strawberry cakes, when receiving the email notification, the subject line will look as below:

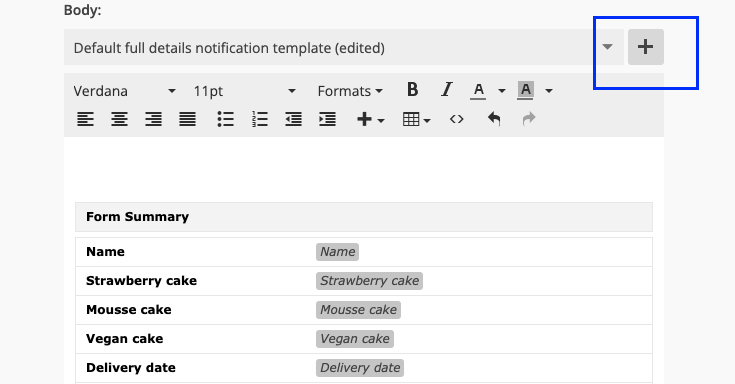
When customizing the email notification template/body, you can add the Product/Service field to it by clicking on the + sign.
Integrations
To fully automate your workflow, you can always use integrations. As an example, we are going to enable Google Sheets. By doing this, all the submissions you’ve collected on the form from the moment of enabling the integration will be gathered in a Google Sheet.
Go to Integrations and click on Connect for Google Sheets.
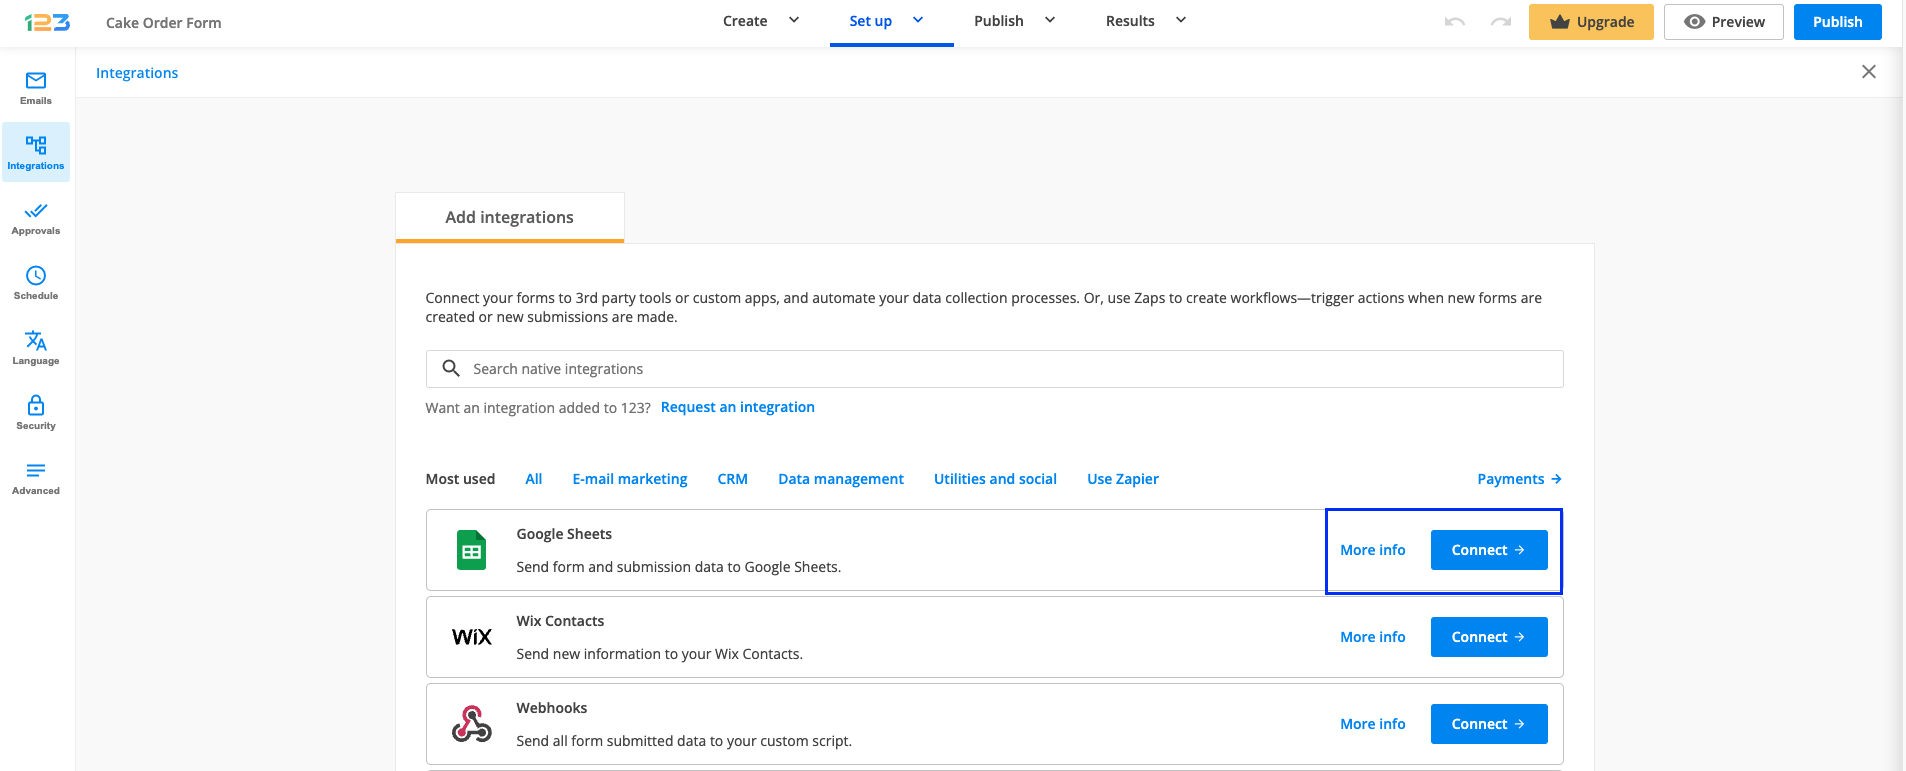
The next step is to connect your Google Account.
Now let’s test our form. Make a test submission and go to your Google Drive. A file has been automatically created, with the name of the form.
In the below example, we have received an order for 3 Strawberry cakes, 1 Mousse cake, and no Vegan cake.

The value we are sending for the Product field is the quantity. If you did not enable the Quantity selector, then the default value that we send is 1.
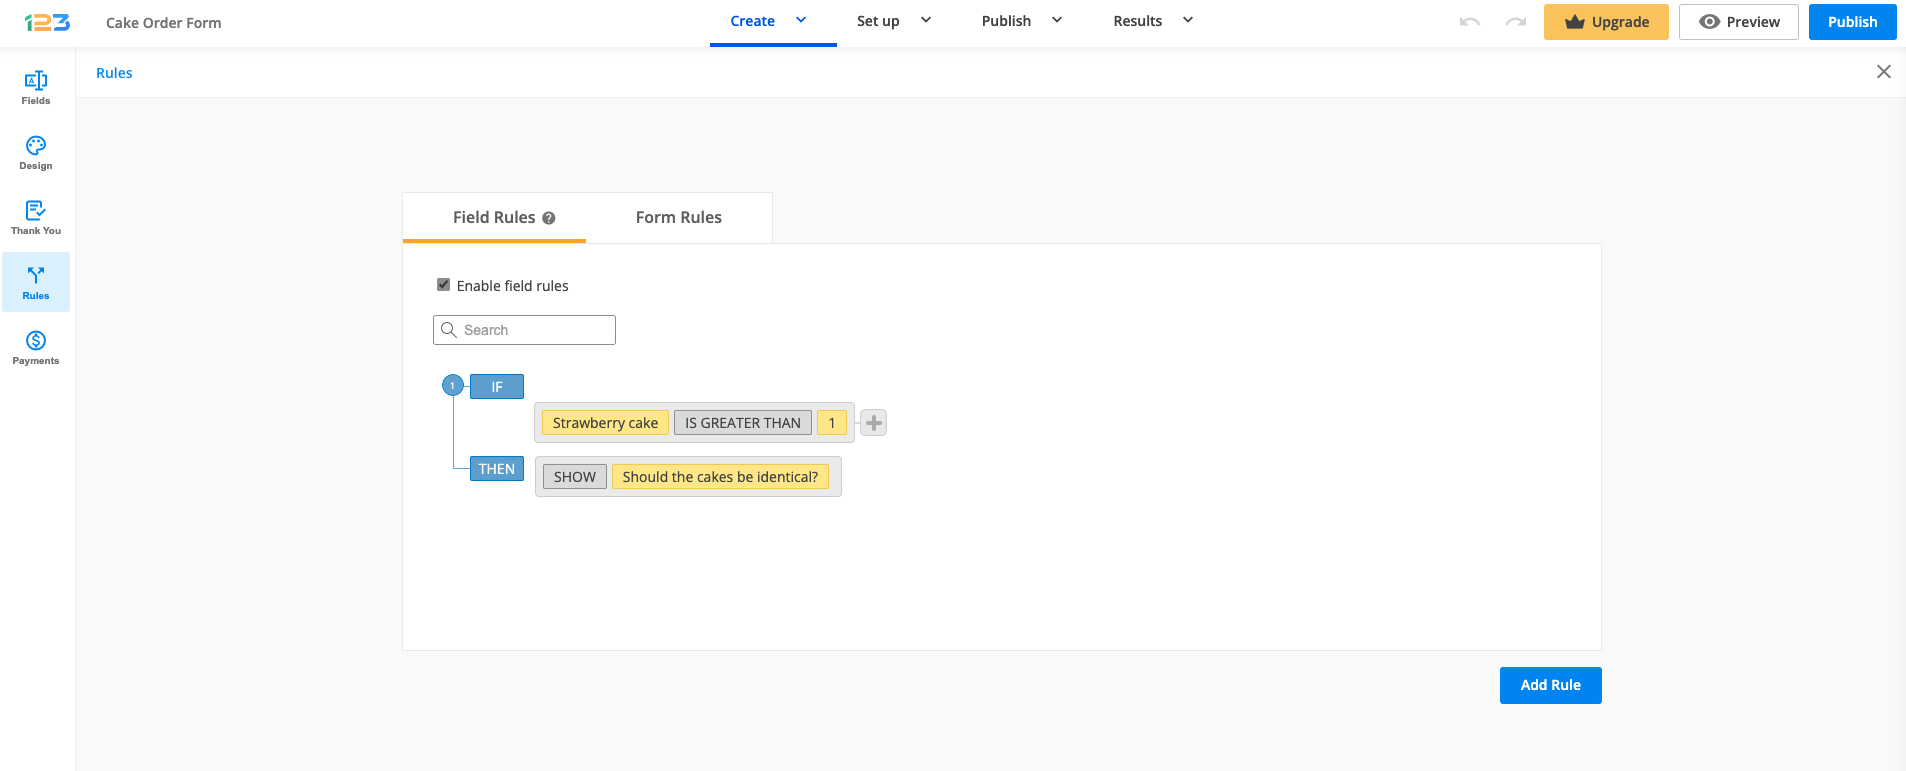
Rules
You can create field or form rules by going to the Rules section from Set up. Just enable them and click on Add rule in order to begin the process of creating rules for your fields/form.
For example, if your respondent orders 2 Strawberry cakes, you want to know if they should be identical or have something different. In this case, if the Strawberry cake has a value greater than 1 (meaning your respondent has ordered more than 1 strawberry cake), then the question Should the cakes be identical? is shown.
Approvals
The Product field can also be used in an approval flow. You can enable Approvals by going to Set up → Approvals and checking Enable approvals for this form.
After clicking on Add approval, you can create the approval flow.
Let’s say that whenever someone orders more than 1 Strawberry cake, you want to send an approval email to a certain email address. The approval condition would look like below:
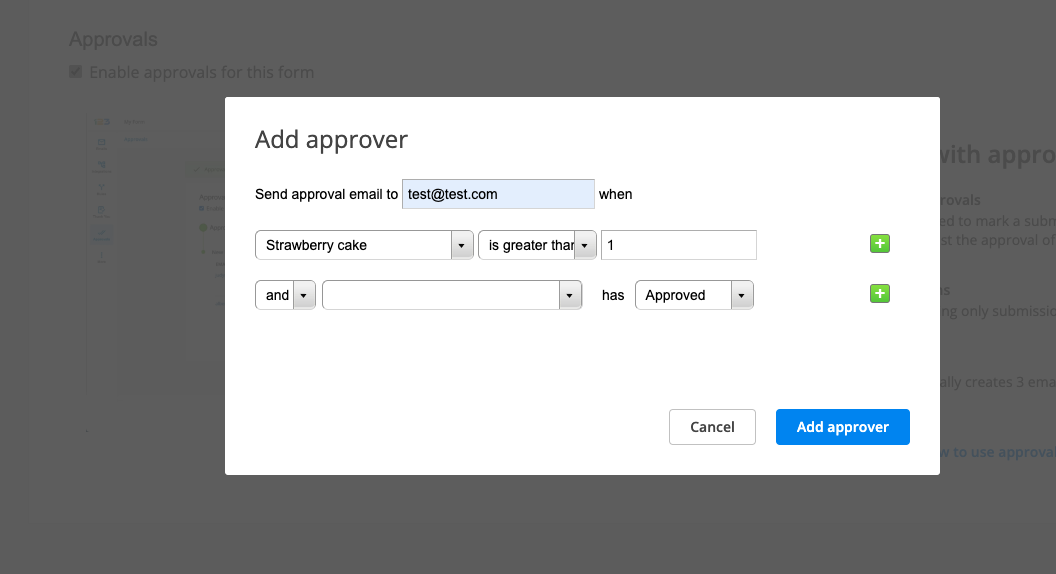
Finally, select the Add approver button and you’re all set.
Related articles
123FormBuilder is excited to announce the release of our latest feature – the Product field! This new feature makes it easier than ever for businesses to sell products or services directly through their online forms.
With the Product field, businesses can create customized forms allowing customers to select and purchase products or services without leaving the form. This can significantly streamline the buying process and boost sales.
How it works
Let’s begin with a use case: you want to create a form through which you are collecting cake orders. You’ve added all the necessary info: name, delivery date and time, phone number, email, and address for delivery.
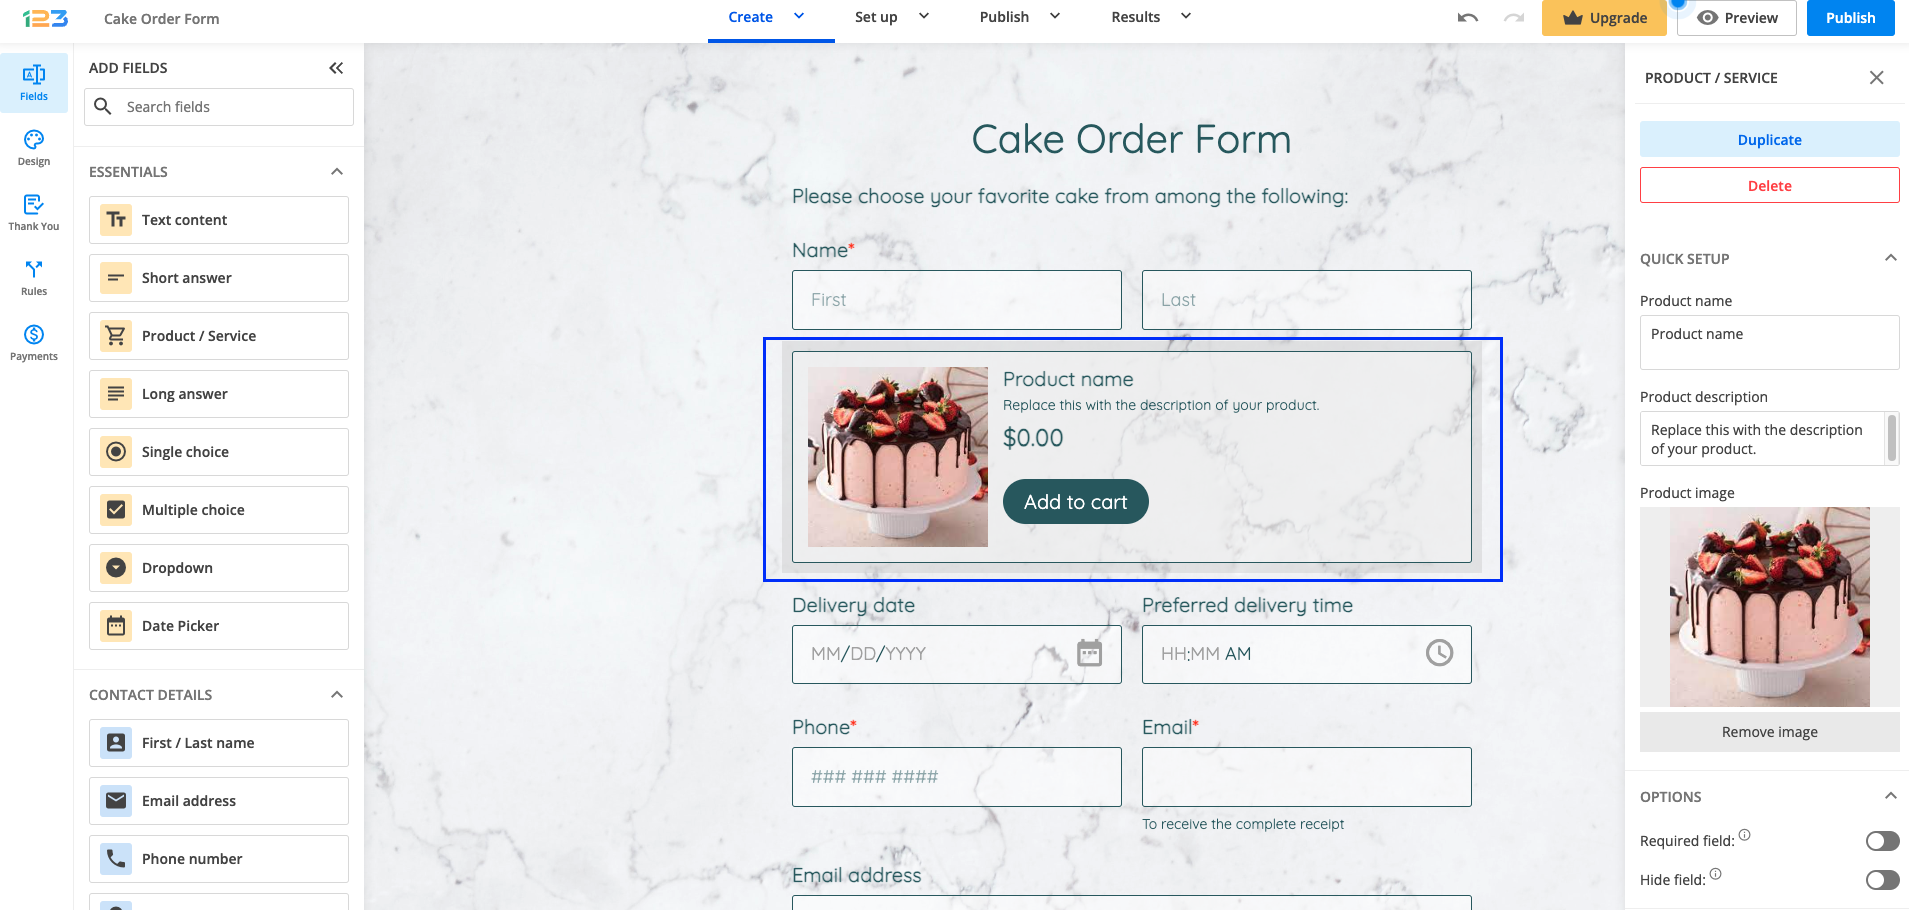
Now it’s time to add the products/cakes you want to sell. Simply drag and drop the Product/Service field onto your form.
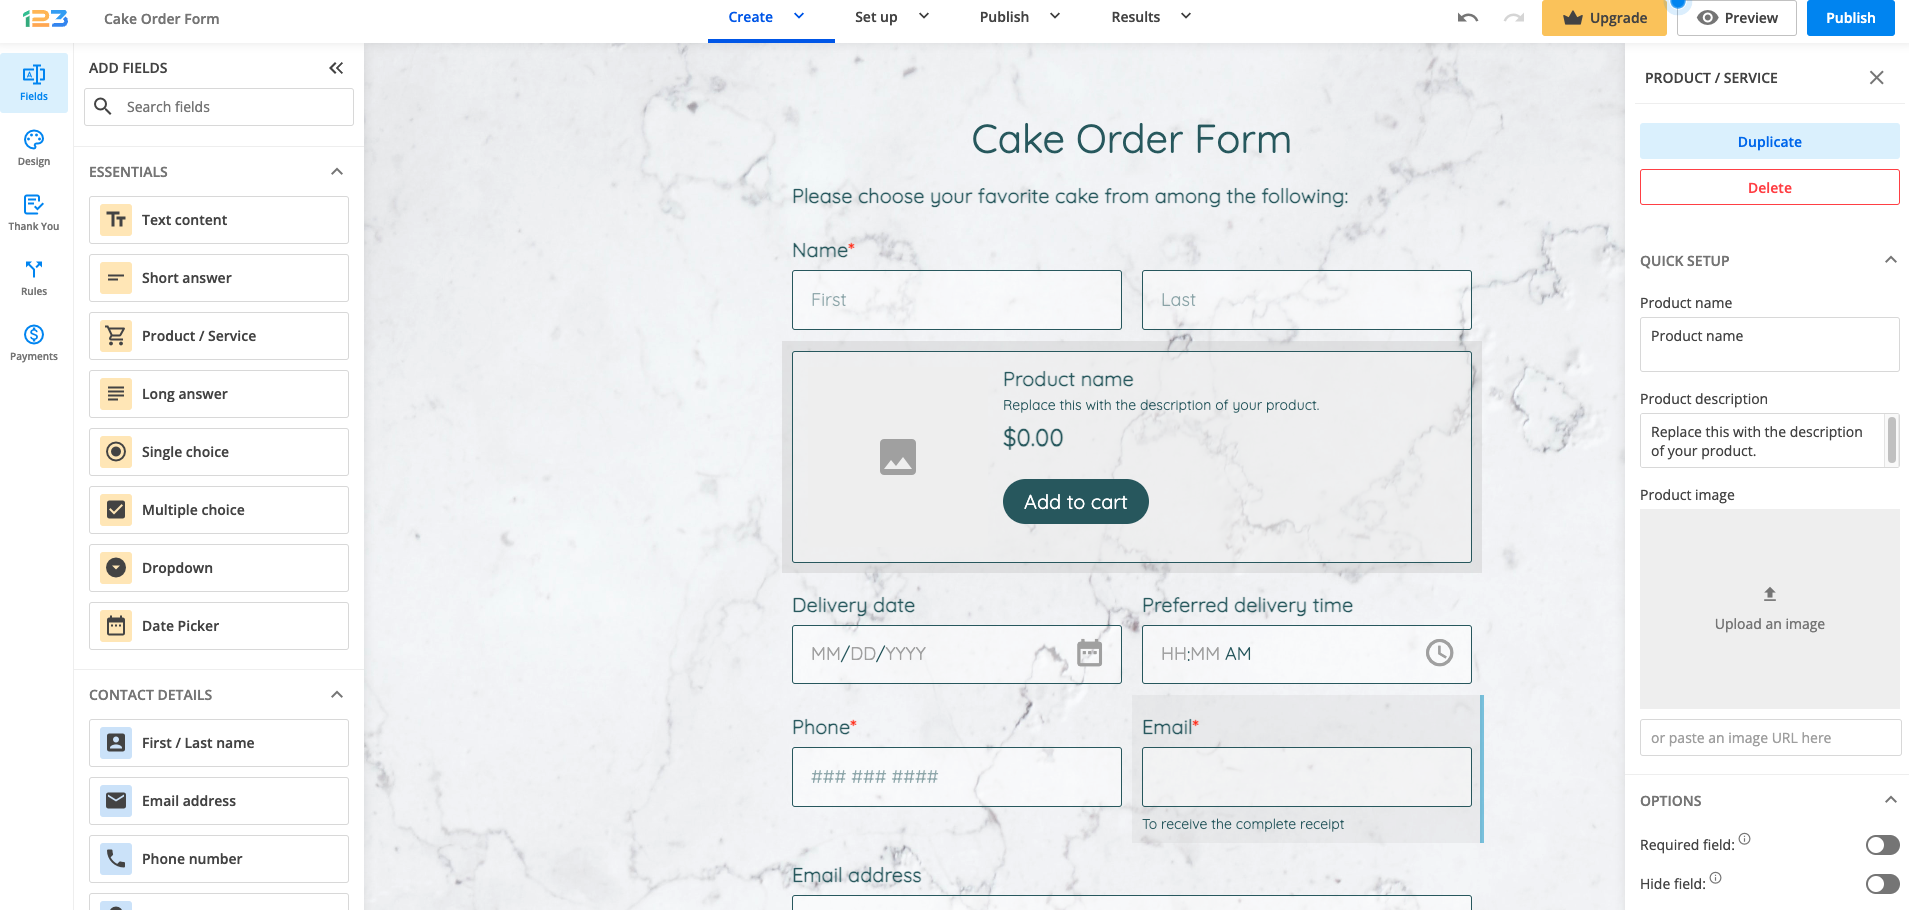
Once added to the form, you can easily customize the Product/Service field.
a. Product name – here you give a name to your product for your respondents to easily identify the product/service you are selling.

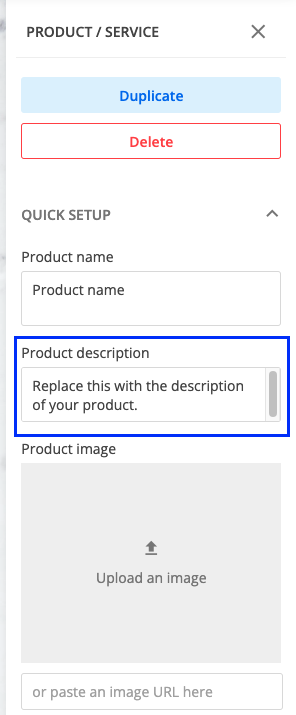
b. Product description – for your respondents to fully understand what your product/service offers, you can provide a product description.
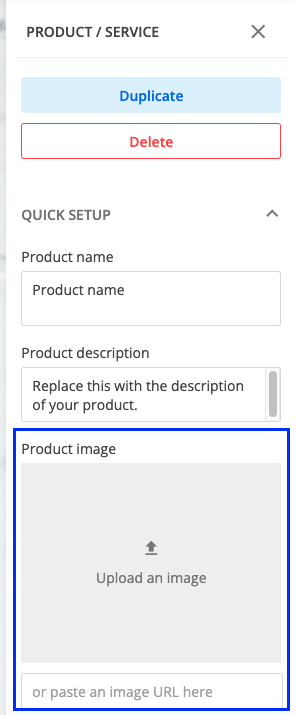
c. Product image – this may be the most eye-catching element for your respondents: the product image. Upload a picture of your product/service so that your respondents can easily scan the products and choose the most appropriate one for them.
For our Cake Order form, we’ve created our first product: Strawberry cake!
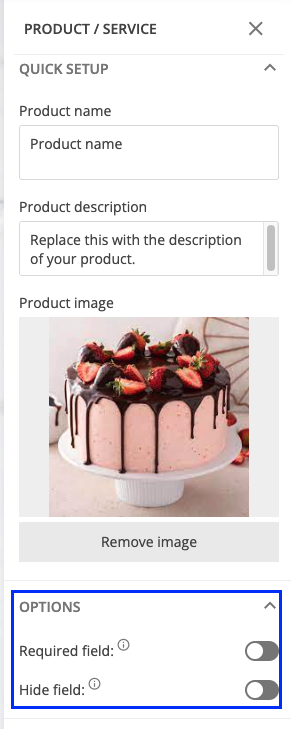
Now we need to provide more customization to our first product. We can mark it as required – so your respondents will need to provide an answer to this field/choose this product/service or you can hide the field, if needed.
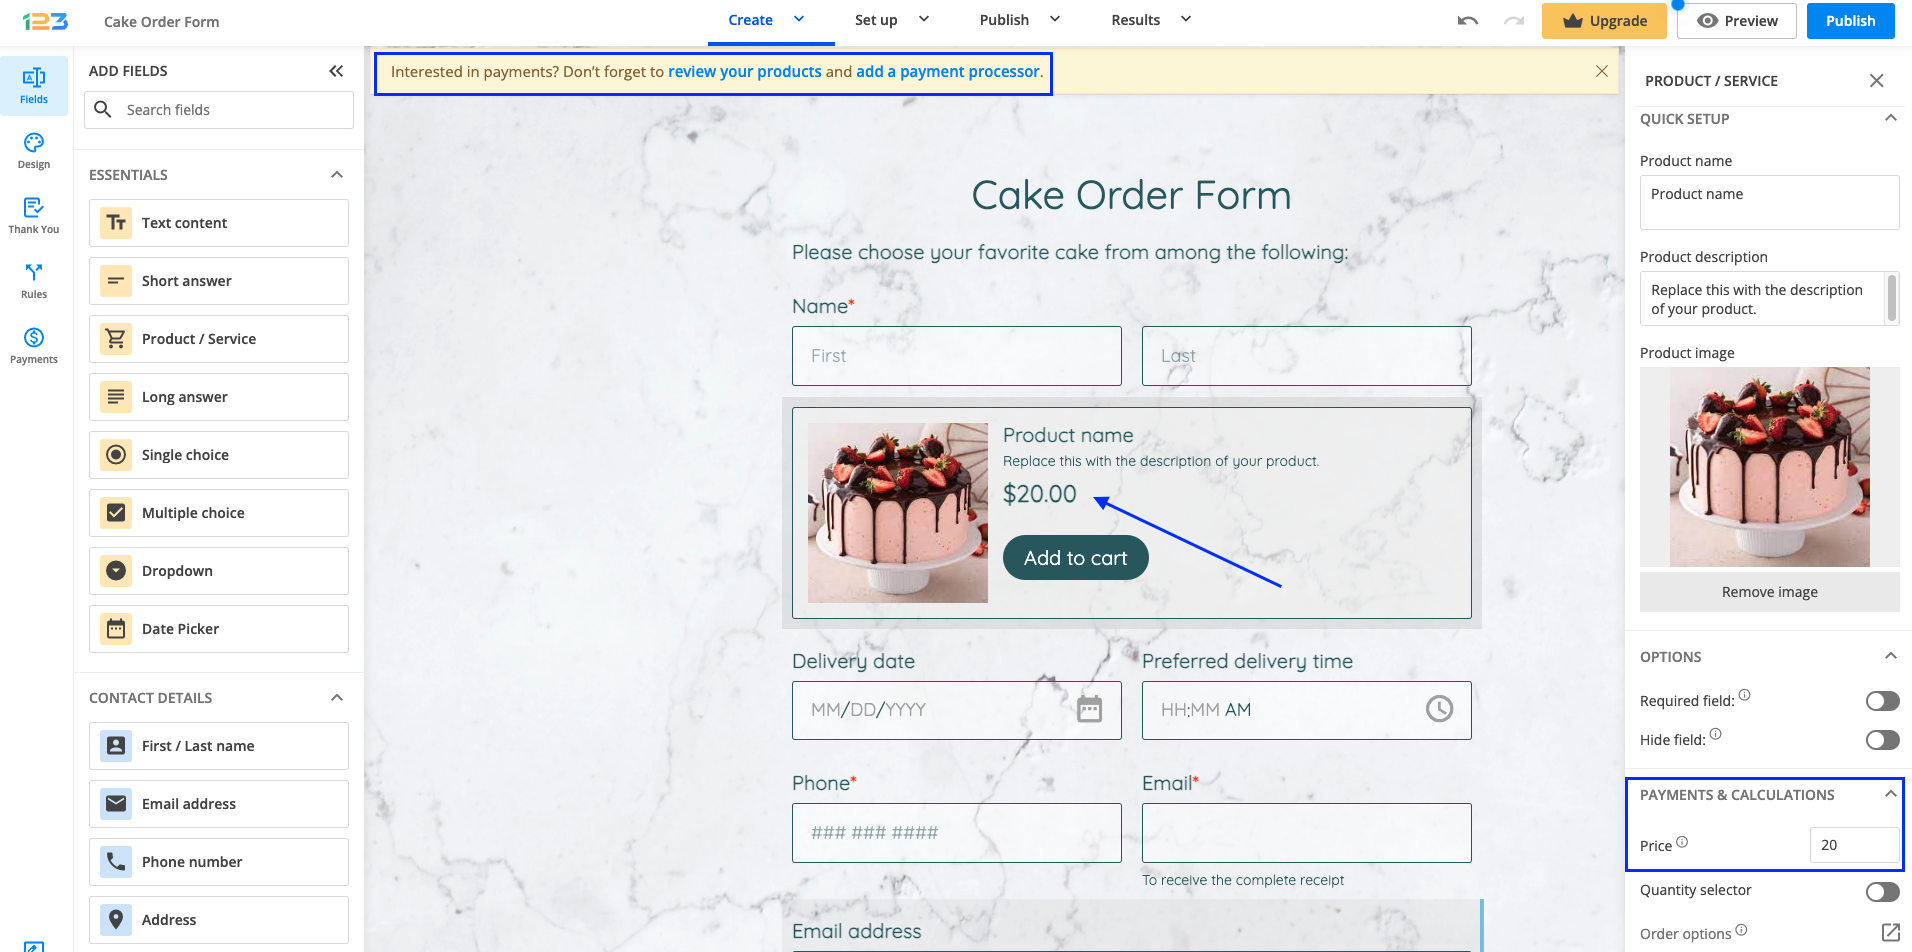
The next step would be to add a price to your product. You can do that by providing a value to the Price field from Payments & Calculations. The price you provide will be displayed on your form for your respondents.
Additionally, if you have not added a payment processor to the form yet, you will notice an informative banner at the top of the page. This is a reminder to add a payment processor, but we will get back to that in a second.
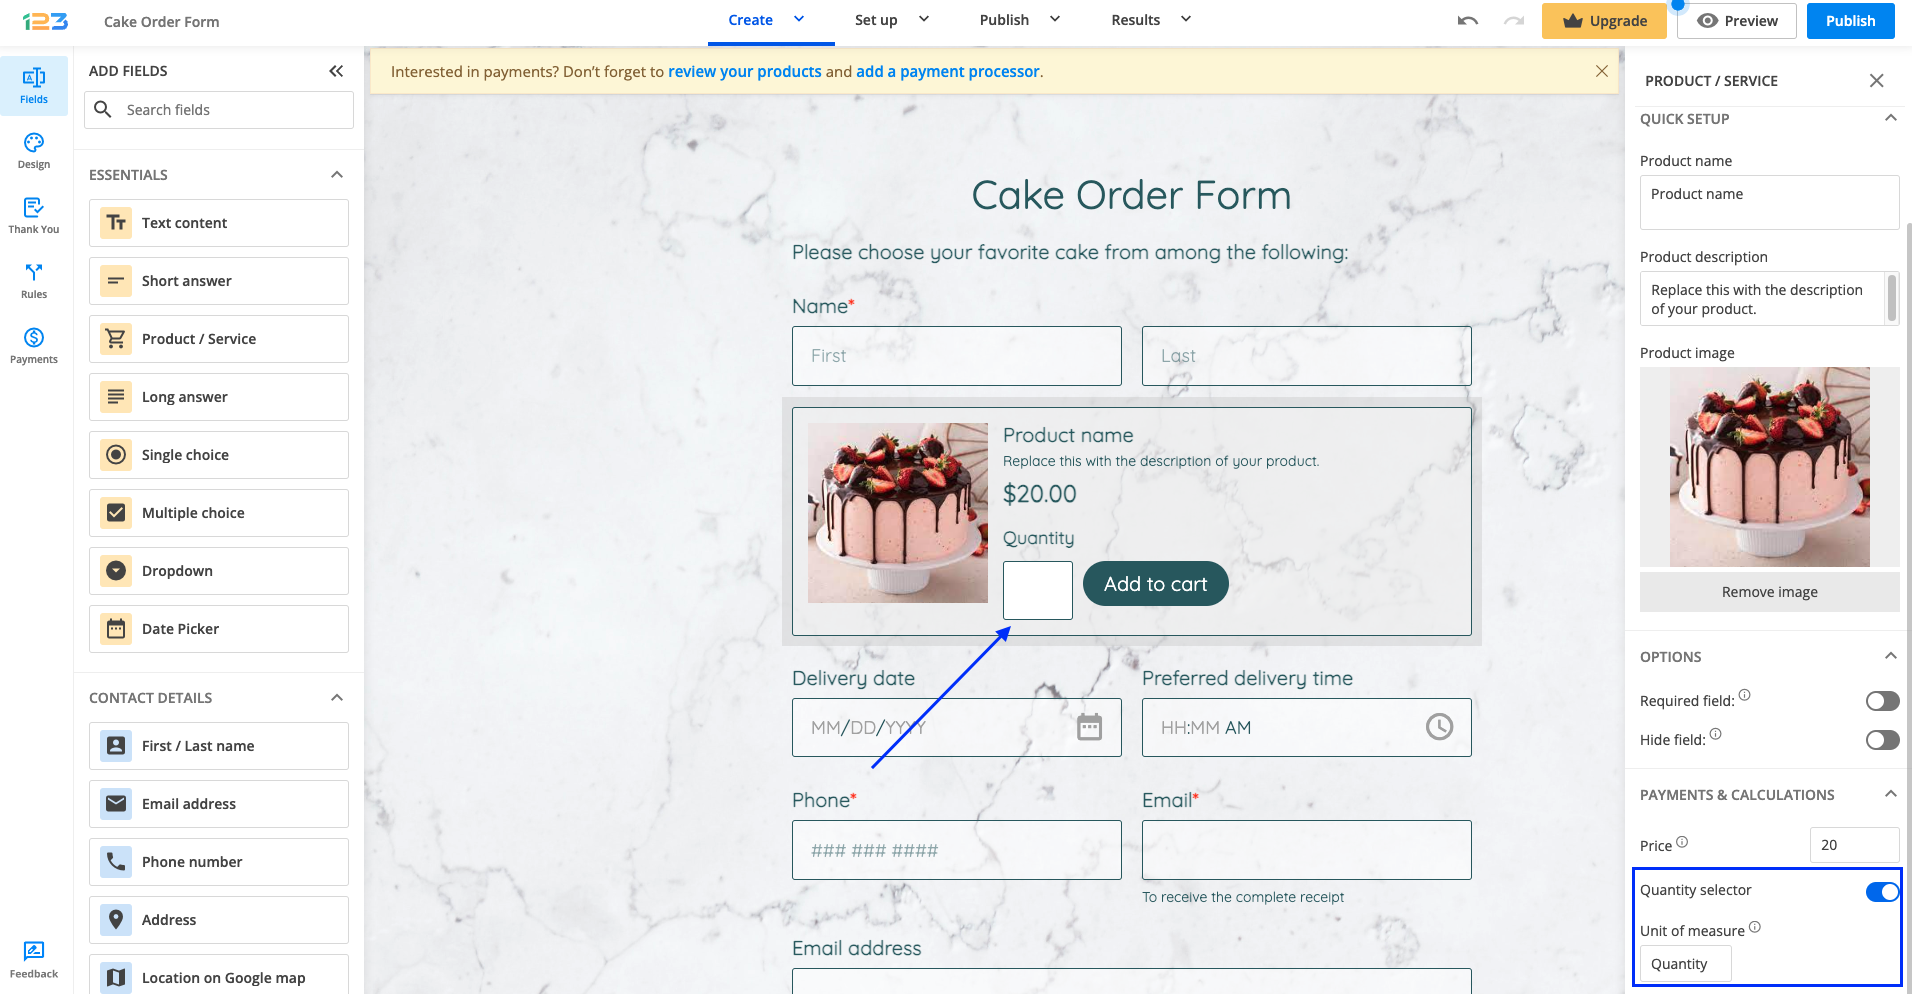
If you want to offer your respondents the possibility of ordering multiple items from the same product (e.g. 2 Strawberry cakes), then you have to enable the Quantity selector. Once enabled, you can establish the Unit of measure – the label you set here will appear as your unit of measure for your product (e.g. bottles, packs, lbs, kg).
The last customization that we can bring is related to Order options. Here you can change the currency, discount, and taxes, and add more advanced calculations.
Once you click on Order options, a pop-up will open where you can:
a. change the price of the product, if needed
b. apply a discount on the product
c. apply a tax on the product
d. set a stacked discount – which applies on top of the discount applied on each product
e. set a stacked tax – which applies on top of the taxes applied on each product
f. change the currency of the product – click on the USD – US Dollar dropdown and select the currency you are interested in

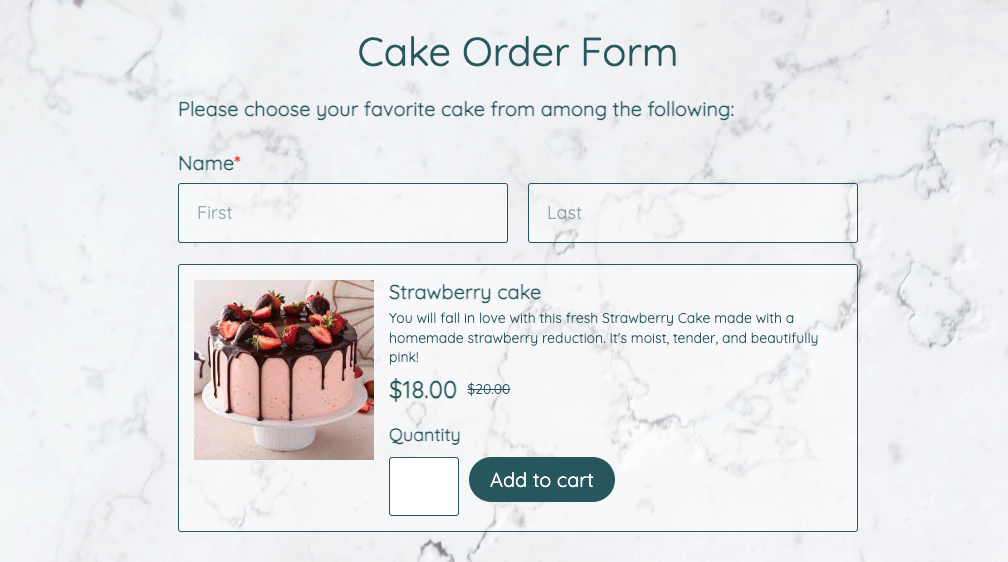
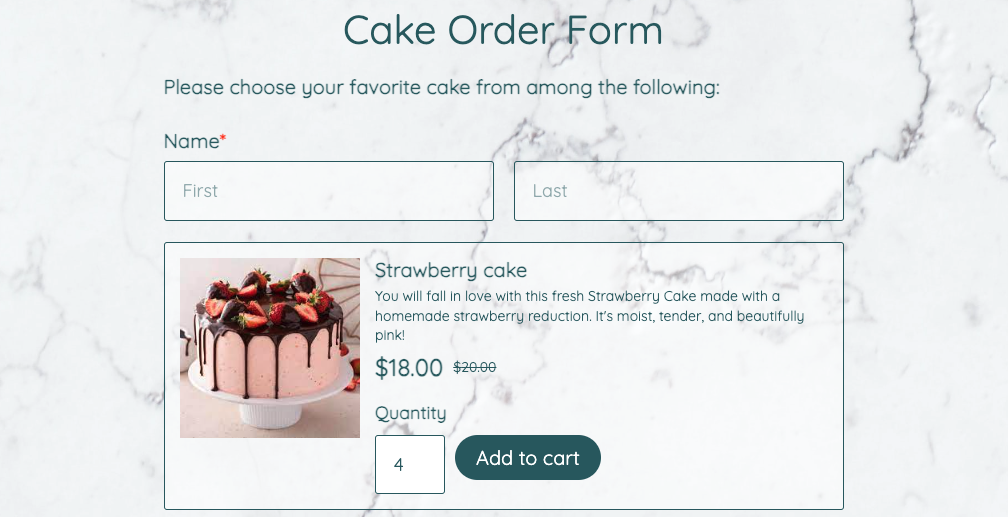
For example, let’s add a discount of 10% to our Strawberry Cake. Once you input your 10% discount on Order options and click on Save, our Strawberry cake will have the price updated: we are going to show the full price and the price after the discount has been applied.
Payment processor & Order summary
Moving forward with our form, let’s add more products to it: Mousse cake and Vegan Cake. And last but not least, let’s add a payment processor to the form. You can do that by navigating to Payments from the left side panel and selecting the payment processor you want to use.
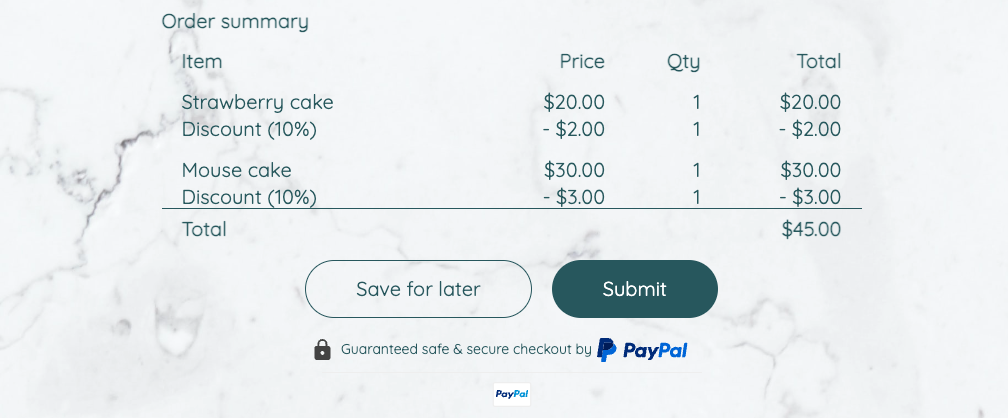
For our form, we have used PayPal. Once a payment processor has been added and enabled, you’ll notice an Order summary at the end of the form.
This table will be populated automatically based on your respondents’ choices for the product/service list.
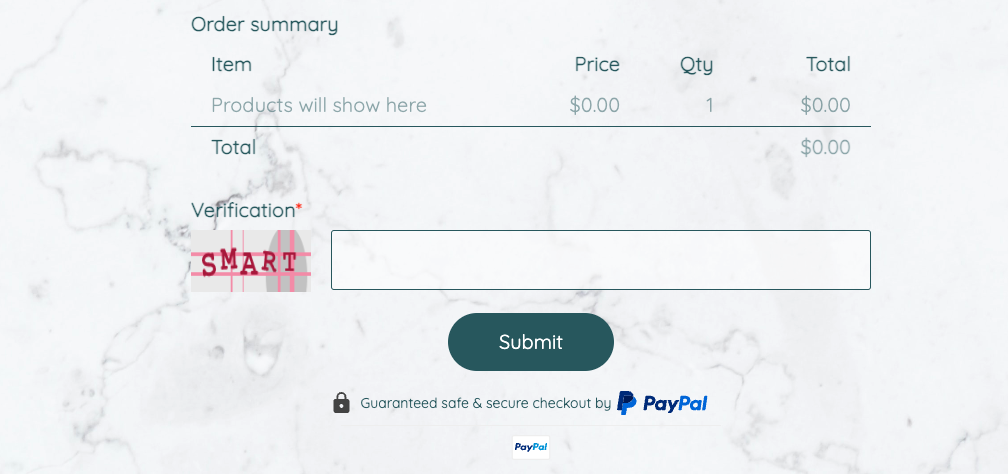
Let’s test the form in Preview to see what it looks like. For our form, we have selected Strawberry cake and Mousse cake. The Order summary has been automatically updated to reflect our choices.
In the Order summary you can see the product that has been selected, its price and its quantity, and the total price for each product and the entire order.
If a discount has been added to a product, for example for our Strawberry cake, the discount will be reflected in the Order summary, as Discount (x%). We also display the value that has been discounted.
Following the same pattern, if a tax is applied to a product, the tax will be reflected in the Order summary as a Special tax(x%) along with the value of the tax.

If you have enabled the Quantity selector, respondents will be able to provide the number of items they want to order for that product and simply click the Add to cart button.
Subsequently, the Order summary will also reflect the quantity for each product.

Submissions
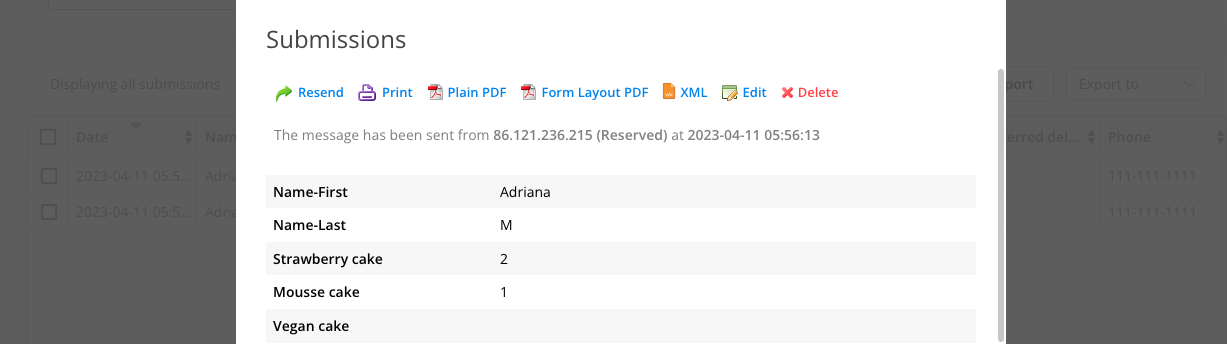
In order to test our form, let’s make a test submission and go to Results → Submissions. For each product added on your form, you can see the quantity:
a. Strawberry cake – 2 → this means that 2 Strawberry cakes have been ordered
b. Mousse cake – 1 → this means that 1 Mousse cake has been ordered
c. Vegan cake – no value → this means that no Vegan cake has been ordered.
You’ve created your 123FormBuilder form and shared it with your respondents. Now you have gathered some views, even some submissions on your form. But how can you interpret Insights data? How can you use it to level up your form?
Form Insights – Navigation
You might have noticed that below the form stats, you have some clickable titles: Views/Submissions/Submission rate/Avg time to complete. All Insights data is filtered based on this selection. By default, Views is selected.

When you click on Submissions, the charts, the device, the referrer and the location card are refreshed to take into consideration the number of submissions. The same principle applies when Submission rate or Avg. time to complete is selected.
When Users or Abandon is clicked, we are updating the info shown in Insights charts in order to see the evolution of our form per day.
Note: keep in mind that currently, for Users & Abandons we are displaying only the Form insights cards, and charts, as they are not included in the Device, Location, Referrer cards.
Form Insights – Devices card
Let’s take the below example. Our form has gathered in total 38 views and 7 submissions and we have Views selected by default.
By using the devices card, you can see from which devices your respondents have viewed and submitted the form from. In the below example, the most used device for viewing the form is Desktop: 32 views, representing 84% of the total views.
You can hover on the pie chart to see the allocation of each type of device for your Views.
When switching to Submissions, the pie chart will reload in order to take into consideration the number of submissions per each type of device. Each slice from the pie chart will represent the percentage of submissions per each device. On hover, you can see the number of submissions for each device.
The same principle applies for Submission rate. On a bar chart, you have the submission rate represented for each type of device. On hover on each bar column, you have the type of device and it’s submission rate.
When Avg. time to complete is selected, the bar chart is reloaded to take into consideration the average time to complete per each device. On hover you can see the type of device and the average time to complete per each type of device.
How can Devices card information help me?
Let’s continue with the above example. Our form has registered a lot of views from Desktop devices (32) and only 2 submissions. This means a submission rate of 6.25%. Pretty low, if we are comparing it with Mobile or Tablet devices, isn’t it?
This should be making us thinking: what is happening with my form when it is viewed and completed from a desktop device? Is there an issue with the type of fields, with how it looks? Is the submit button not visible on desktop device? Or is there any other issue that I’m not aware of?
You can figure this out by going to the Preview section and playing around with all the devices. Dig deeper in the layout of your form and see what is causing problems to having it completed.
Now that you have figured out where the issue is, make the necessary adjustments and test it out once more. Sit back, relax and let your form gather more submissions.
Form Insights – Referrer card
Let’s take the below example. Our form has views and submissions registered on multiple referrers. If there are more than 3 referrers, you will have the option of expanding the list in order to see them all.
If we can not detect the referrer, we use the placeholder No referrer, like below.
When Views is selected, the pie chart will represent the top 3 referrers. Each slice of the pie chart shows the number of views and the appropriate referrer.
The same principle applies when Submissions is selected. Each slice of the pie chart shows the number of submissions per each type of referrer.
When Submission rate is selected, the pie chart is changed to a bar chart. When hovering over the column chart, you can see the referrer and the submission rate registered for that specific referrrer.
The same principle applies for when Avg. time to complete is selected. For each referrer, you can see the average time it took your respondents to complete the form.
How can Referrer card information help me?
By analysing each referrer’s performance, you can figure out which one is the most successful. Let’s say that you have shared your form on social media, on email and you have also embedded it in your website.
If the views registered for your form when embedded are higher, but submissions very low, this might mean that your respondents have difficulty completing it on your website. Now it’s time to dig deeper and see where the stopper is.
Maybe one channel is more successful than another, so this might be the key of getting as many submissions as possible.
Form Insights – Location card
Following the same pattern, location card shows you from which countries your form has registered views and submissions.
When Views is selected, the map will be have the countries from which your form registered views coloured. On hover, you can see the name of the country and the number of views registered from that country.
The same principle applies for all other information: Submissions, Submission rate, Avg. time to complete.
How can Referrer card information help me?
If your form is meant to collect submissions from multiple countries, here you can see which country is performing better.
Let’s say a country is registering a lot of views, but no submissions. In this case, you should verify if the translations have been made correctly.
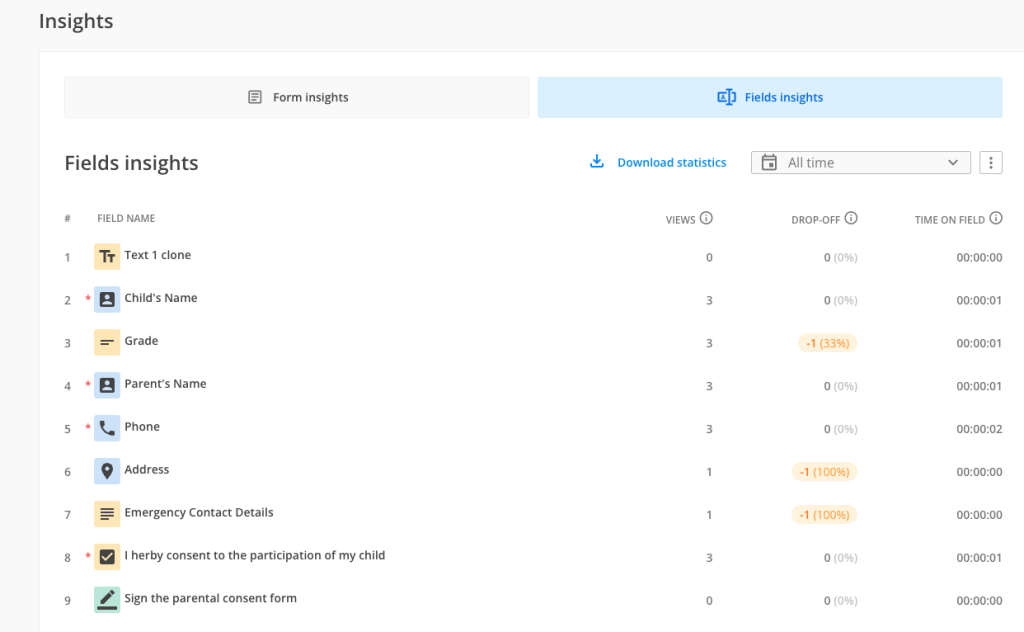
Fields Insights
Fields Insights section is available starting with 6 September 2023. Fields Insights section is meant to provide you in-depth form analytics performance per each question that you currently have on your form.
For more information on how Fields Insights section works, please check out this article.
Related articles
How can Insights section help me?
Fields Insights
Beginning with 22th of March 2023, we’ve released some powerful features for Insights section.
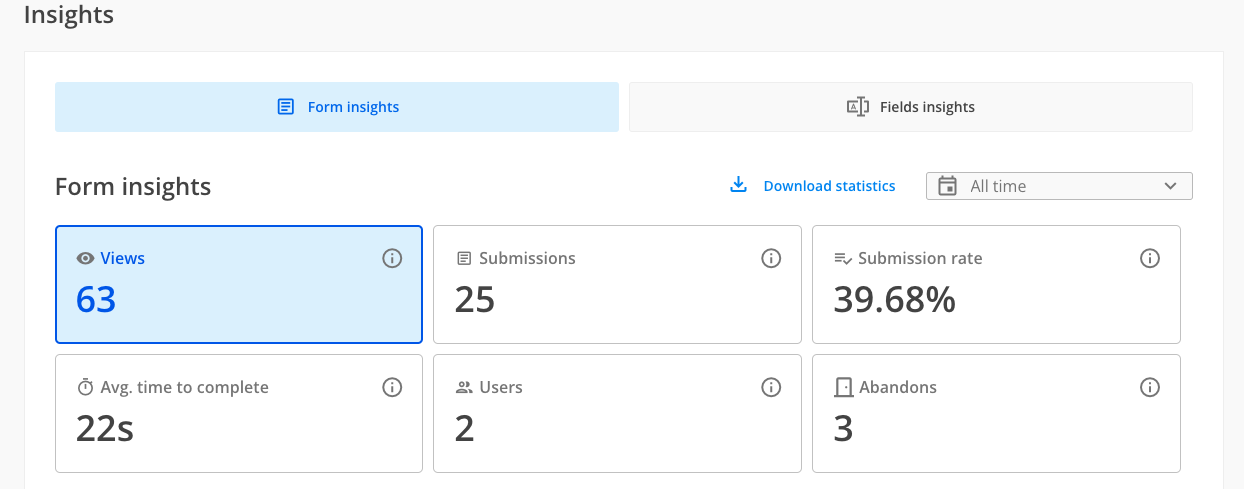
If your pricing plan is below Platinum, you will have access to the basic form stats of the form:
a. Views
b. Submissions
c. Submission rate
d. Avg. time to complete
e. Users
f. Abandons
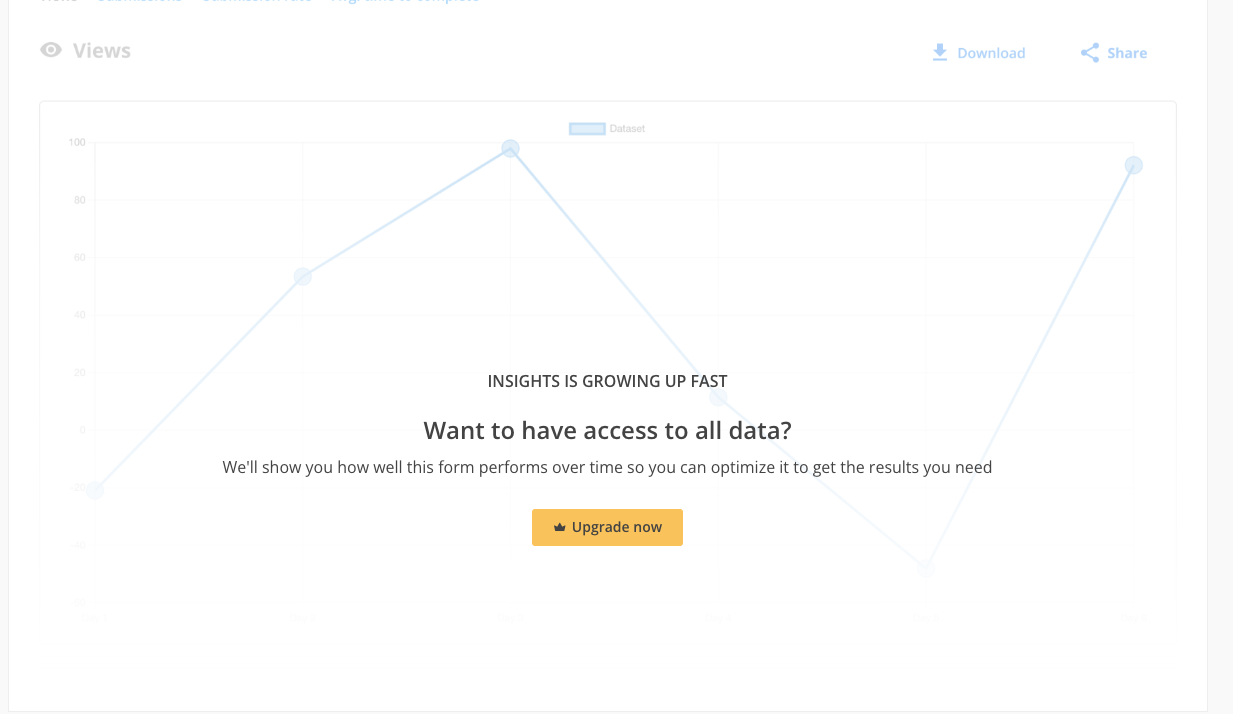
How can I access the full data?
If you are interested to know how your form is performing over time with more in-depth analysis, you can directly upgrade from Insights section.
Once you upgrade, you will have access to more powerful features, such as:
a. charts to see the performance over time for all your form stats
b. information related to the devices your respondents have viewed & submitted the form from, the submission rate for each device and the average time to complete per each device
c. information related to the referrers your respondents viewed & submitted the form from, the submission rate for each referrer and the average time to complete per each referrer
d. information related to the location of your respondents that viewed & submitted the form from, the submission rate for each location and the average time to complete for each location.
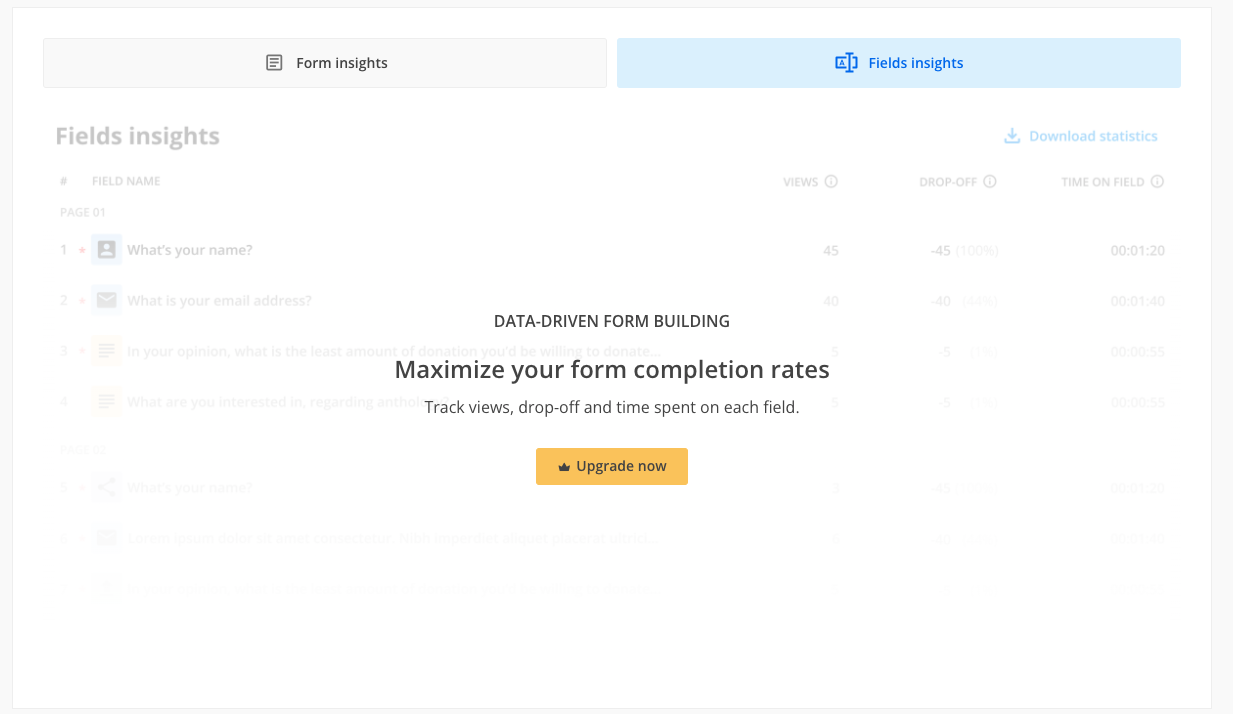
Fields Insights
Beginning with 6 September 2023, Fields Insights section is available to all users. If your pricing plan is below Platinum, you will be seeing a placeholder image with an Upgrade button.
Fields Insights section is meant to give you in-depth form analytics performance per each question that you currently have on your form. For more details on how the Fields Insights section works, please check out this article.
How can this information help me?
Insights section is a very powerful one, especially if you are interested in levelling up your form in order to gather more submissions.
For example, let’s take the device information. If you notice that your respondents mainly submit the form from a mobile device, maybe it’s time to think how you can modify your form in order to be mobile friendly. Keep in mind how your respondents interact with the form on a mobile device and change the type of fields to better suit mobile devices. For example, you can change a likert scale from your form as some respondents might have difficulty providing answers to a likert scale on a smaller resolution.
If you notice that on a certain device you are registering a lot of views but very few submissions, this could be a trigger warning. Some respondents might have difficulty submitting the form on a certain device. In this case, you can start digging deeper and see what the issue with the form is. You can always use the Preview and switch to different types of devices to see how your respondents interact with the form and if they are having any issues at all.
The referrer information can help you see what channel is the most used one. Let’s say you have shared the form on social media platforms and directly on email. You will be able to see which channel is the most performing one. This might help you better understand your respondents’ behavior.
The location information is useful especially if you are sharing your form in multiple countries.
Important Note
Forms created before the above release dates will have incomplete data, starting from the release date until the present day.Related articles
According to our Terms of service, forms with high email bounce rates will be limited for abuse. In order to bring more clarity on this matter, here you can find which are the rules we are following when limiting forms/users for high email bounce rates.
How can users reach a high bounce rate?
Our threshold of allowed bounced emails is 5% of the sent emails.
If there are more than 90 emails sent in the last one hour, we are allowing a bounce rate lower than 5%. This means that we are allowing you to send 90 ignored emails, but starting with email number 91, if the percentage of bounced emails is >=5%, then your account will be blocked.
How are we treating each particular case?
If you are a free user and you reach the maximum allowed threshold of 5% bounced emails, your account will be blocked. In this case, you need to get in contact with Customer Care.
If you are a premium user on days one and two of your lifetime and you reach 5% bounced emails, then your account will be blocked. You can sort this out by getting in contact with Customer Care.
If you are a premium user and your account is older than 3 days, then all email notifications from any form will be blocked. Additionally, you are going to receive an email with information about the form that caused the high bounce rate.
Related articles
The form generated PDF file can be sent to Salesforce in two objects:
- Attachments and/or
- Files
The setup is easy, but dependent on the version of the Emails section your form has.
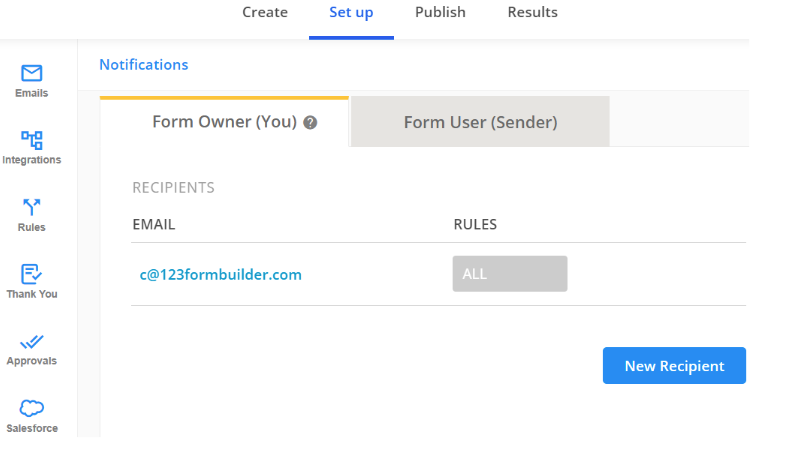
The form has Emails version 1 if you see Form Owner and Form Sender tabs when accessing the Emails section
Otherwise, your form has access to Emails version 2:
Now that you have identified the version of the Emails section of your form, let’s see what’s the necessary setup in order to send the form generated PDF to:
Emails notifications v1
If you need to send the Default Template PDF to Salesforce, then no special setup is required in the Emails section, you can go directly to the Mapping part.
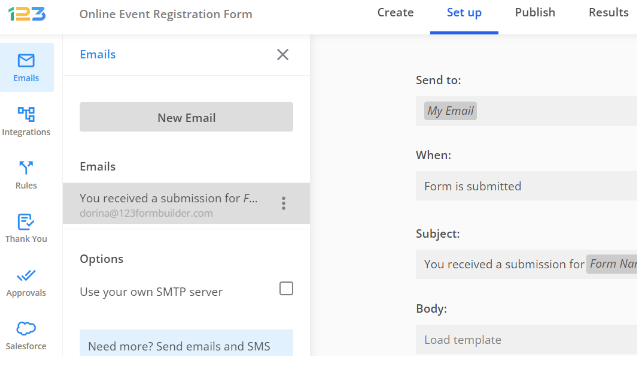
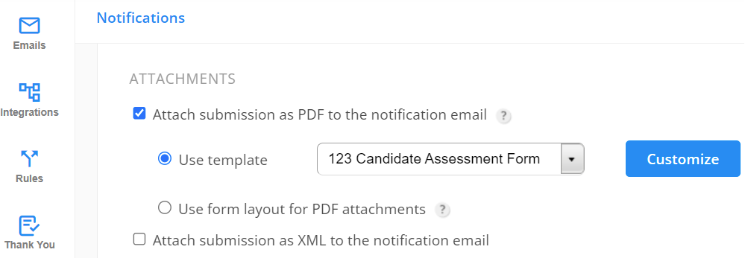
However, if you want to send to Salesforce a custom PDF that you created, make sure the template is selected in the Emails section, under ATTACHMENTS → Attach submission as PDF to the notification email → Use template:
Note: Form Layout PDF can’t be send to Salesforce if your form has Emails v1
How to send the PDF template to the Attachment object for emails with v1
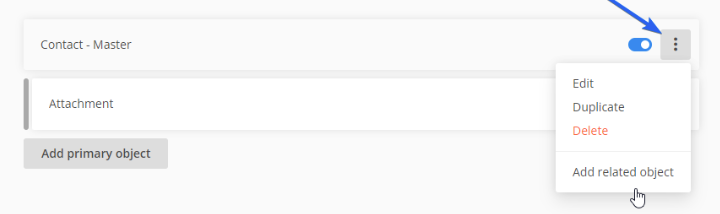
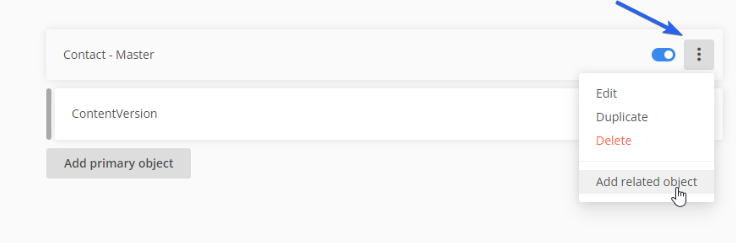
In the Object Mapping section simply create a primary object and then add Attachment as a related object.
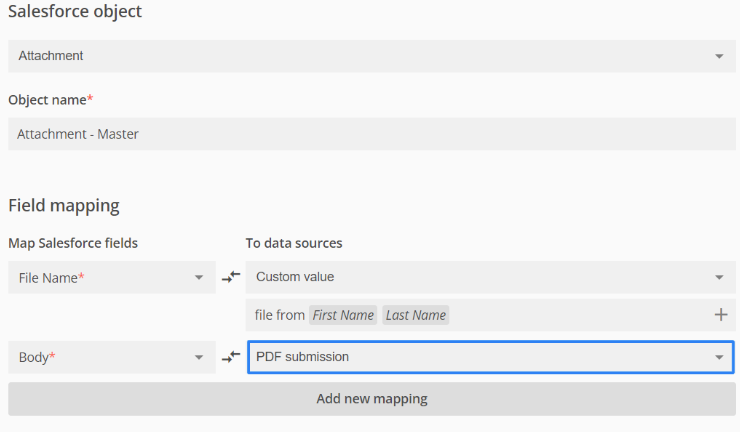
After you choose it, you’ll see 2 required Salesforce fields listed in the Field mapping section: File name & Body.
Map the File Name with another form field or use custom value to type your own text.
Map the Body on the left with PDF submission on the right.
How to send the PDF template to the Files object for emails with v1
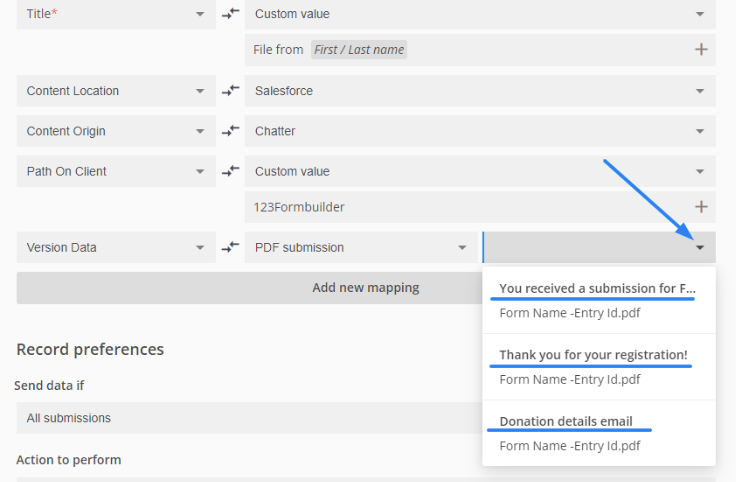
In the Object Mapping section of your Salesforce integration create a primary object and add the Content Version object as a related object.
Afterward, associate the Salesforce fields with the fields indicated in this image:

Emails version 2
If your form has access to this version, before setting up the Mapping part, you need to make sure that you have at least one Email with the option Add attachment: Submission PDF or Submission PDF using form layout enabled

How to send the PDF template to the Attachment object for emails with v2
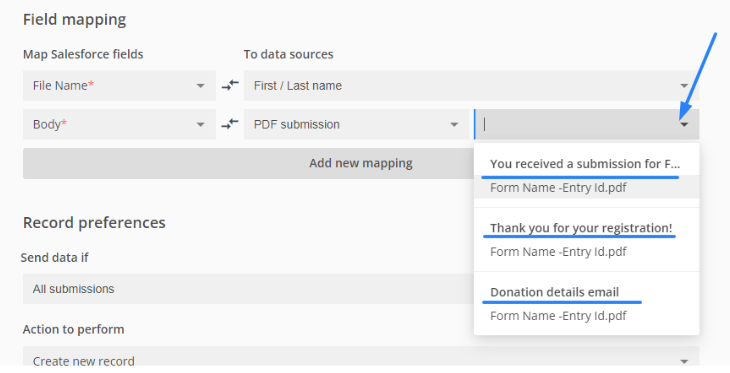
It is done the same way as described above, in Emails v1 mapping, except now you have the option to choose in the mapping which PDF to send:
How to send the PDF template to the Files object for emails with v2
It is done the same way as described above, in Emails v1 mapping, except now you have the option to choose in the mapping which PDF to send:
Related articles:
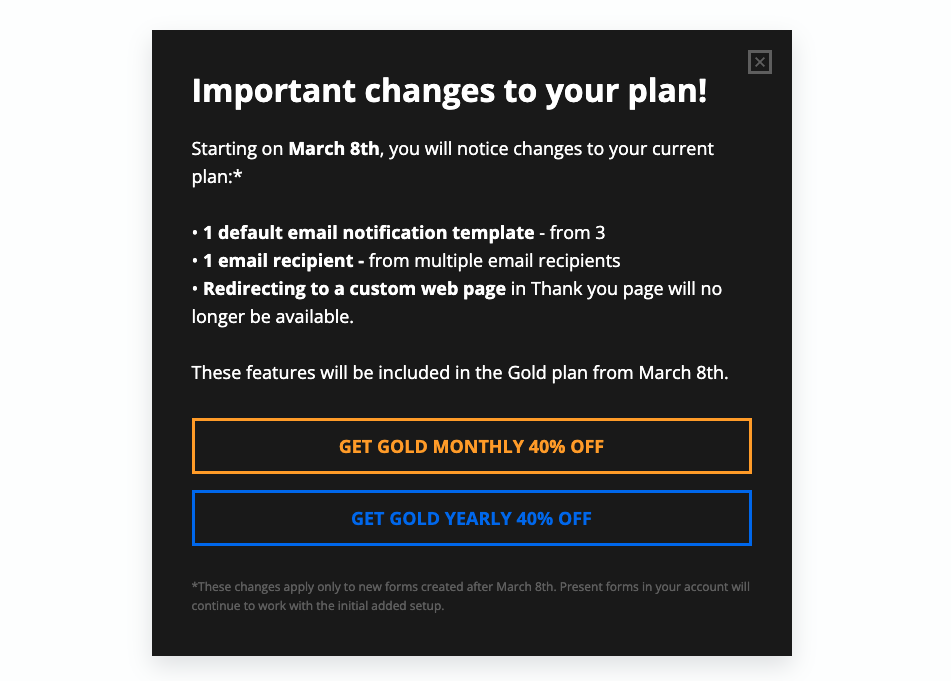
Starting with 8th of March 2023, there are going to be some changes to your pricing plan. You might have noticed an in-app announcement related to this topic, but we are going to take each change one by once for more information.
Custom email notification template
Before changes, free users, users on Wix Starter & Weebly Silver had access to 3 custom email templates.
After 8th of March 2023, for Free/Wix Starter/Weebly Silver pricing plans, users will have one email notification available, with no edit option.
Only new forms (created after 8th of March 2023) will be impacted. Forms created before this release date will continue to work with the initial setup. If there are made any changes to an older setup, the new changes will automatically apply.
Email recipients
Before changes, free users, users on Wix Starter & Weebly Silver had accees to multiple email recipients.
After 8th of March 2023, for Free/Wix Starter/Weebly Silver pricing plans, users will have one email recipient available.
Only new forms (created after 8th of March 2023) will be impacted. Forms created before this release date will continue to work with the initial setup. If there are made any changes to an older setup, the new changes will automatically apply.
Redirect options in Thank you page
Before changes, free users, users on Wix Starter & Weebly Silver had access to the redirect options from Thank you page (Redirect to a webpage/ Show text, then redirect to a web page/Redirect with custom variables).
After 8th of March 2023, for Free/Wix Starter/Weebly Silver pricing plans, users will no longer have access to the redirect option in Thank you page, as they will become available from Gold pricing plan.
Only new forms (created after 8th of March 2023) will be impacted. Forms created before this release date will continue to work with the initial setup. If there are made any changes to an older setup, the new changes will automatically apply.
Custom sender email
Before changes, Wix Starter/Weebly Silver users were able to customize the From email option.
After 8th of March 2023, custom email sender (or in other words, customizing From email option) will be available starting with Platinum pricing plan.
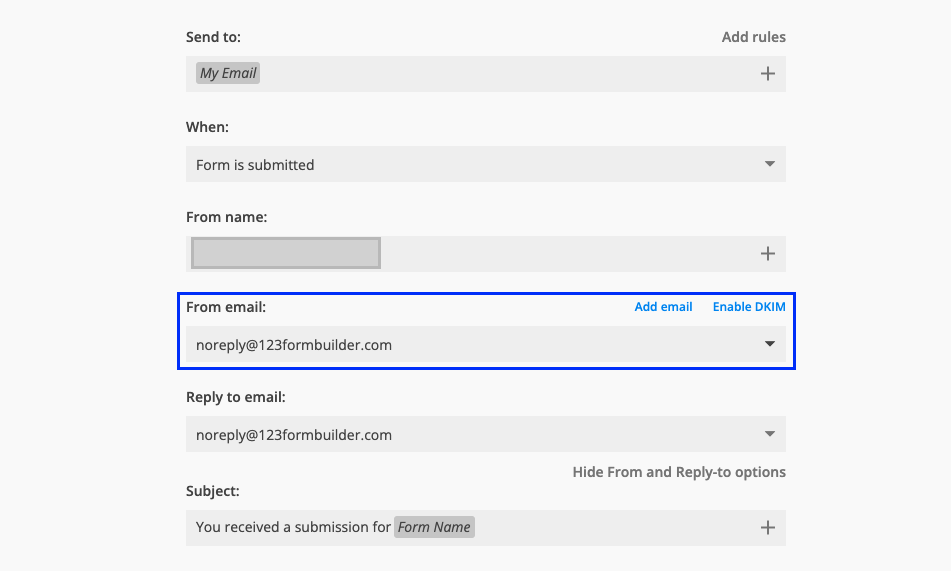
All forms will be impacted as it follows:
– forms on Dormant, Wix Starter, Weebly Silver & Gold with custom sender will be redirected to noreply@123formbuilder.com
– forms on Platinum, Diamond & Enterprise with custom sender but with invalid SPF will be redirected to noreply@123formbuilder.com
We have introduced a new feature that comes to your help, especially if you are using the Free/Starter/Silver pricing plan.
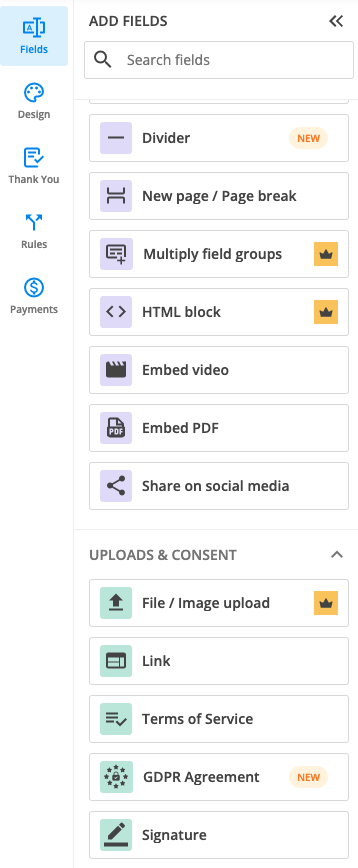
Premium icons
All fields and field settings that are outside of your current pricing plan are marked with a premium icon. This way, you can easily recognize that you currently do not have access to those fields.
Let’s use the following fields as an example: Multiply field groups, HTML block, and File/Image upload. These fields are not included in the Free plan, thus they are marked with a premium icon. This has been implemented so you can easily understand that those fields are outside your plan and not get surprised when hitting a paywall.
The behavior remains the same. As a free user, if you try adding such a field to your form, you will still hit the paywall with the appropriate pricing plan selected.
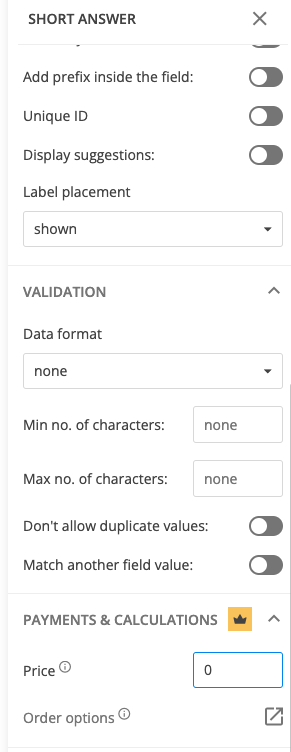
Another place where we have used premium icons to come to your help is for field settings. For example, free users do not have access to Payments & Calculations. Therefore, we have marked these field settings with a premium icon.
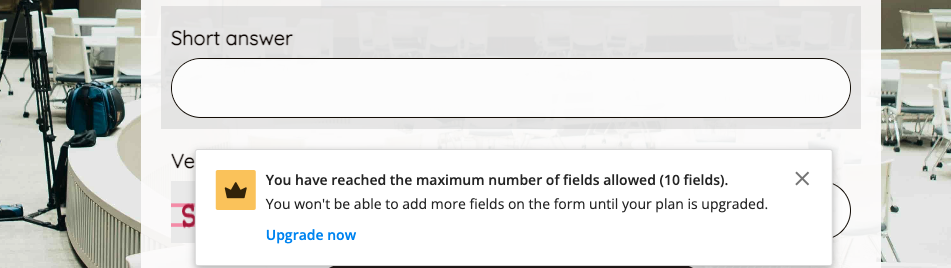
Informing banner
Another feature we have implemented is showing an informing banner in the Editor when you have reached the maximum number of fields allowed on the form according to your pricing plan.
Based on our research, we have noticed that most users were confused about why we were showing a paywall when trying to add an extra field on the form. As such, we’ve come to your help with an informing banner.
For example, as a free user, when adding the 10th field on the form, you will see a banner letting you know that you have reached the maximum number of fields allowed. To add more fields to the form, you can easily upgrade by clicking Upgrade now. A paywall will show up with the next pricing plan that allows you to add more fields.
Related articles
Most Popular
Frequently Asked Questions
Here is a list of the most frequently asked questions. For more FAQs, please browse through the FAQs page.